
Amazon Personalize require a WPSOLR Enterprise license.
This documentation describe the configuration of your indexes for Amazon Personalize.
What is Amazon Personalize?
Amazon Personalize is a fully managed machine learning service from AWS (Amazon Web Services) that enables developers to create personalized recommendations for users, similar to what is used by companies like Amazon.com itself. It allows businesses to deliver tailored recommendations for products, content, or other personalized experiences without requiring deep expertise in machine learning.

How to Use Amazon Personalize with Your WooCommerce Site in Just a Few Clicks
Key Features of Amazon Personalize
1. Recommendations: It provides personalized product, movie, music, or content recommendations based on a user’s behavior and preferences.
2. User Personalization: Uses behavioral data (such as clicks, views, or purchases) to recommend items that are more likely to be relevant to each individual user.
3. Customizable Models: Unlike pre-built recommendation engines, Amazon Personalize allows businesses to train models that are specific to their own datasets and recommendation needs.
4. Real-Time Personalization: Supports real-time recommendations by continuously updating based on the latest user interactions.
5. Multiple Use Cases:
– Personalized product recommendations in e-commerce.
– Personalized media or content recommendations in streaming services.
– Email campaign targeting, promotions, or notifications that adapt to user interests.
6. Automatic Model Tuning: It automates many aspects of the machine learning process, including feature engineering, algorithm selection, and hyperparameter optimization.
How It Works
– Data Ingestion: First, it requires input data like user activity (e.g., views, clicks, purchases) and item metadata (e.g., product descriptions, categories).
– Training: Using this data, Amazon Personalize creates a recommendation model by applying advanced machine learning algorithms, including collaborative filtering, contextual bandits, and deep learning models.
– Inference: Once the model is trained, you can make real-time or batch predictions via API calls, serving personalized recommendations to your users.
Benefits
– No Need for ML Expertise: It abstracts complex ML tasks, so developers with limited ML knowledge can still implement advanced recommendation systems.
– Scalability: Built on AWS infrastructure, making it highly scalable to accommodate a growing user base or increased data volume.
– Integration with Other AWS Services: Works well with other AWS offerings, such as AWS Lambda, Amazon SageMaker, and more.
In summary, Amazon Personalize is a versatile, scalable, and easy-to-use solution to deliver personalized user experiences powered by machine learning.
Amazon Personalize configuration
Login to your Amazon AWS account
Create a security access key for the service
Open the IAM service
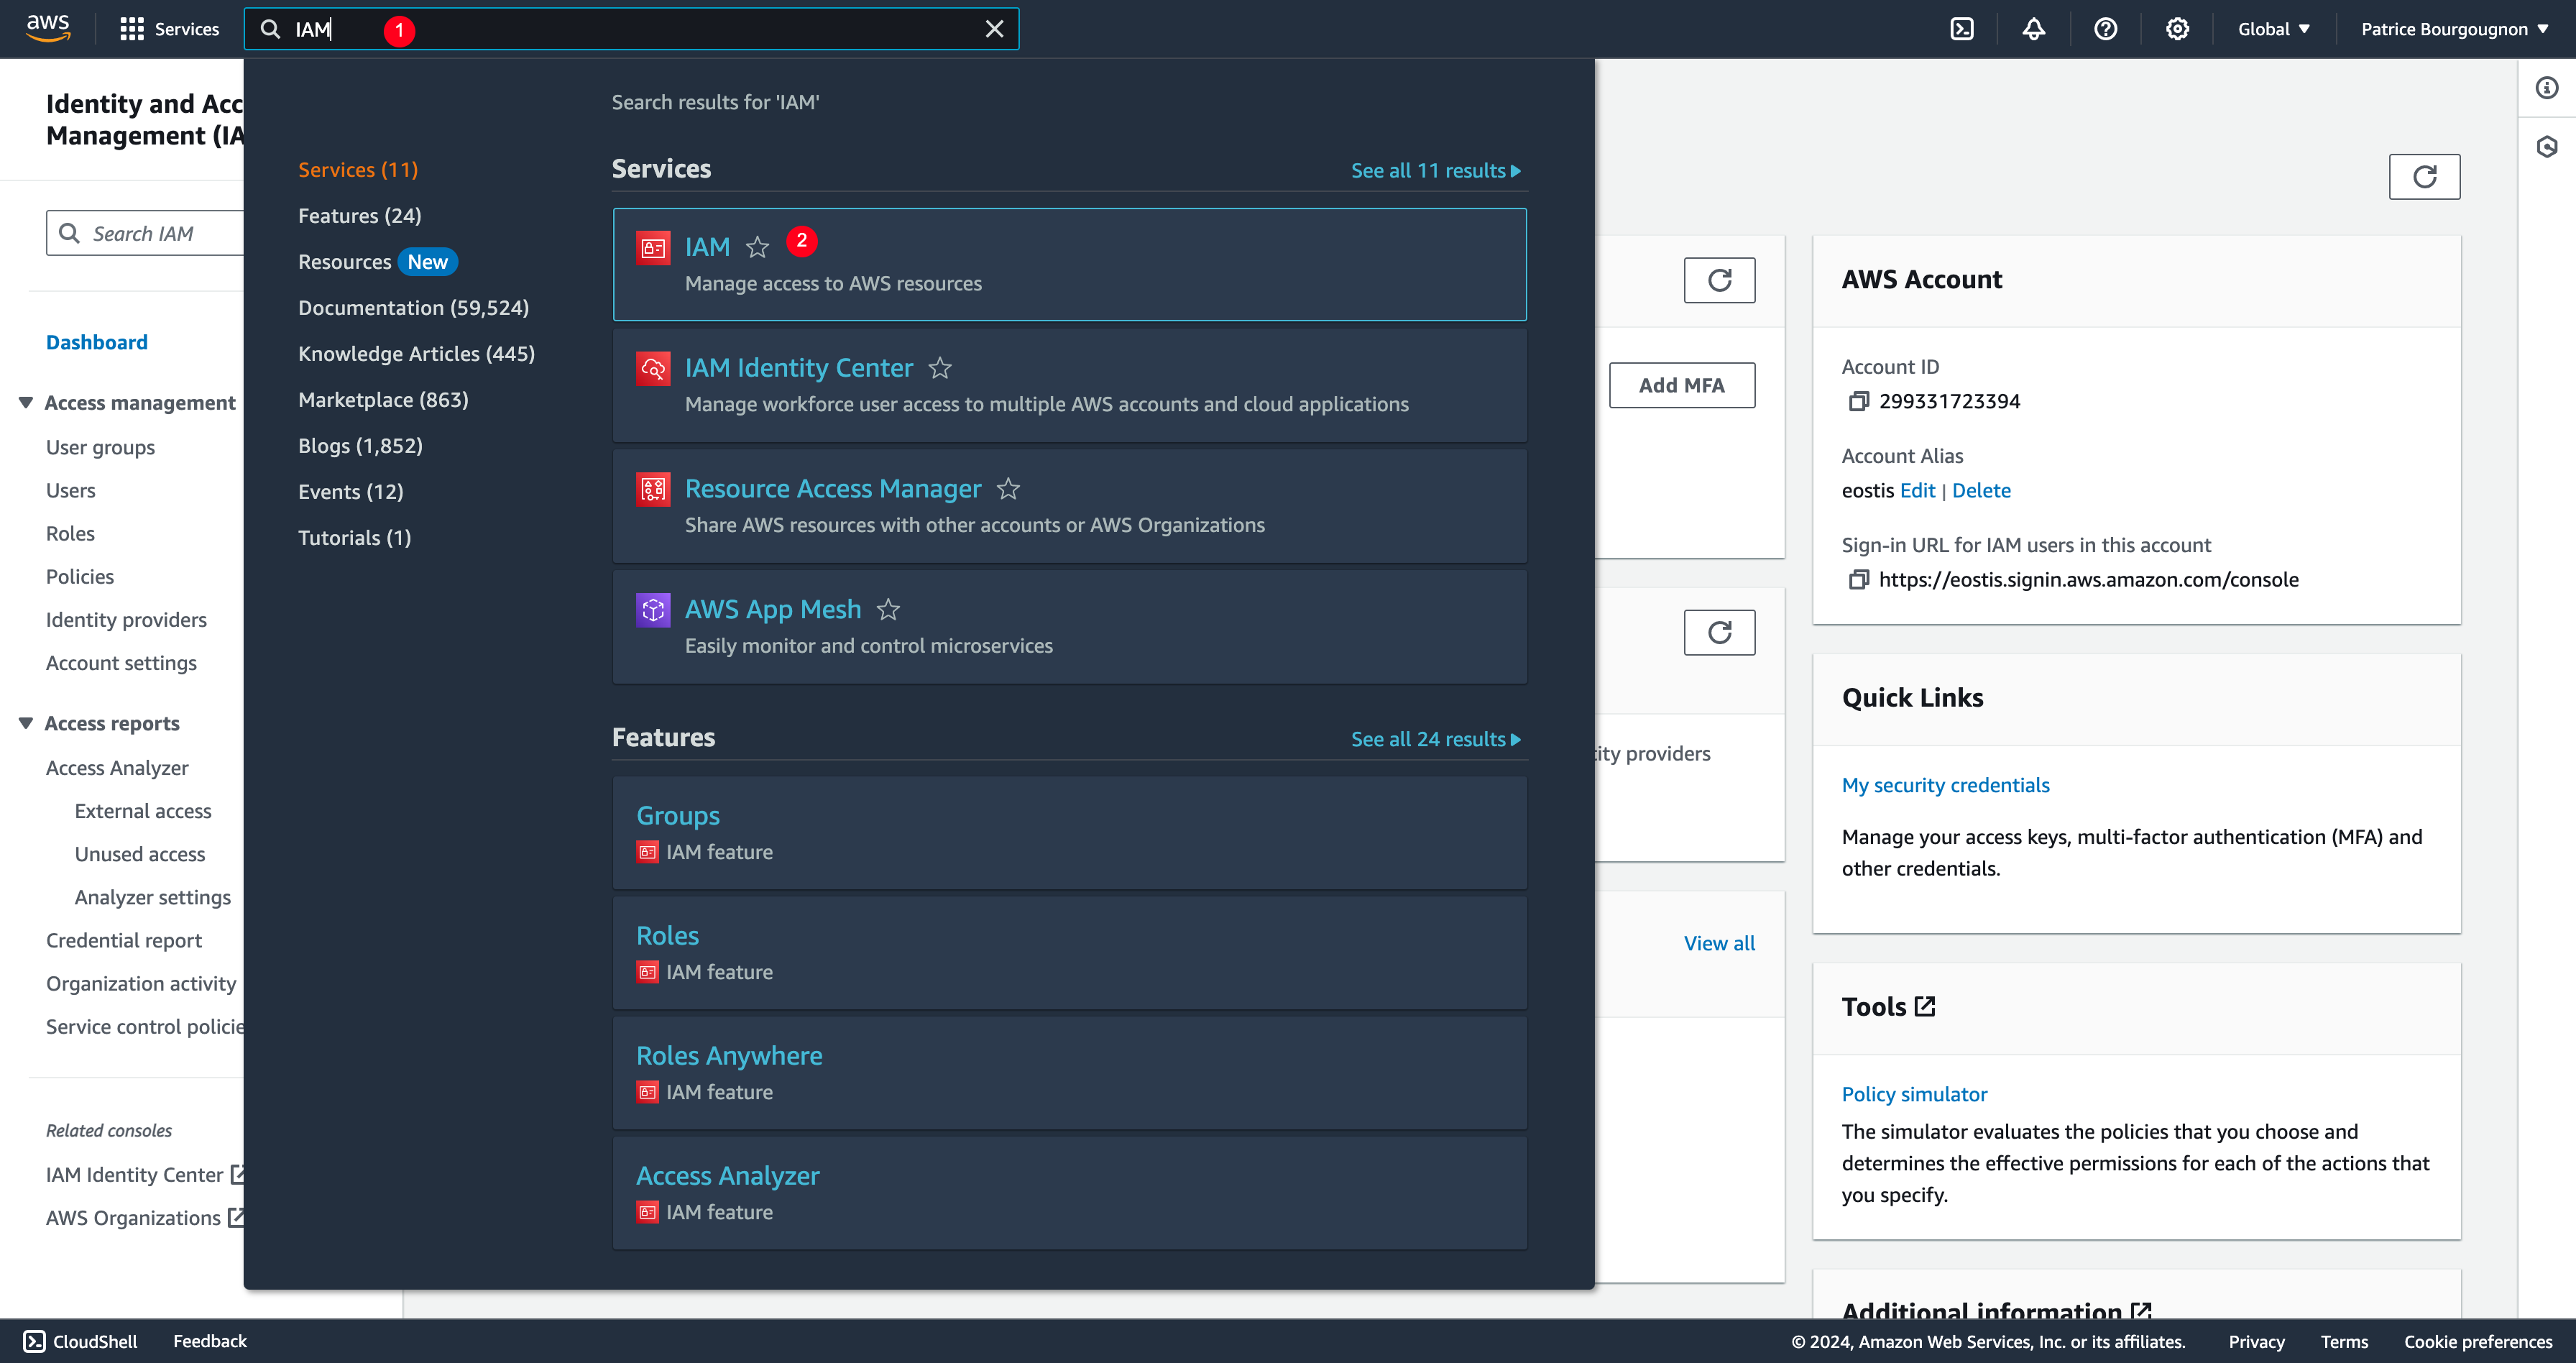
- Type “IAM” in the search bar
- Click on the “IAM” service in search results
Create a new user

- Click on menu “Users”
- Click button “Create user”
Set user details
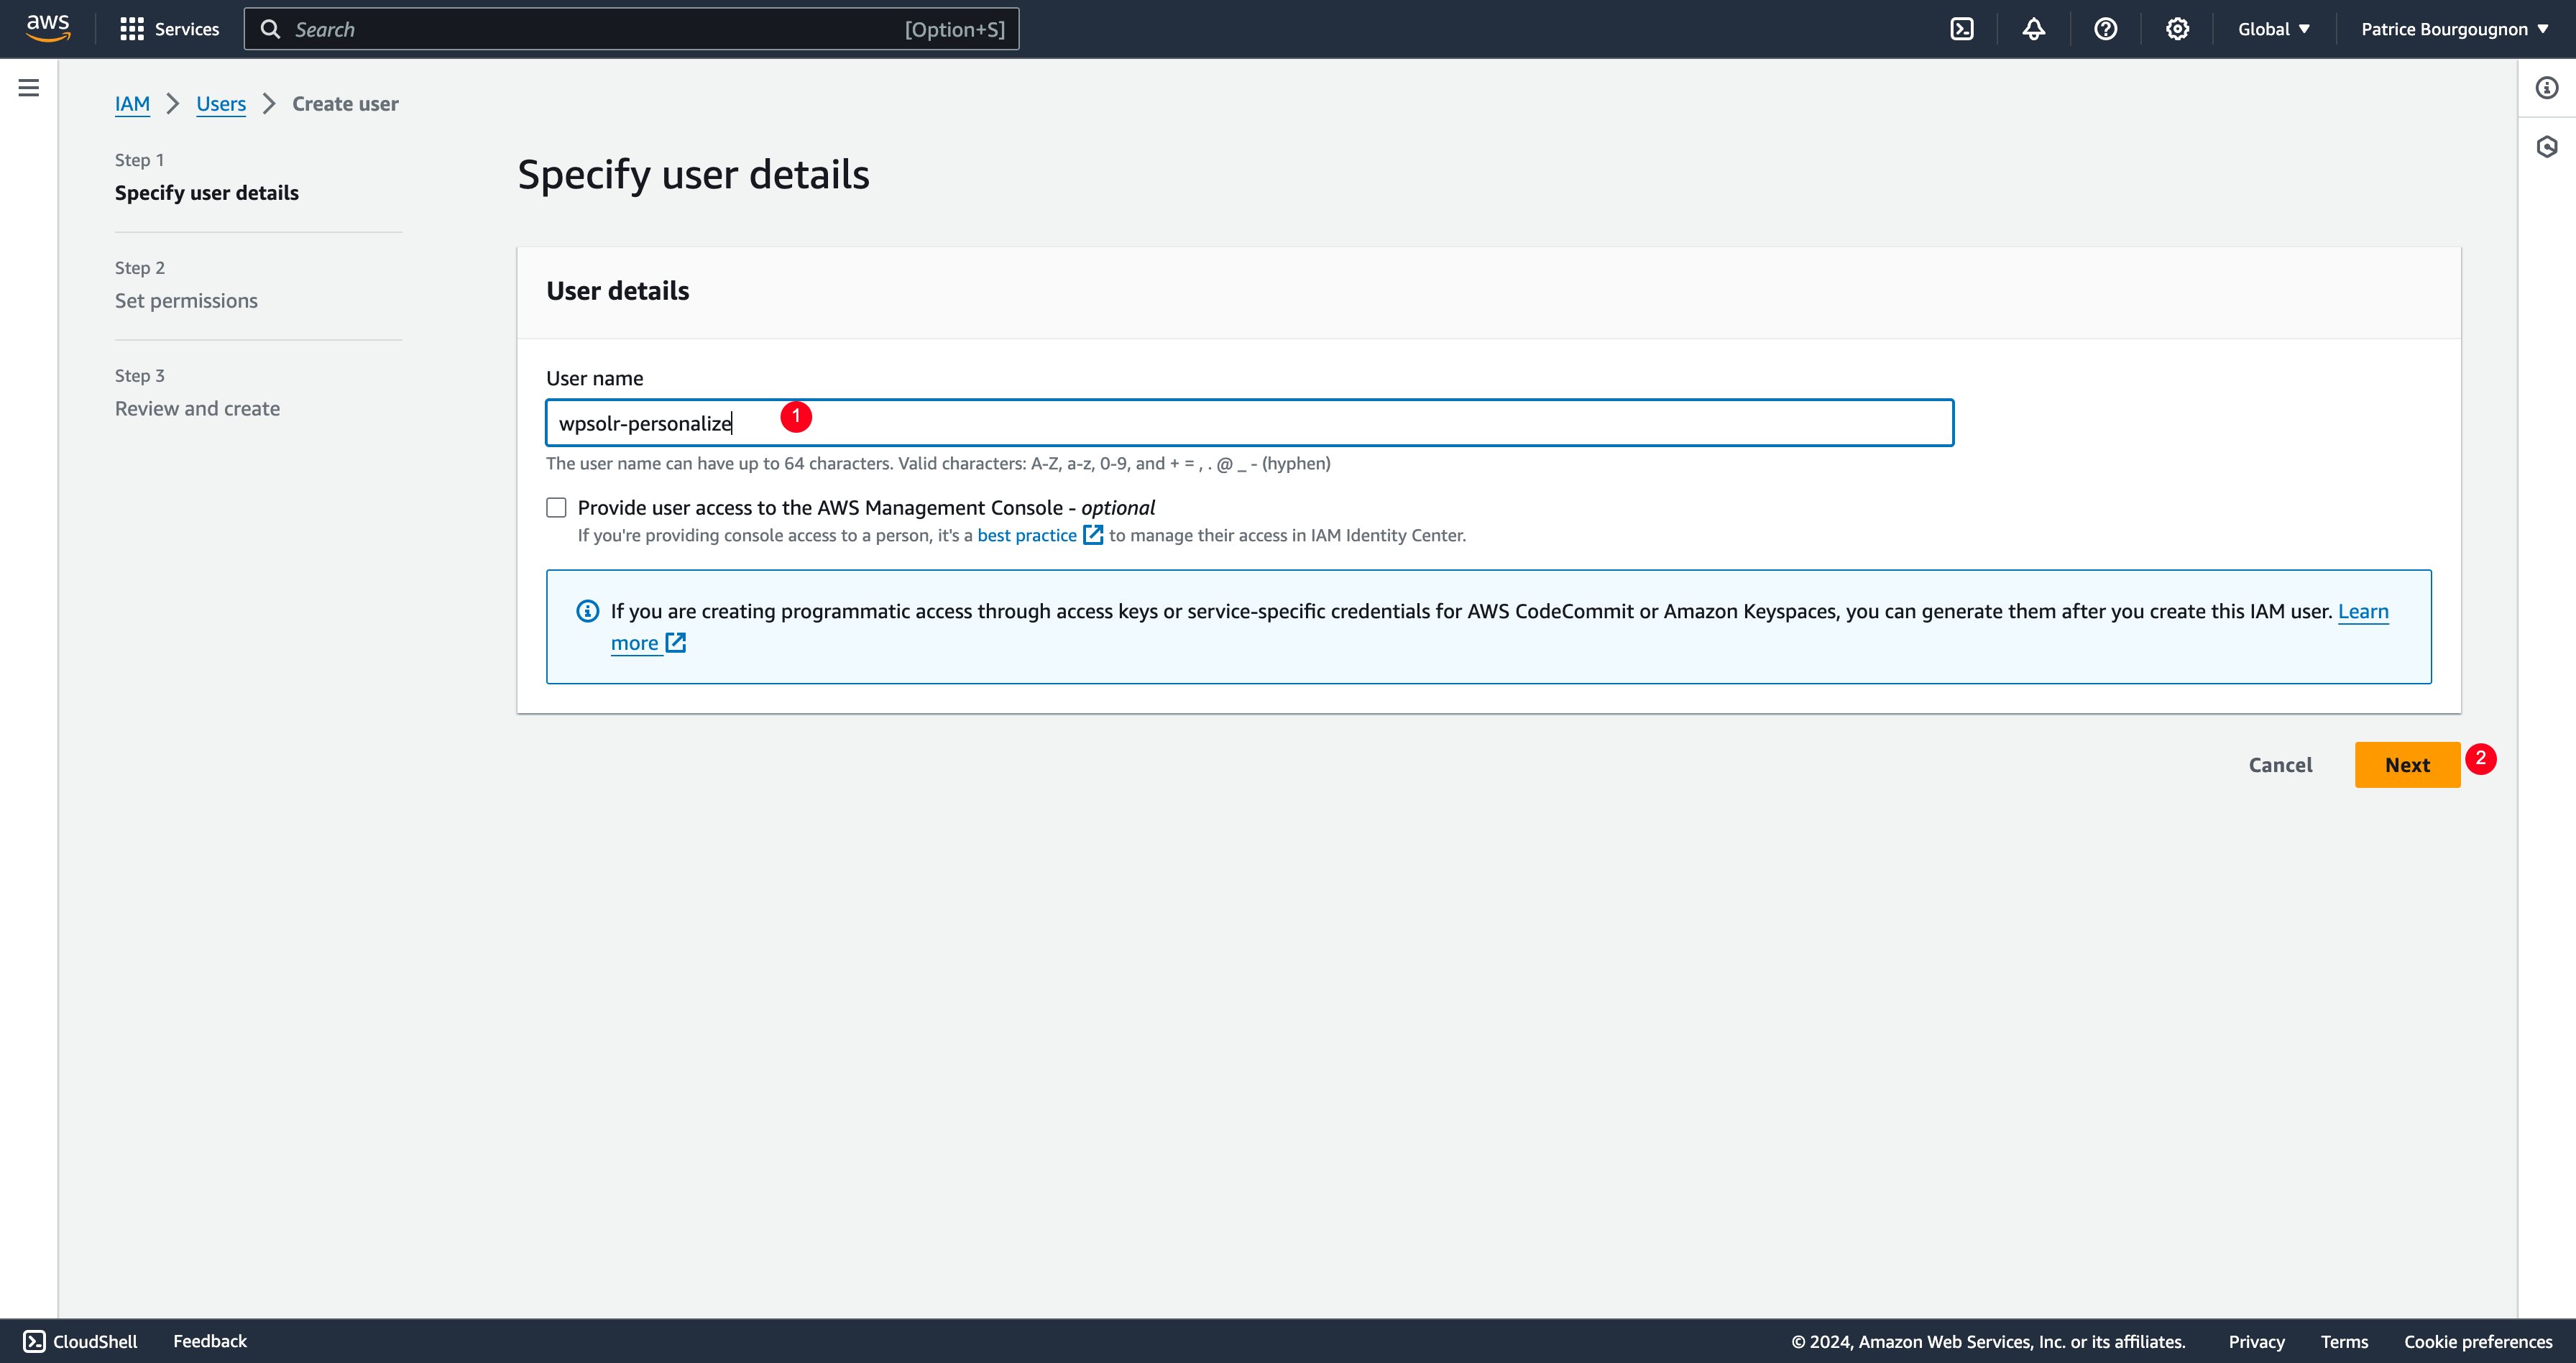
- Set a user name
- Click button “Next”
Set user permissions
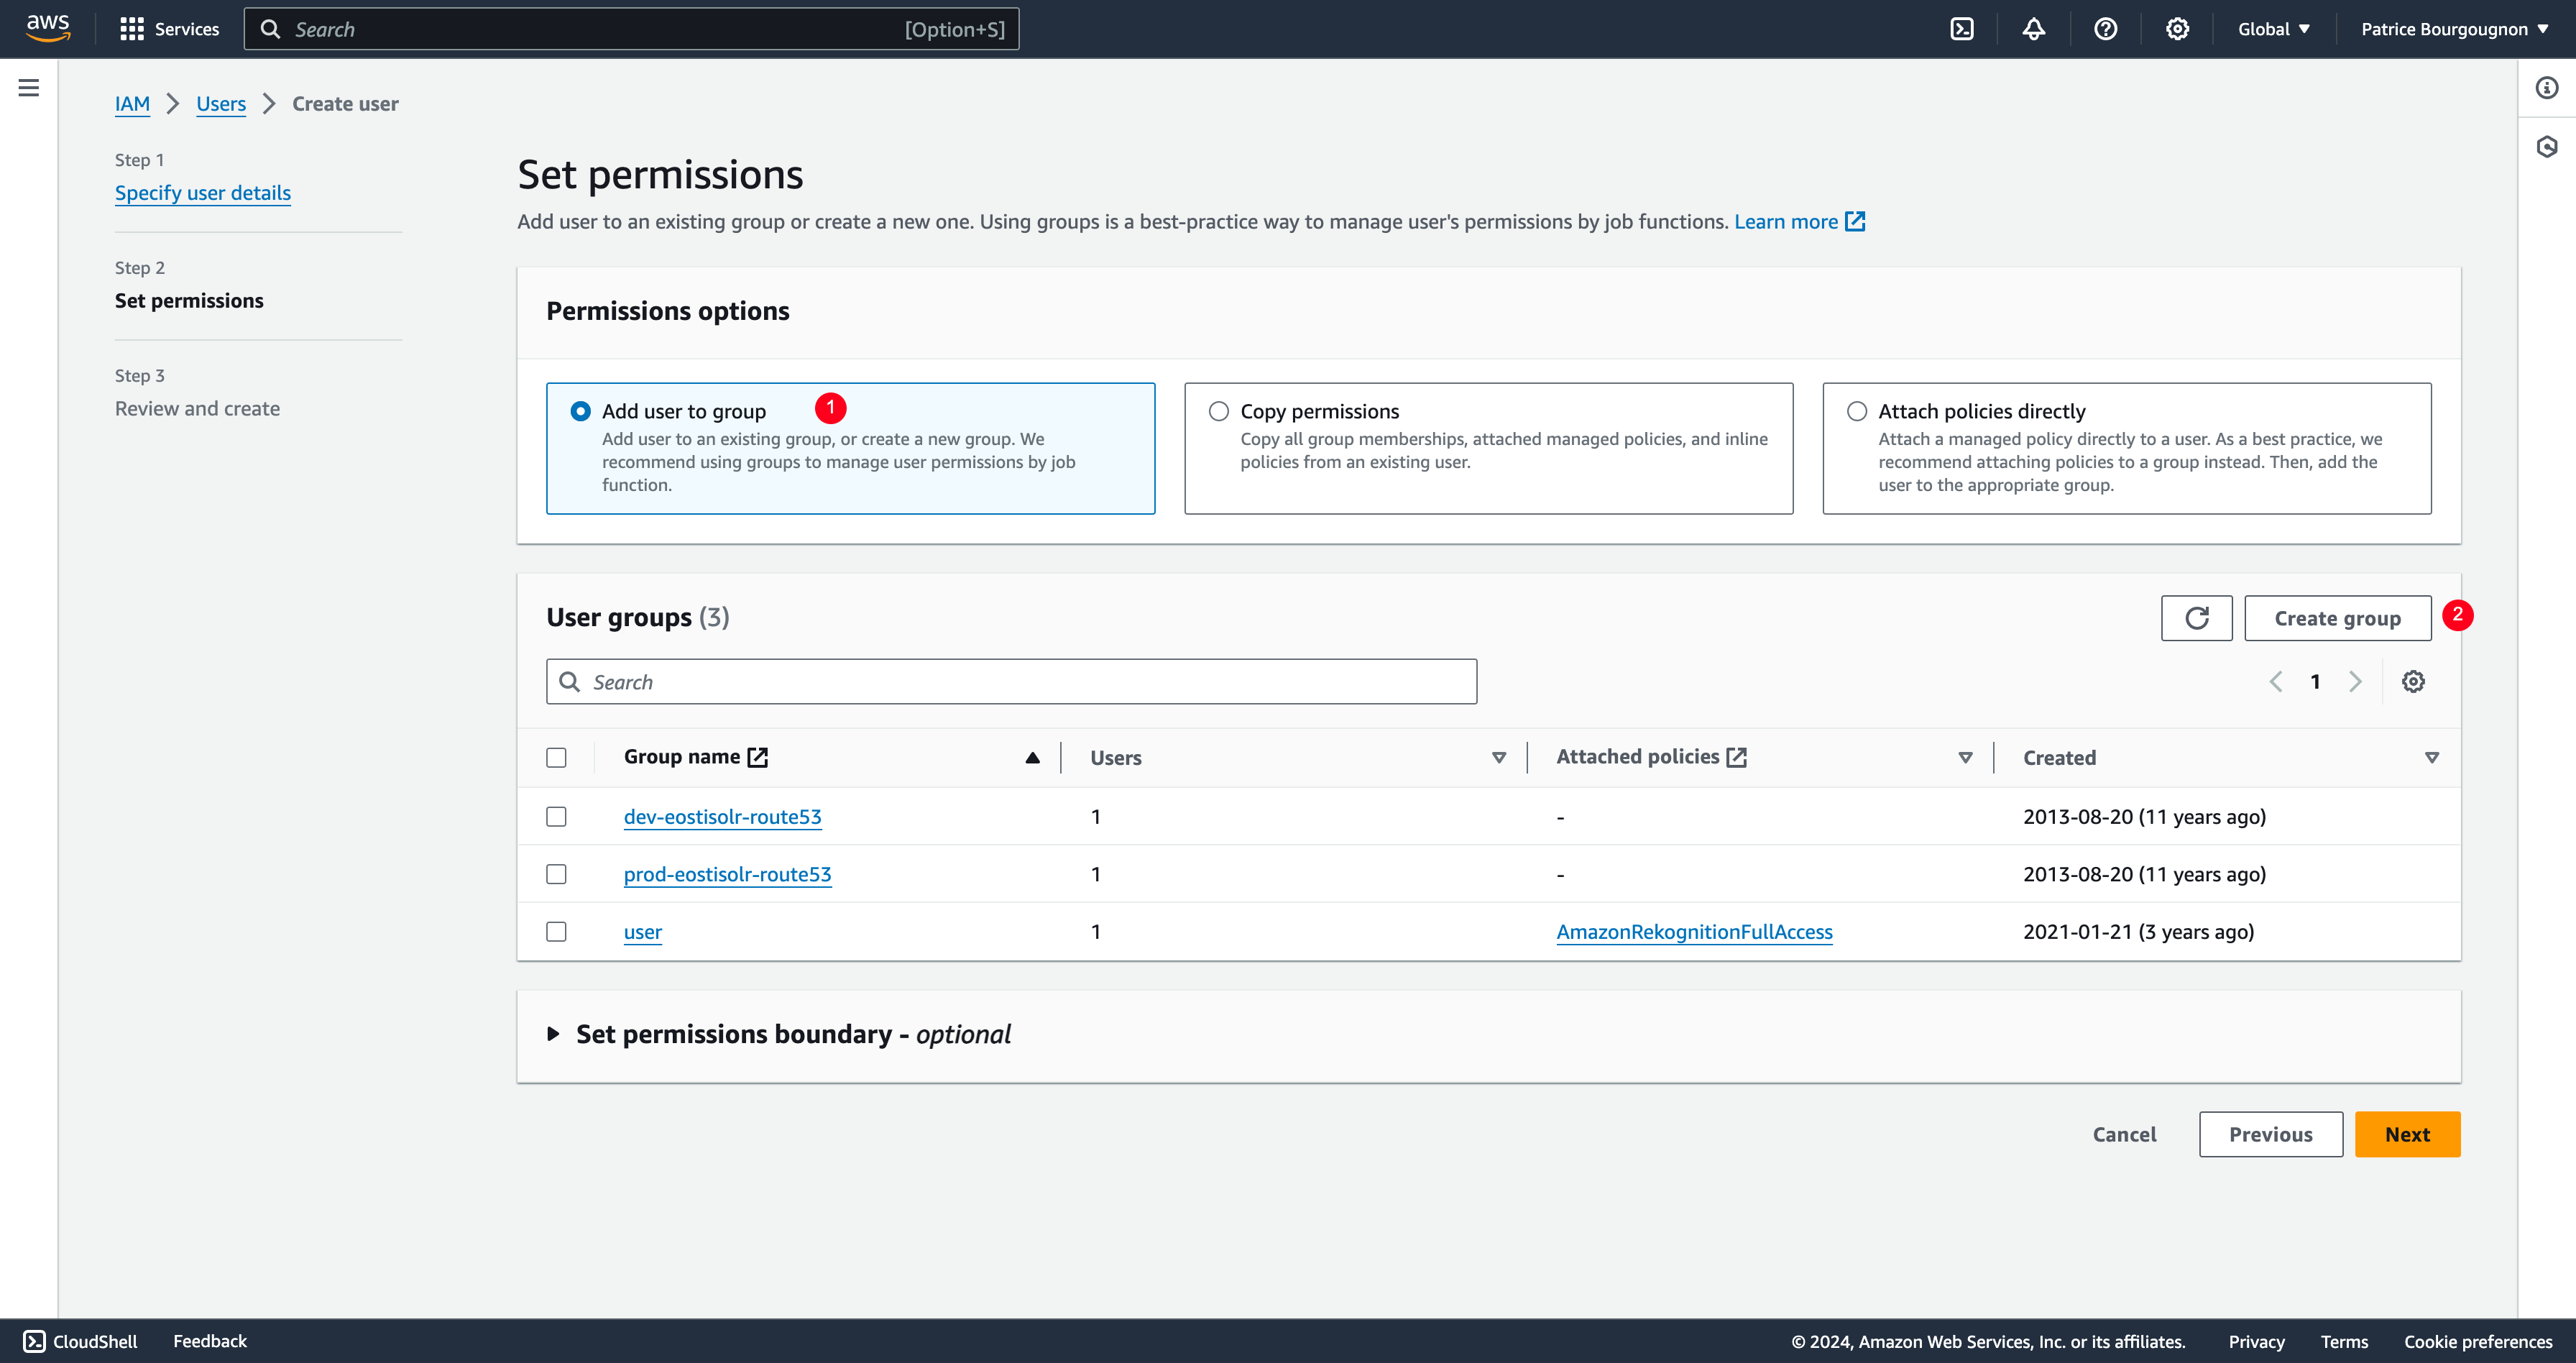
- Add user to a new group you will create on the spot
- Click button “Create group”
Create user group with Amazon Personalize and Cognito policy
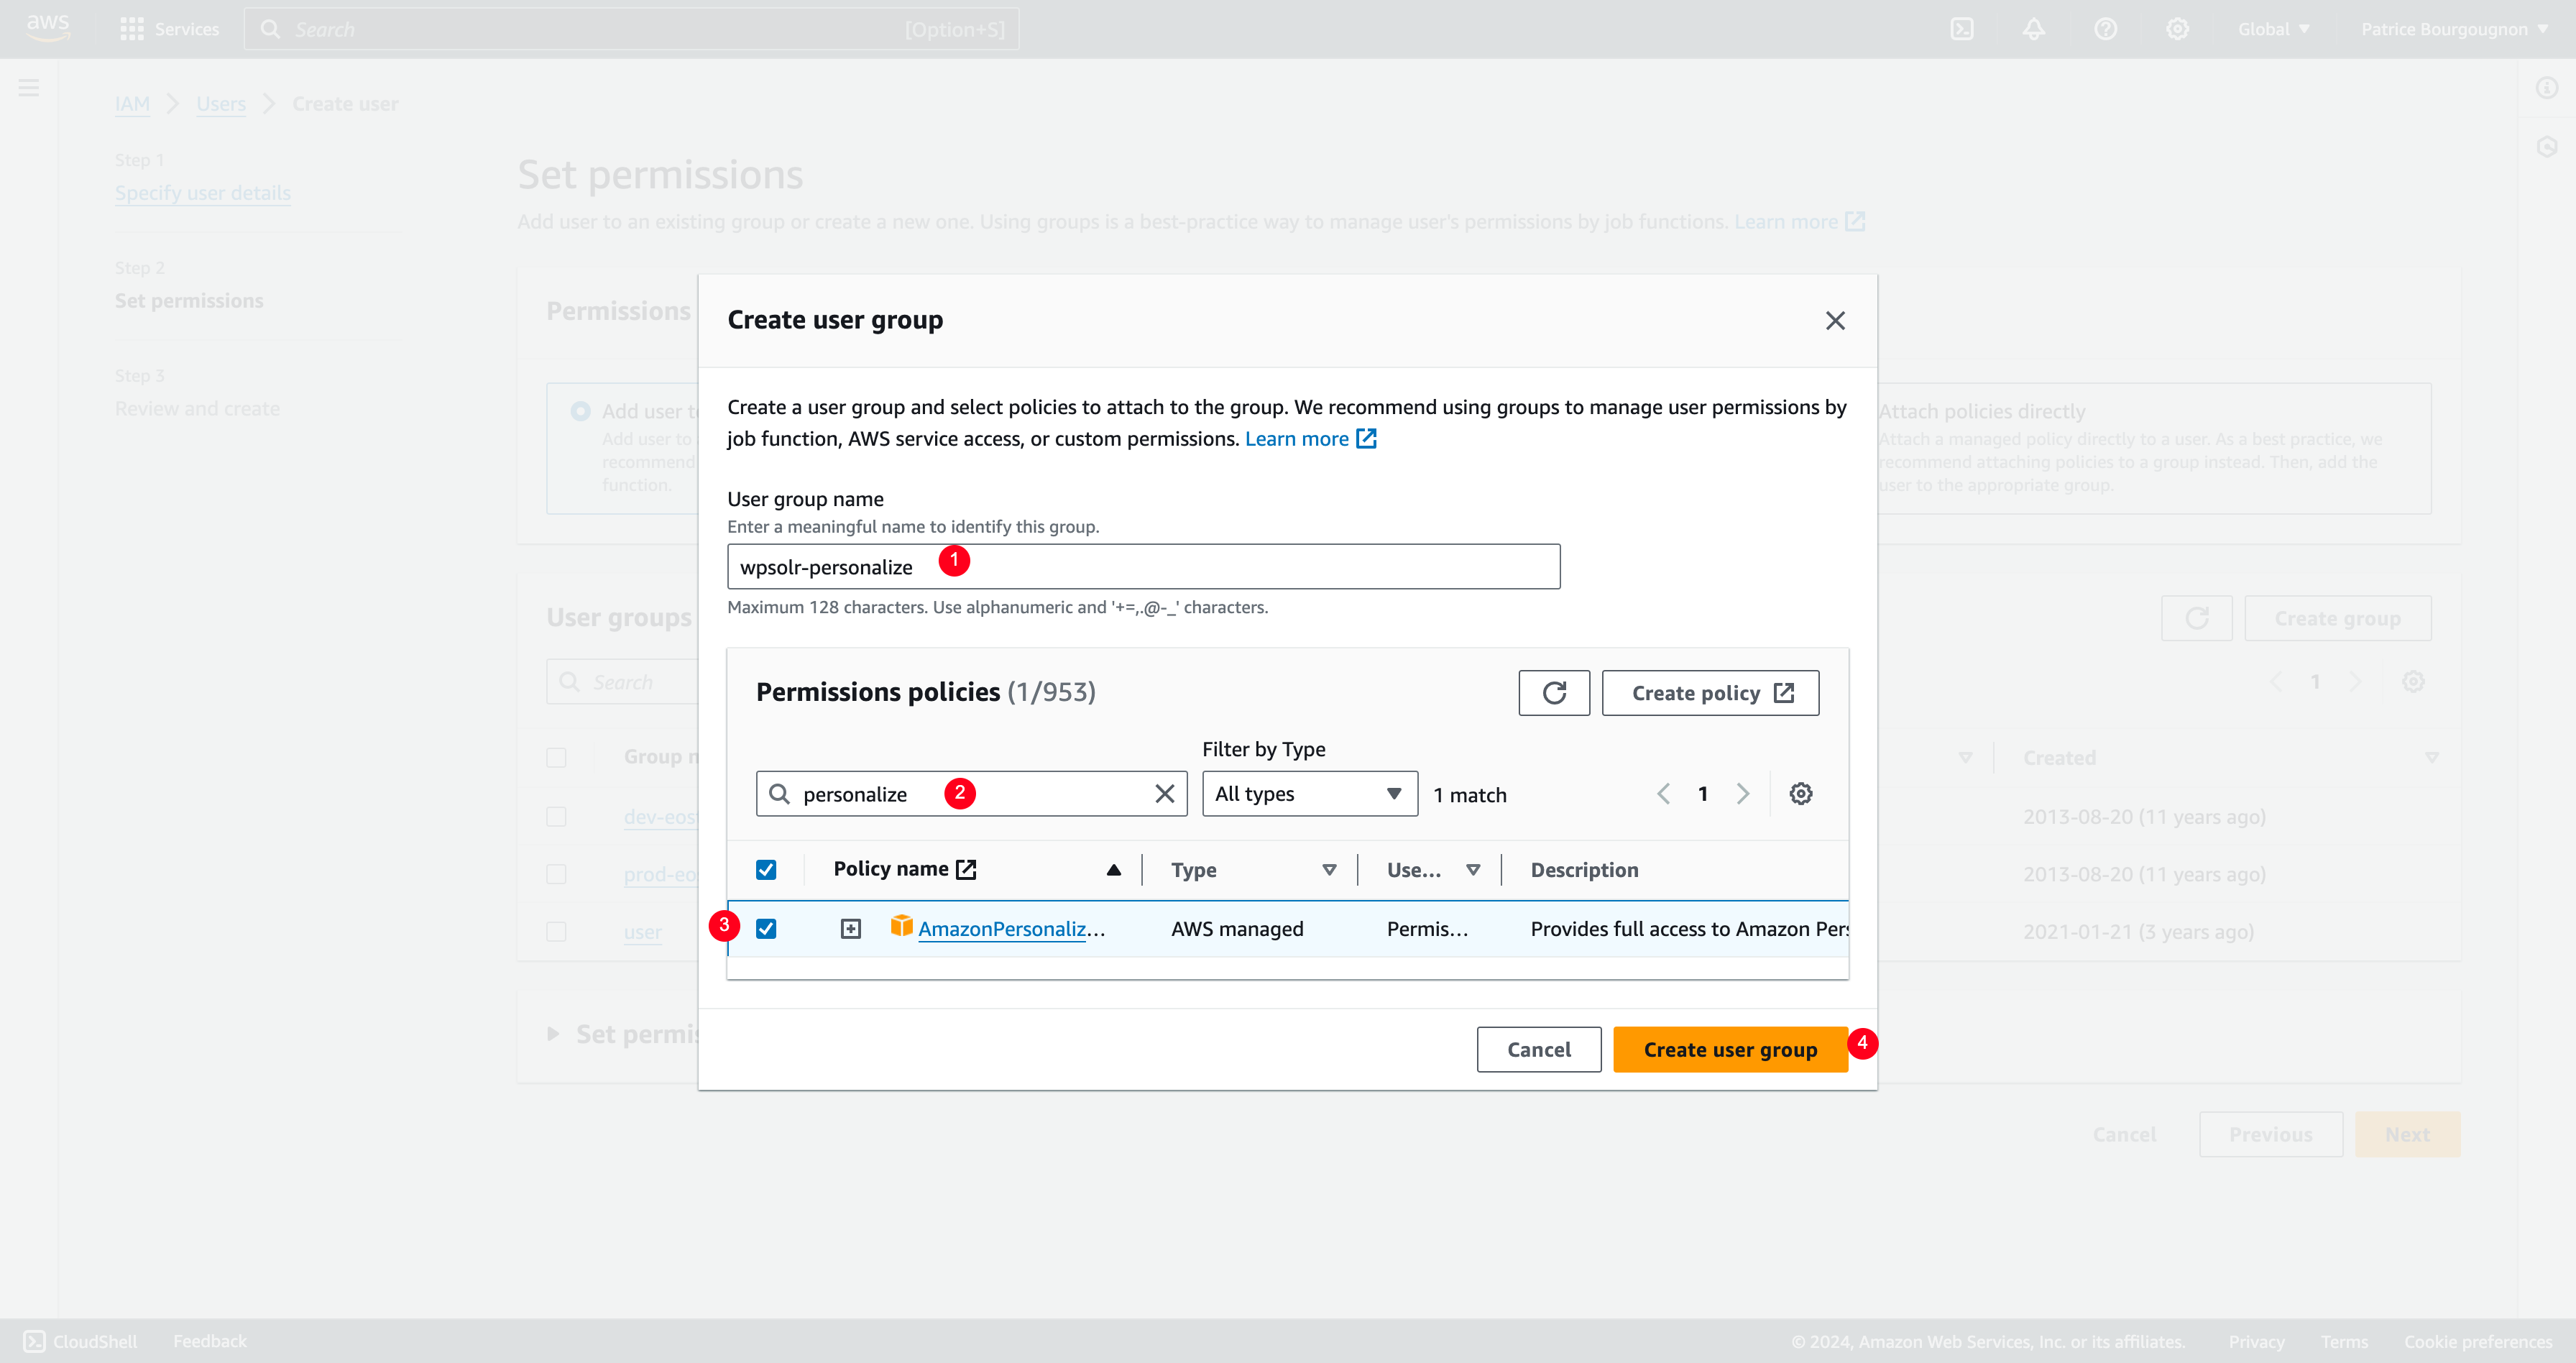
- Set group name
- Search for “personalize” in the search policies bar
- Select “Personalize” in the search policies results
- Click on button “Create user group”
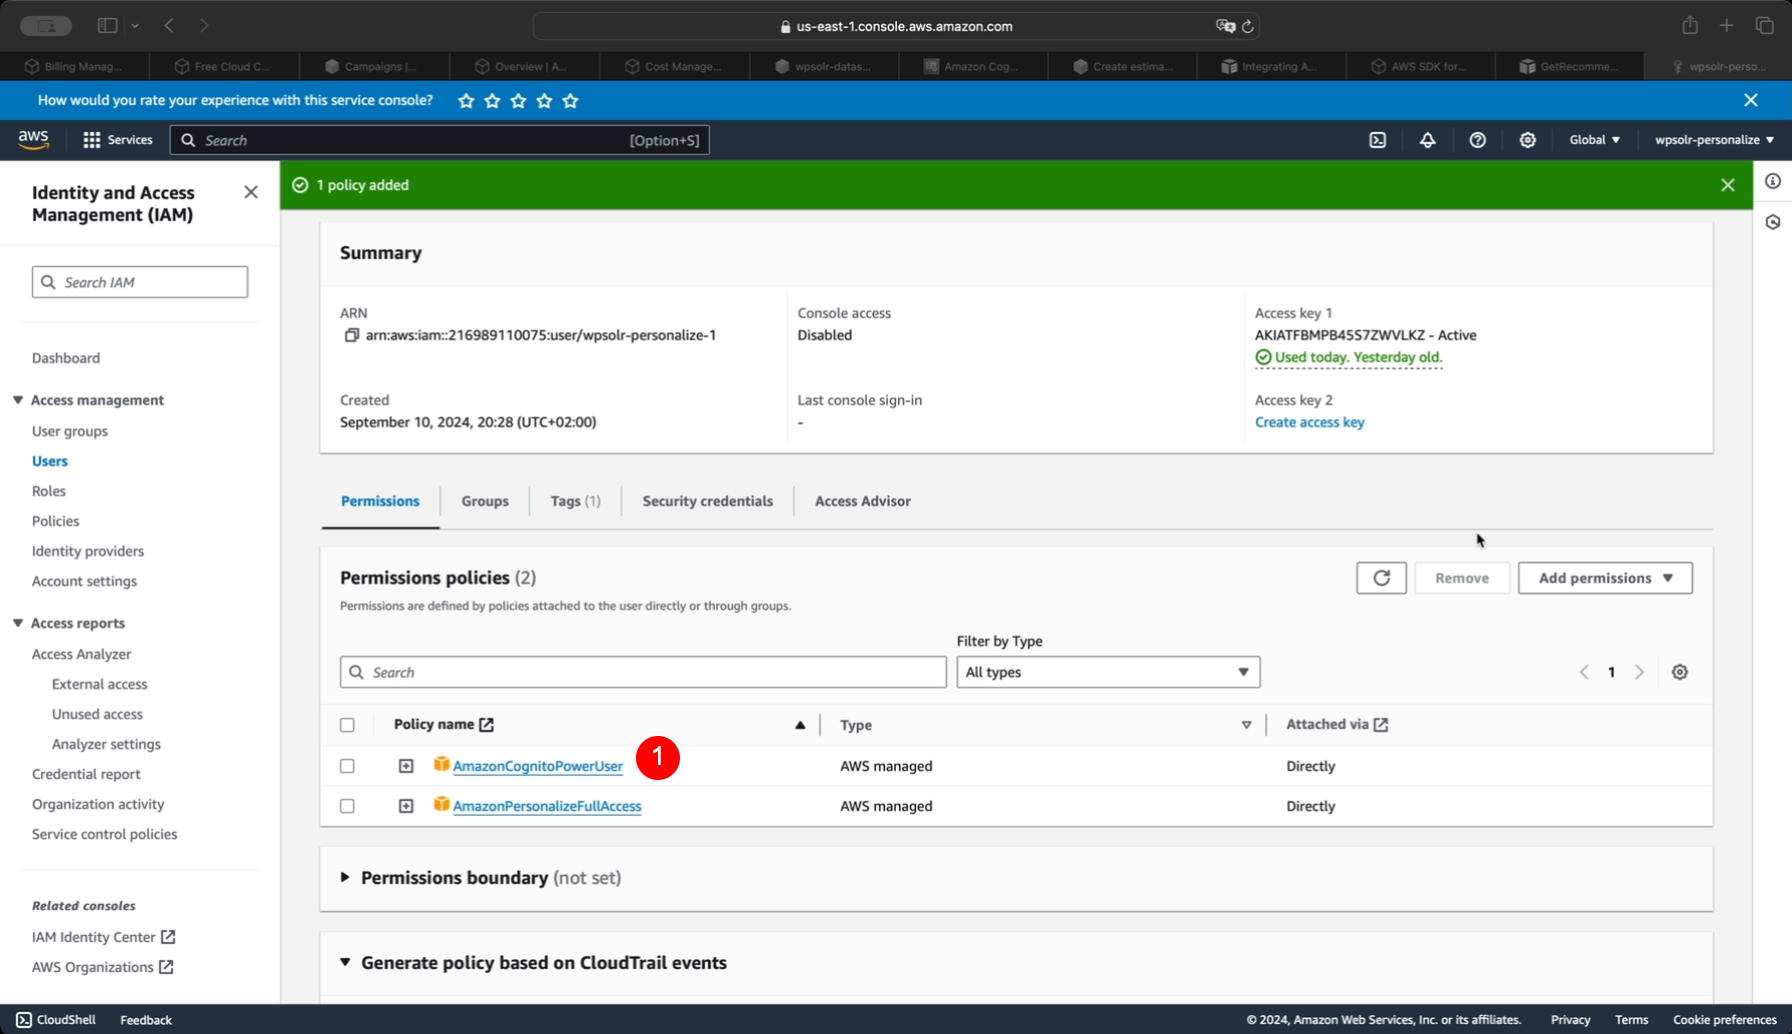
- Do the same for policy “AmazonCognitoPowerUser”. It will be used to create a Cognito unauthenticated logins identity pool to send js events with a tracking id.
Add a custom policy to manage roles
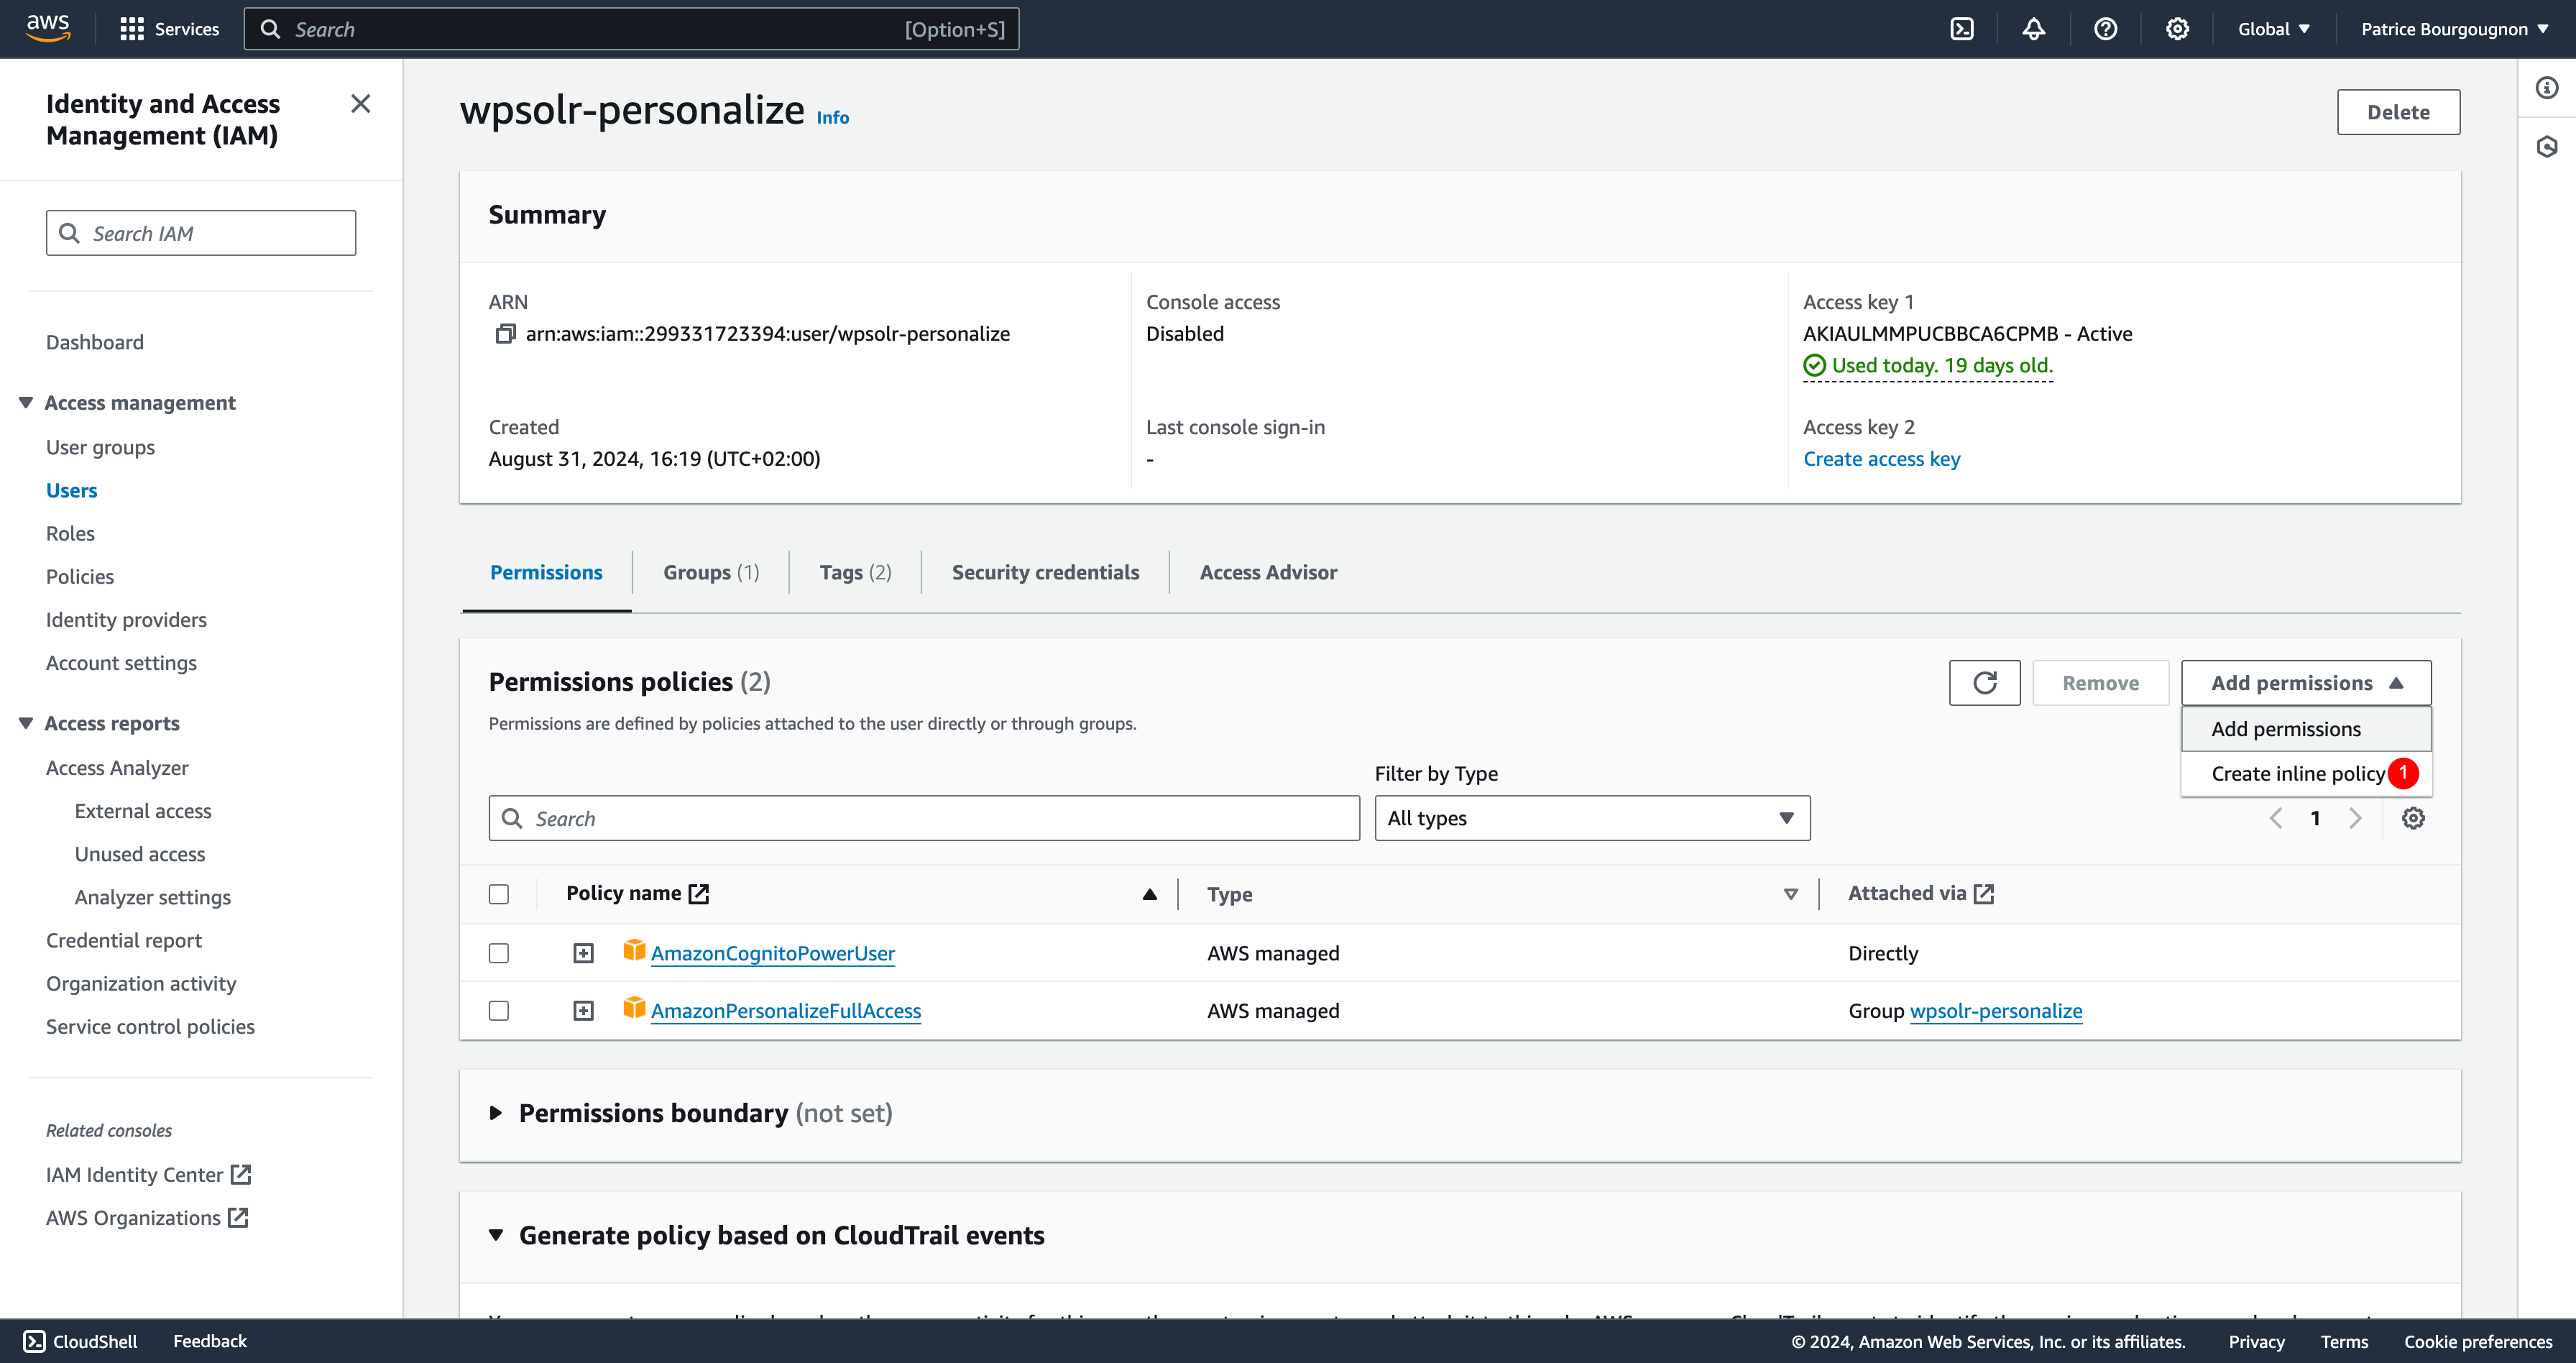
- Click on menu “Create inline policy”
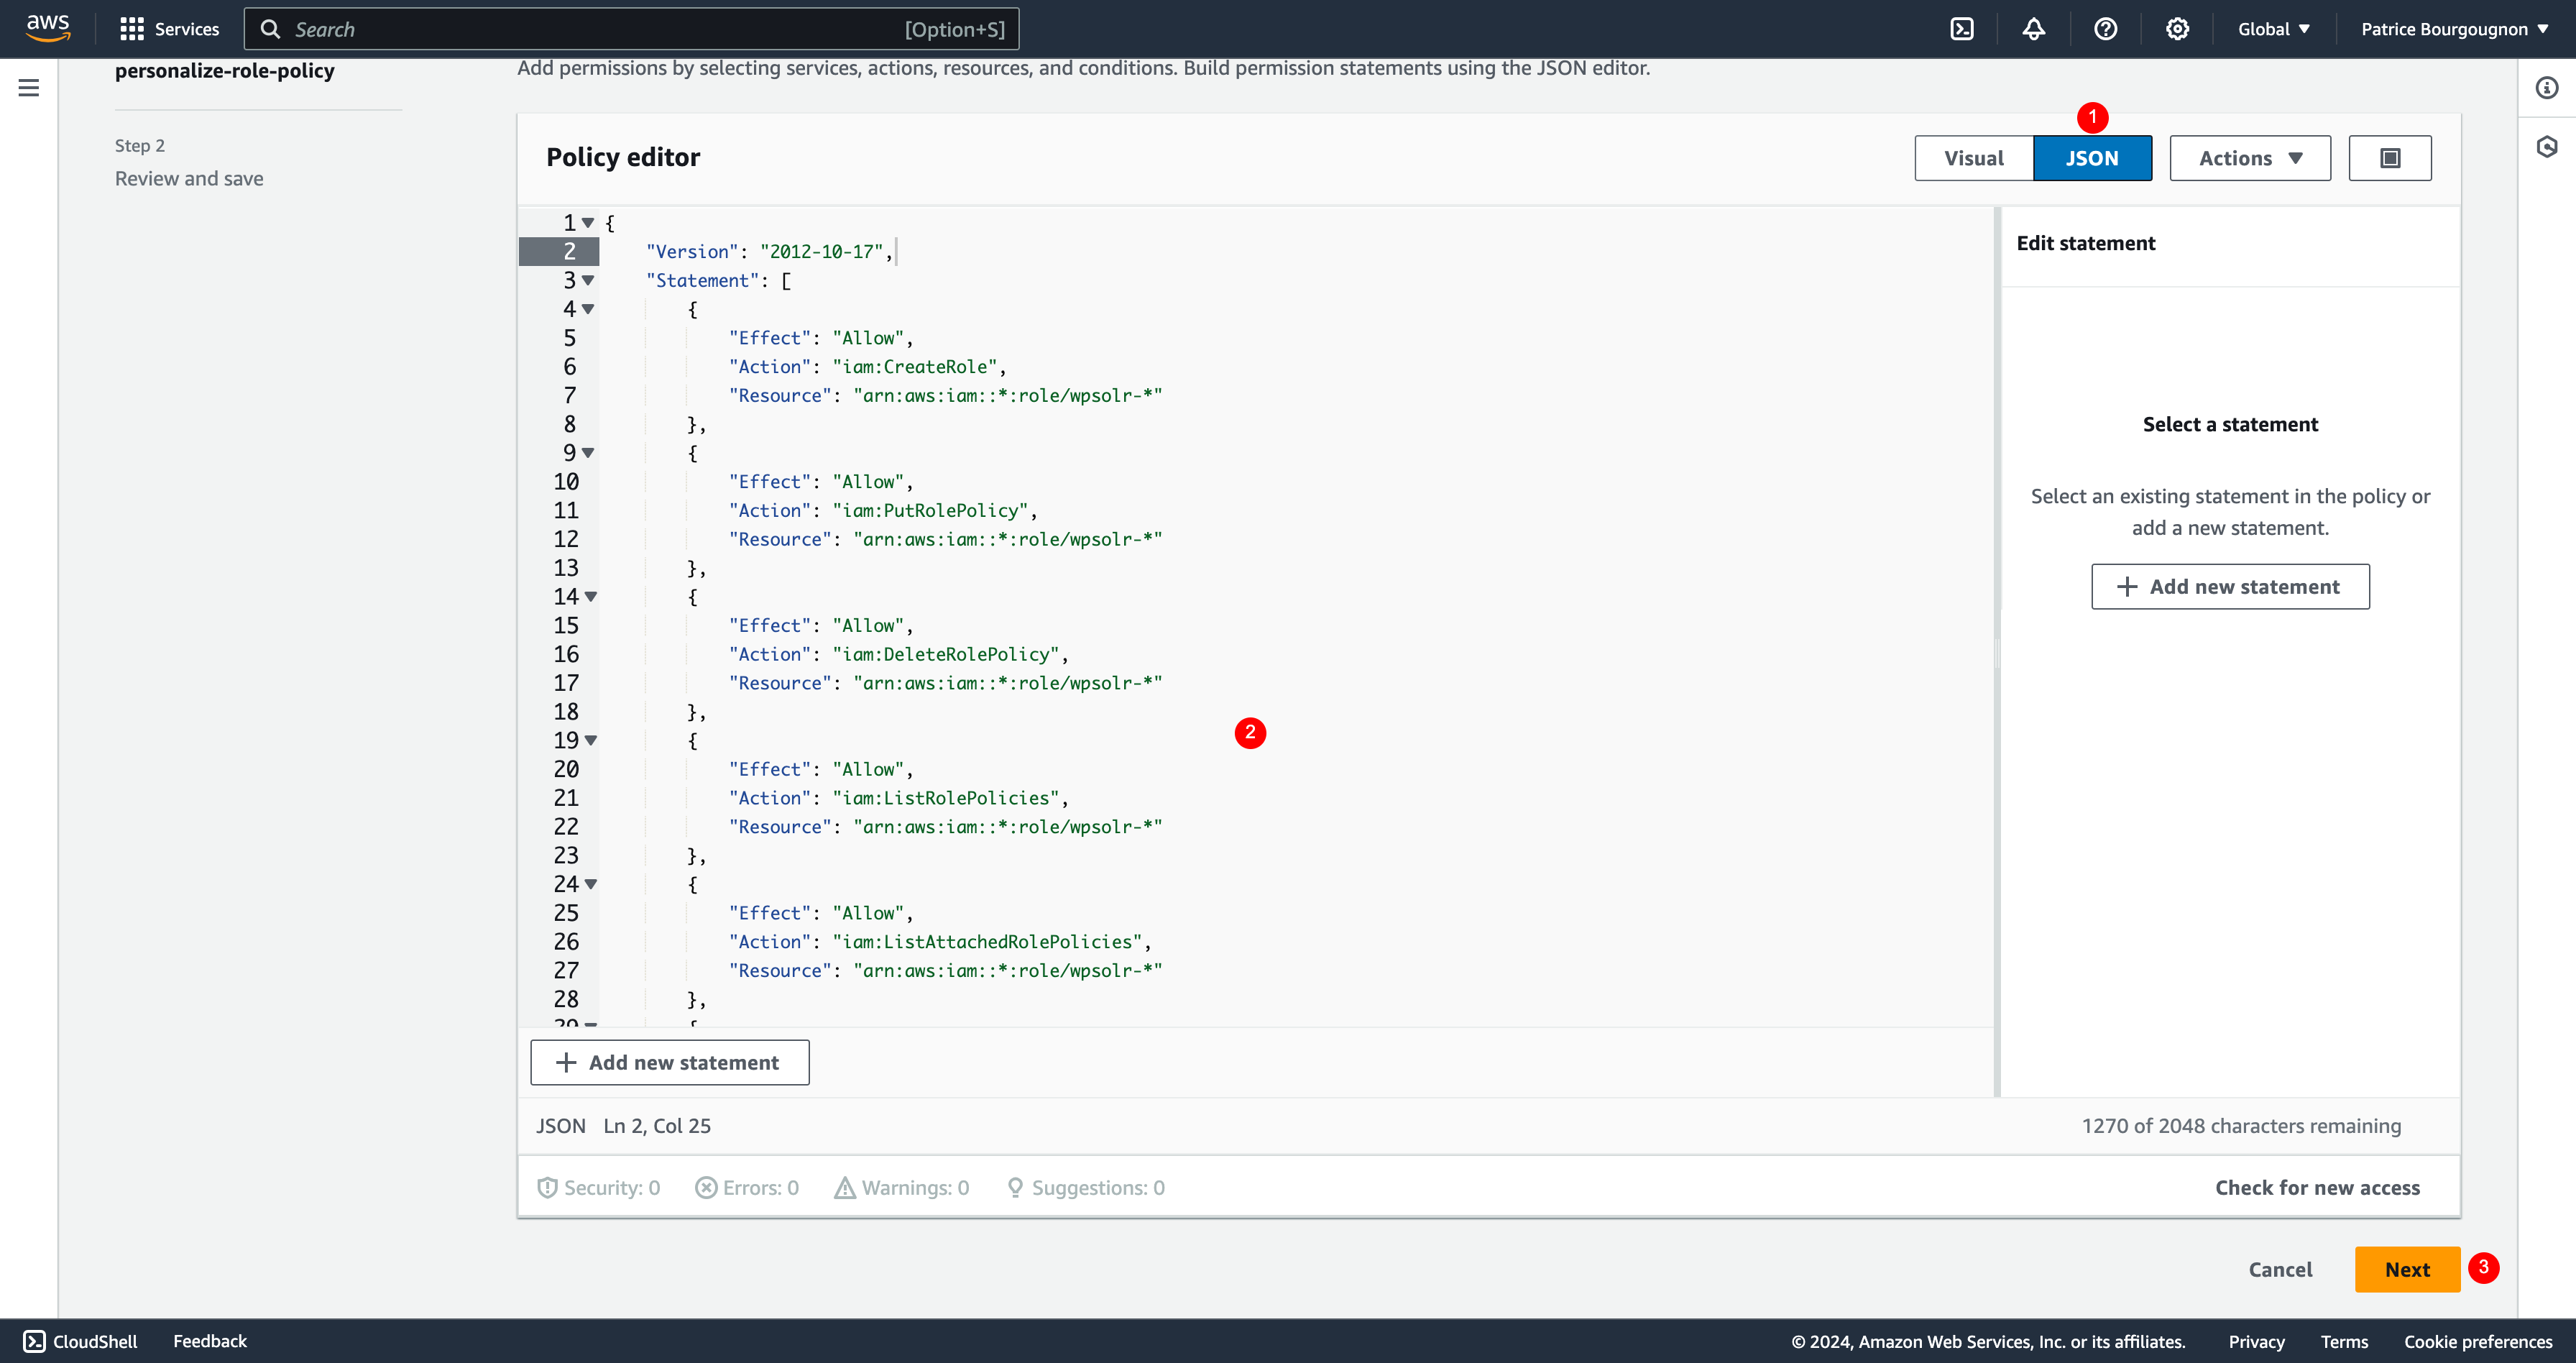
- Click on tab “JSON”
- Copy the policy below in the editor
{
	"Version": "2012-10-17",
	"Statement": [
		{
			"Effect": "Allow",
			"Action": "iam:CreateRole",
			"Resource": "arn:aws:iam::*:role/wpsolr-*"
		},
		{
			"Effect": "Allow",
			"Action": "iam:PutRolePolicy",
			"Resource": "arn:aws:iam::*:role/wpsolr-*"
		},
		{
			"Effect": "Allow",
			"Action": "iam:DeleteRolePolicy",
			"Resource": "arn:aws:iam::*:role/wpsolr-*"
		},
		{
			"Effect": "Allow",
			"Action": "iam:ListRolePolicies",
			"Resource": "arn:aws:iam::*:role/wpsolr-*"
		},
		{
			"Effect": "Allow",
			"Action": "iam:ListAttachedRolePolicies",
			"Resource": "arn:aws:iam::*:role/wpsolr-*"
		},
		{
			"Effect": "Allow",
			"Action": "iam:ListInstanceProfilesForRole",
			"Resource": "arn:aws:iam::*:role/wpsolr-*"
		},
		{
			"Effect": "Allow",
			"Action": "iam:DeleteRole",
			"Resource": "arn:aws:iam::*:role/wpsolr-*"
		},
		{
			"Effect": "Allow",
			"Action": "iam:PassRole",
			"Resource": "arn:aws:iam::*:role/wpsolr-*"
		}
	]
}
You can replace “arn:aws:iam::*:role/wpsolr-*” with your own AWS account “arn:aws:iam::xxxxxxx:role/wpsolr-*”
- Click on button “Next”
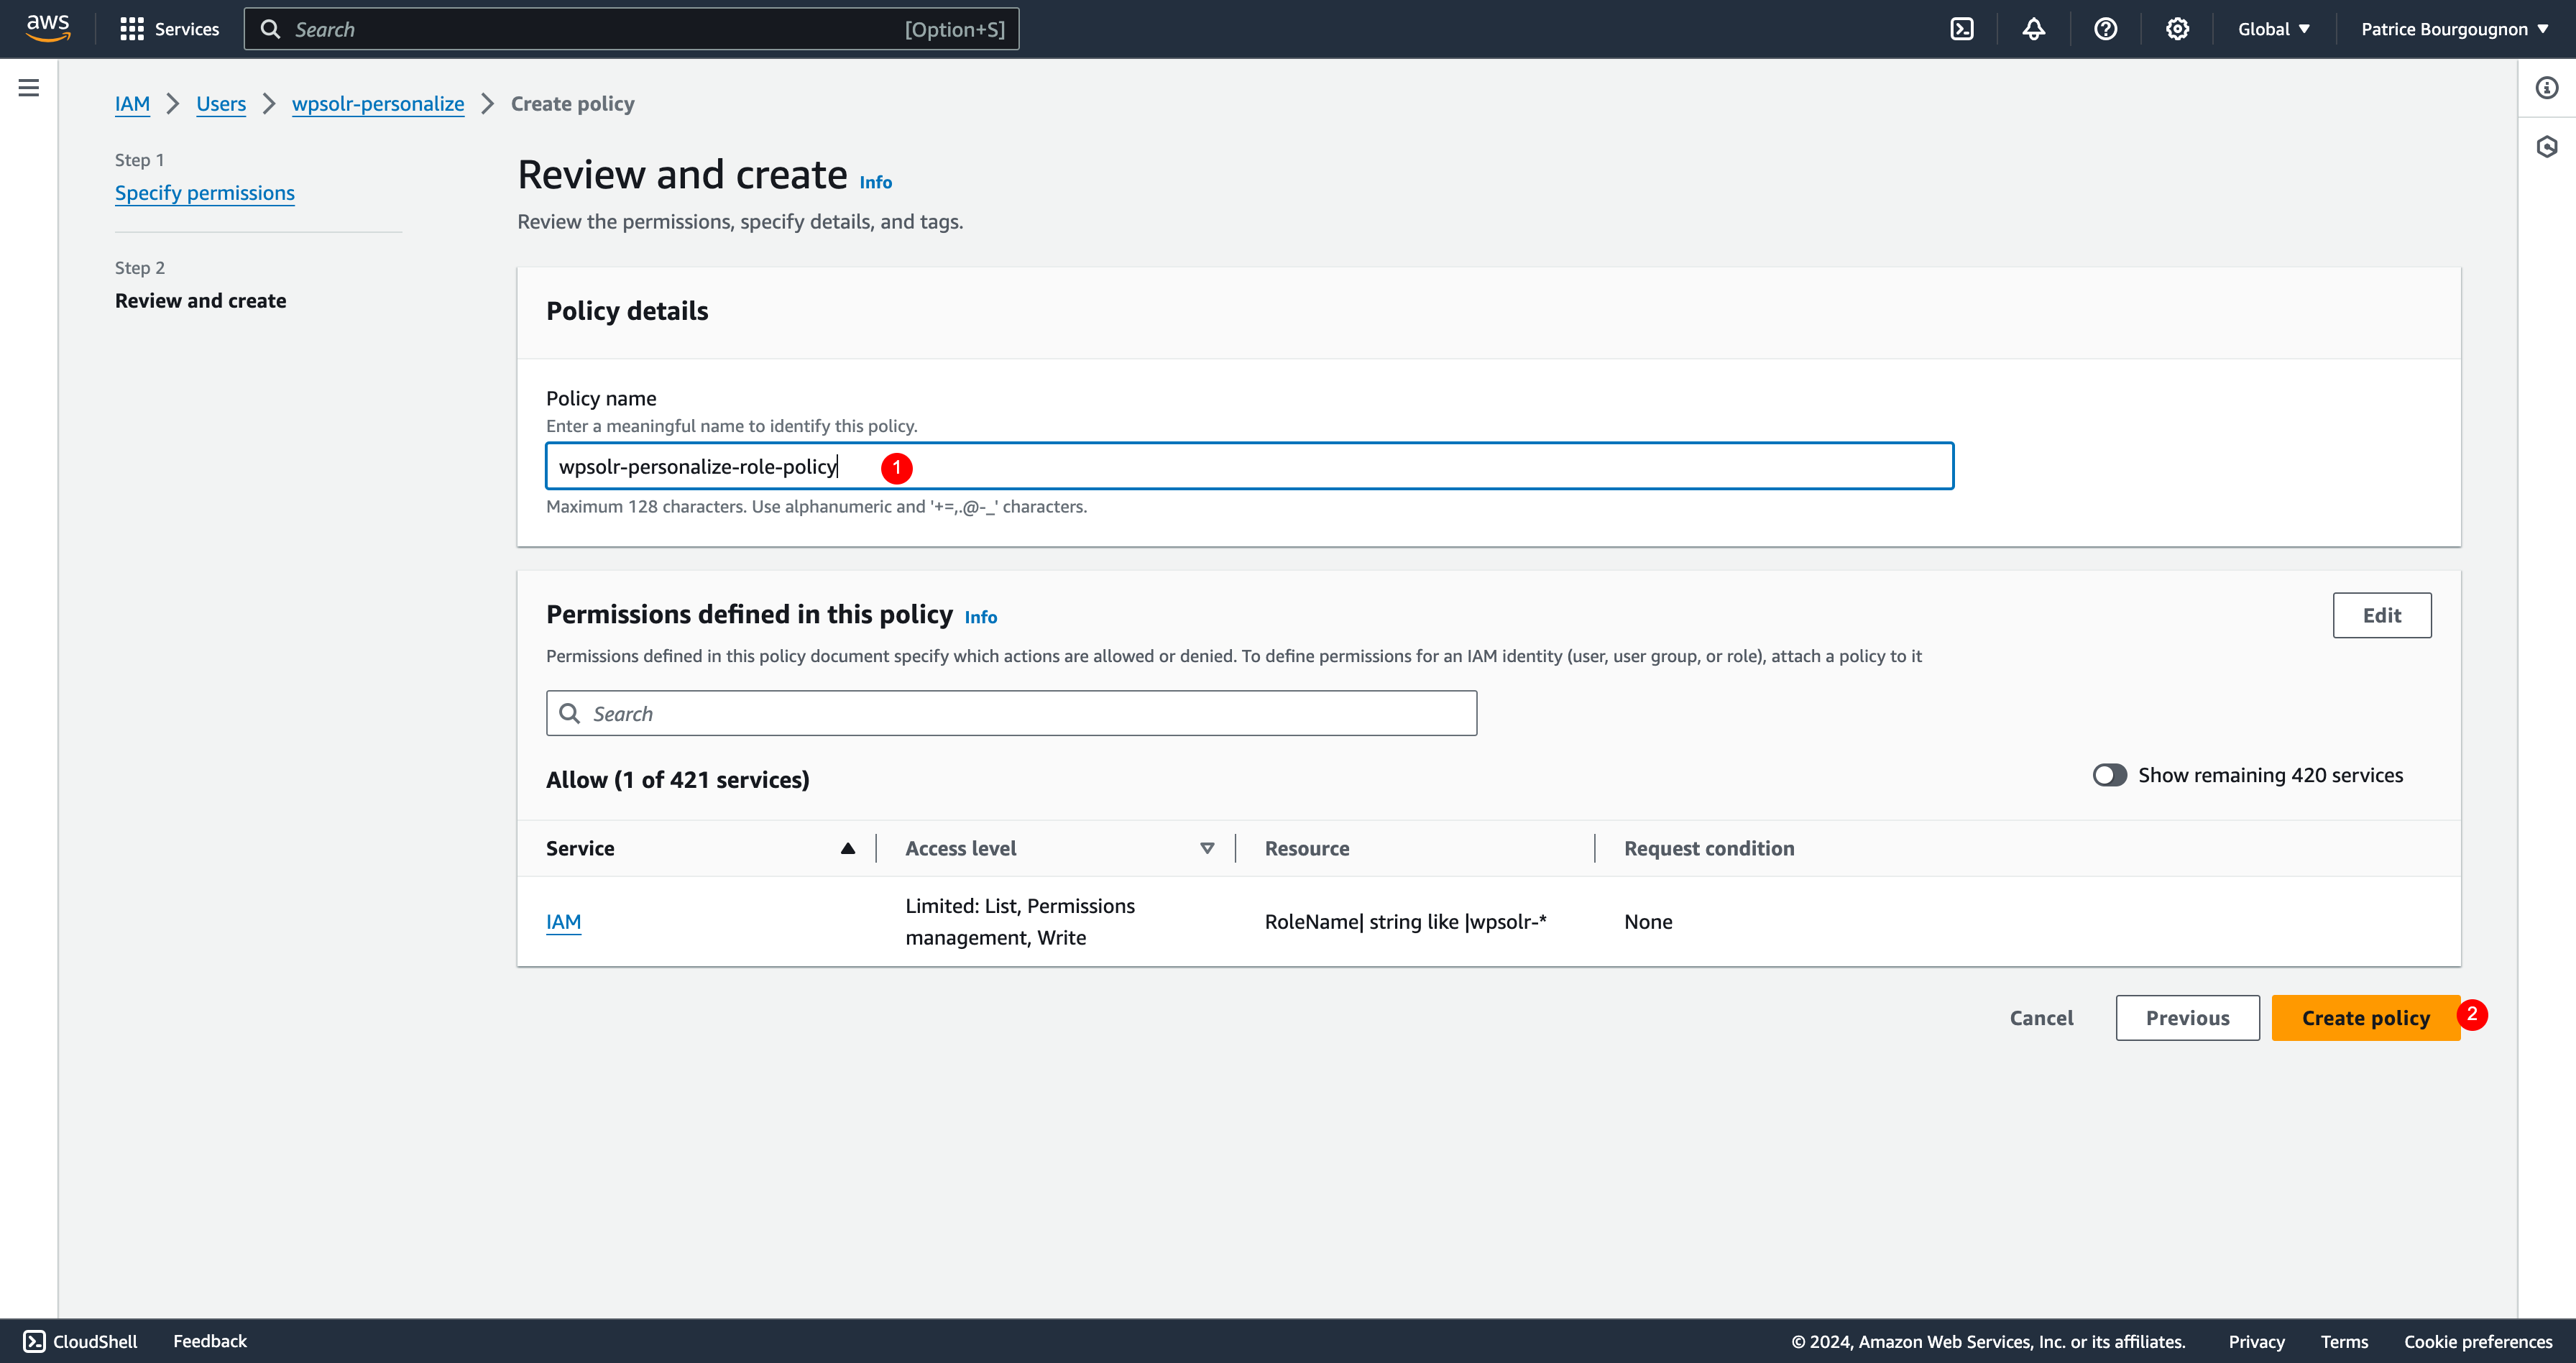
- Give a name to your policy
- Click on button “Create policy”
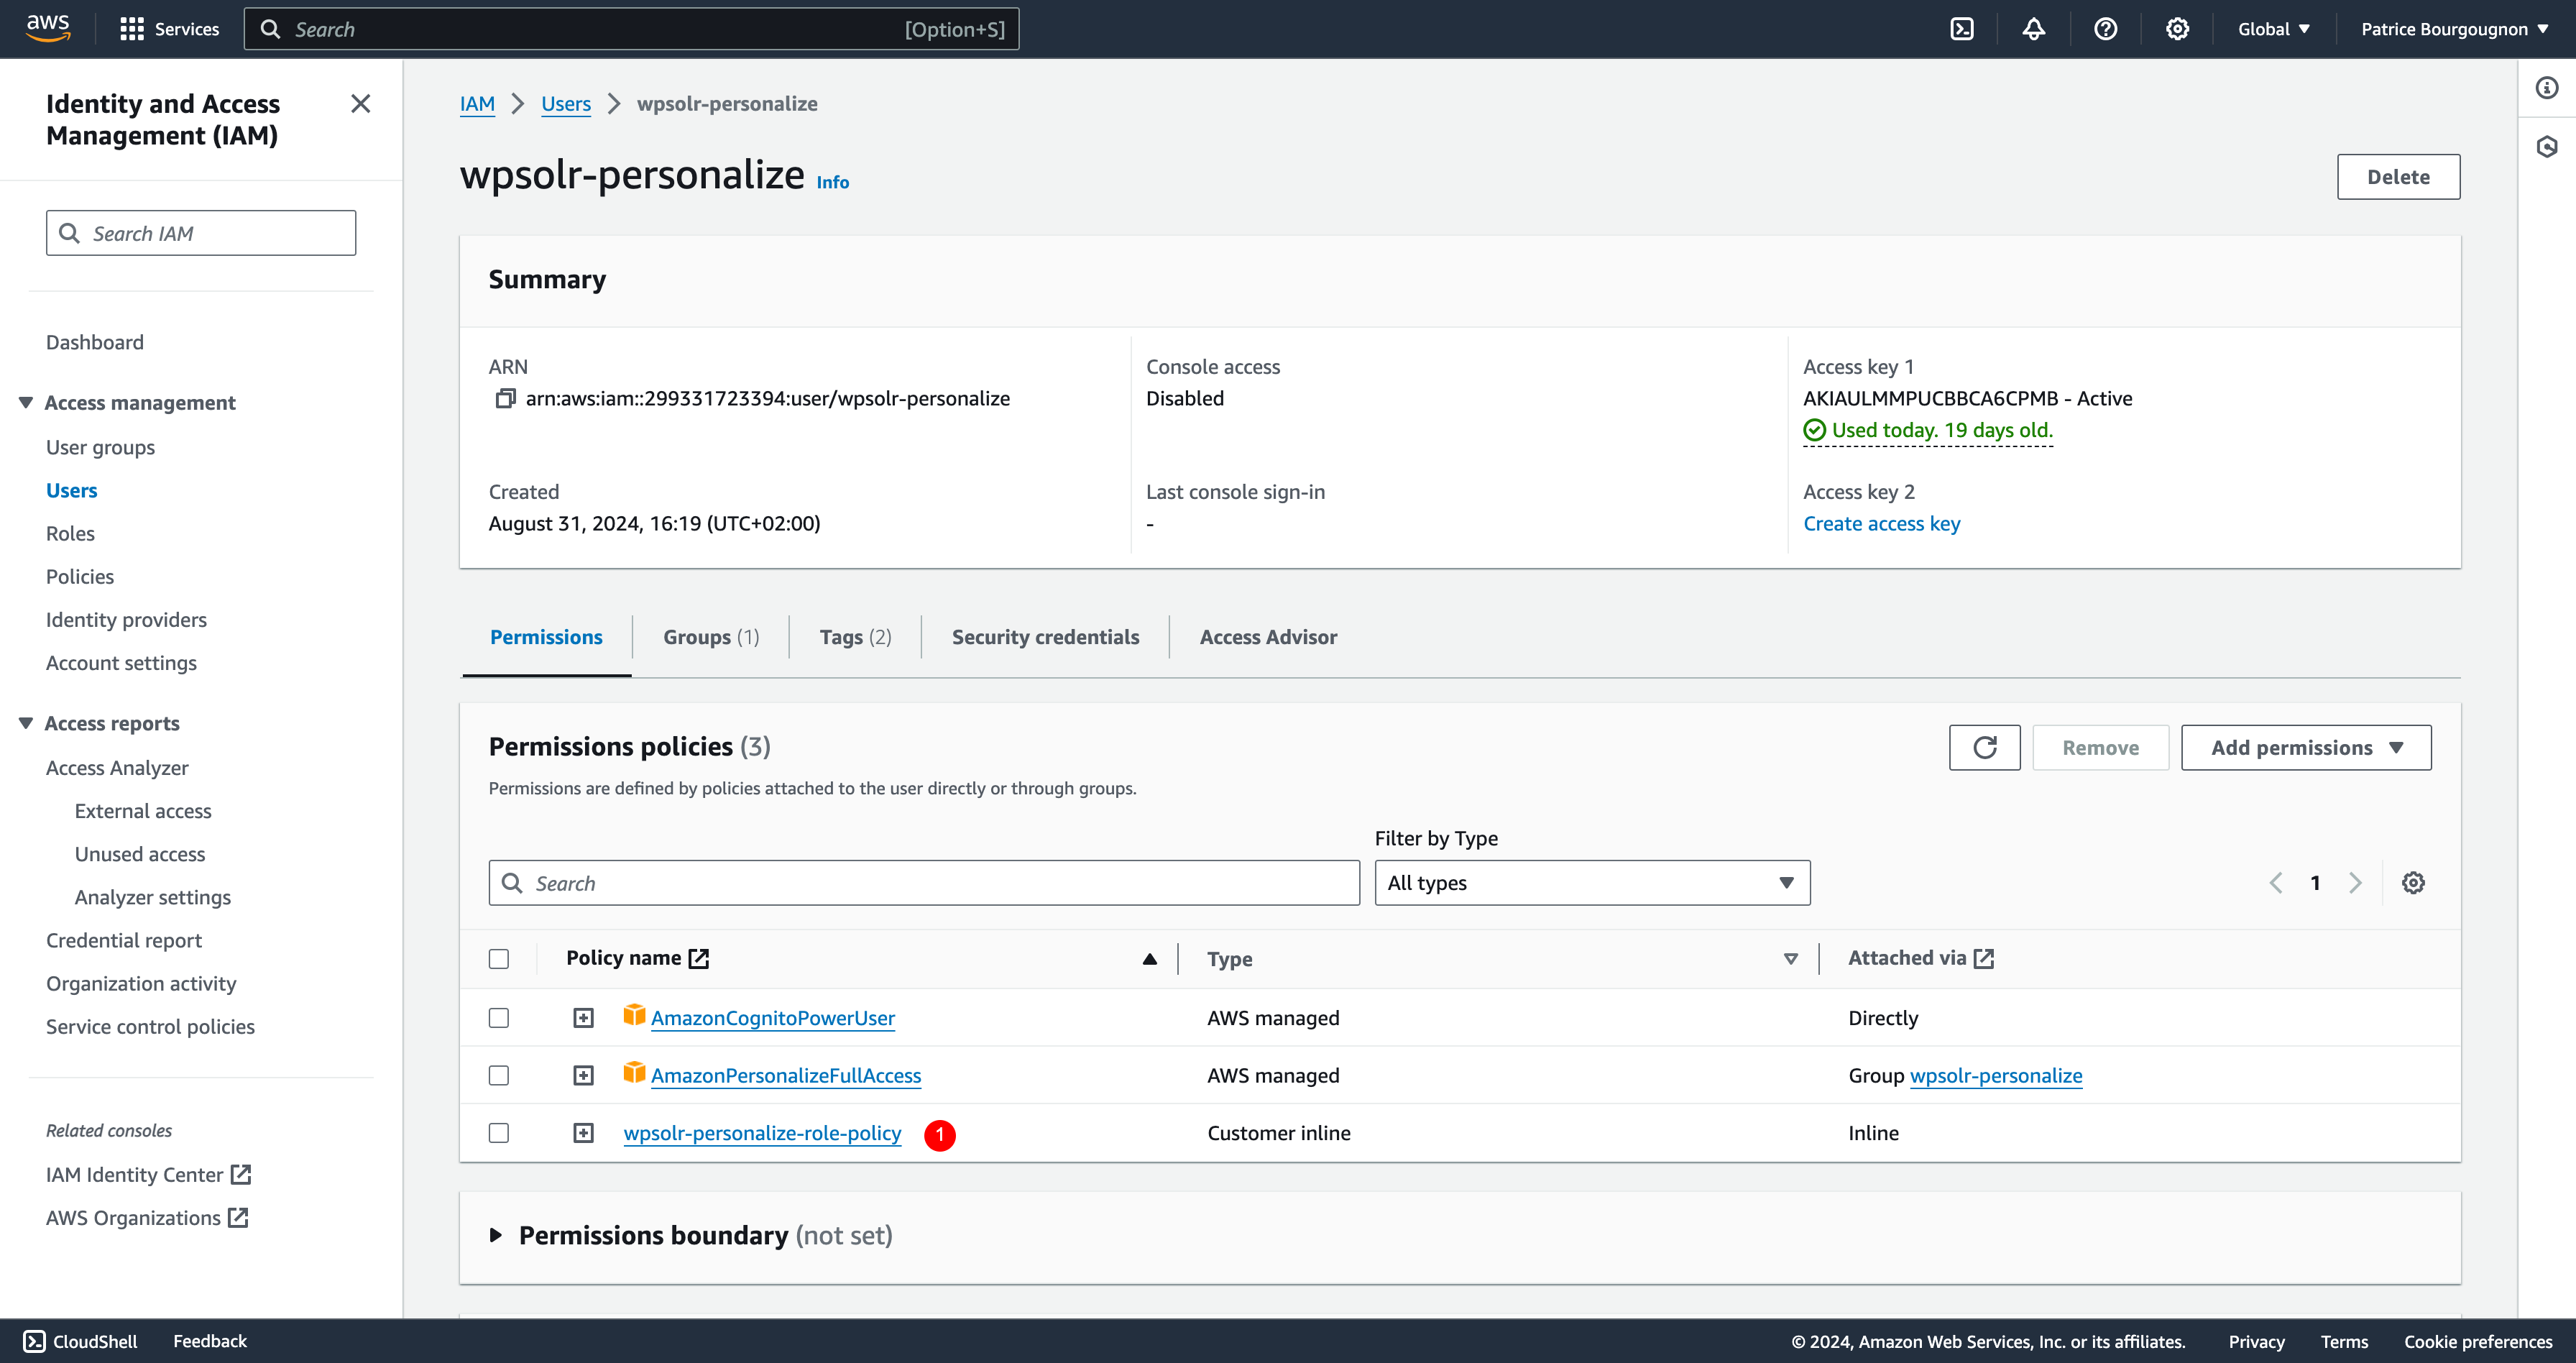
- The new policy is added
Add group to user
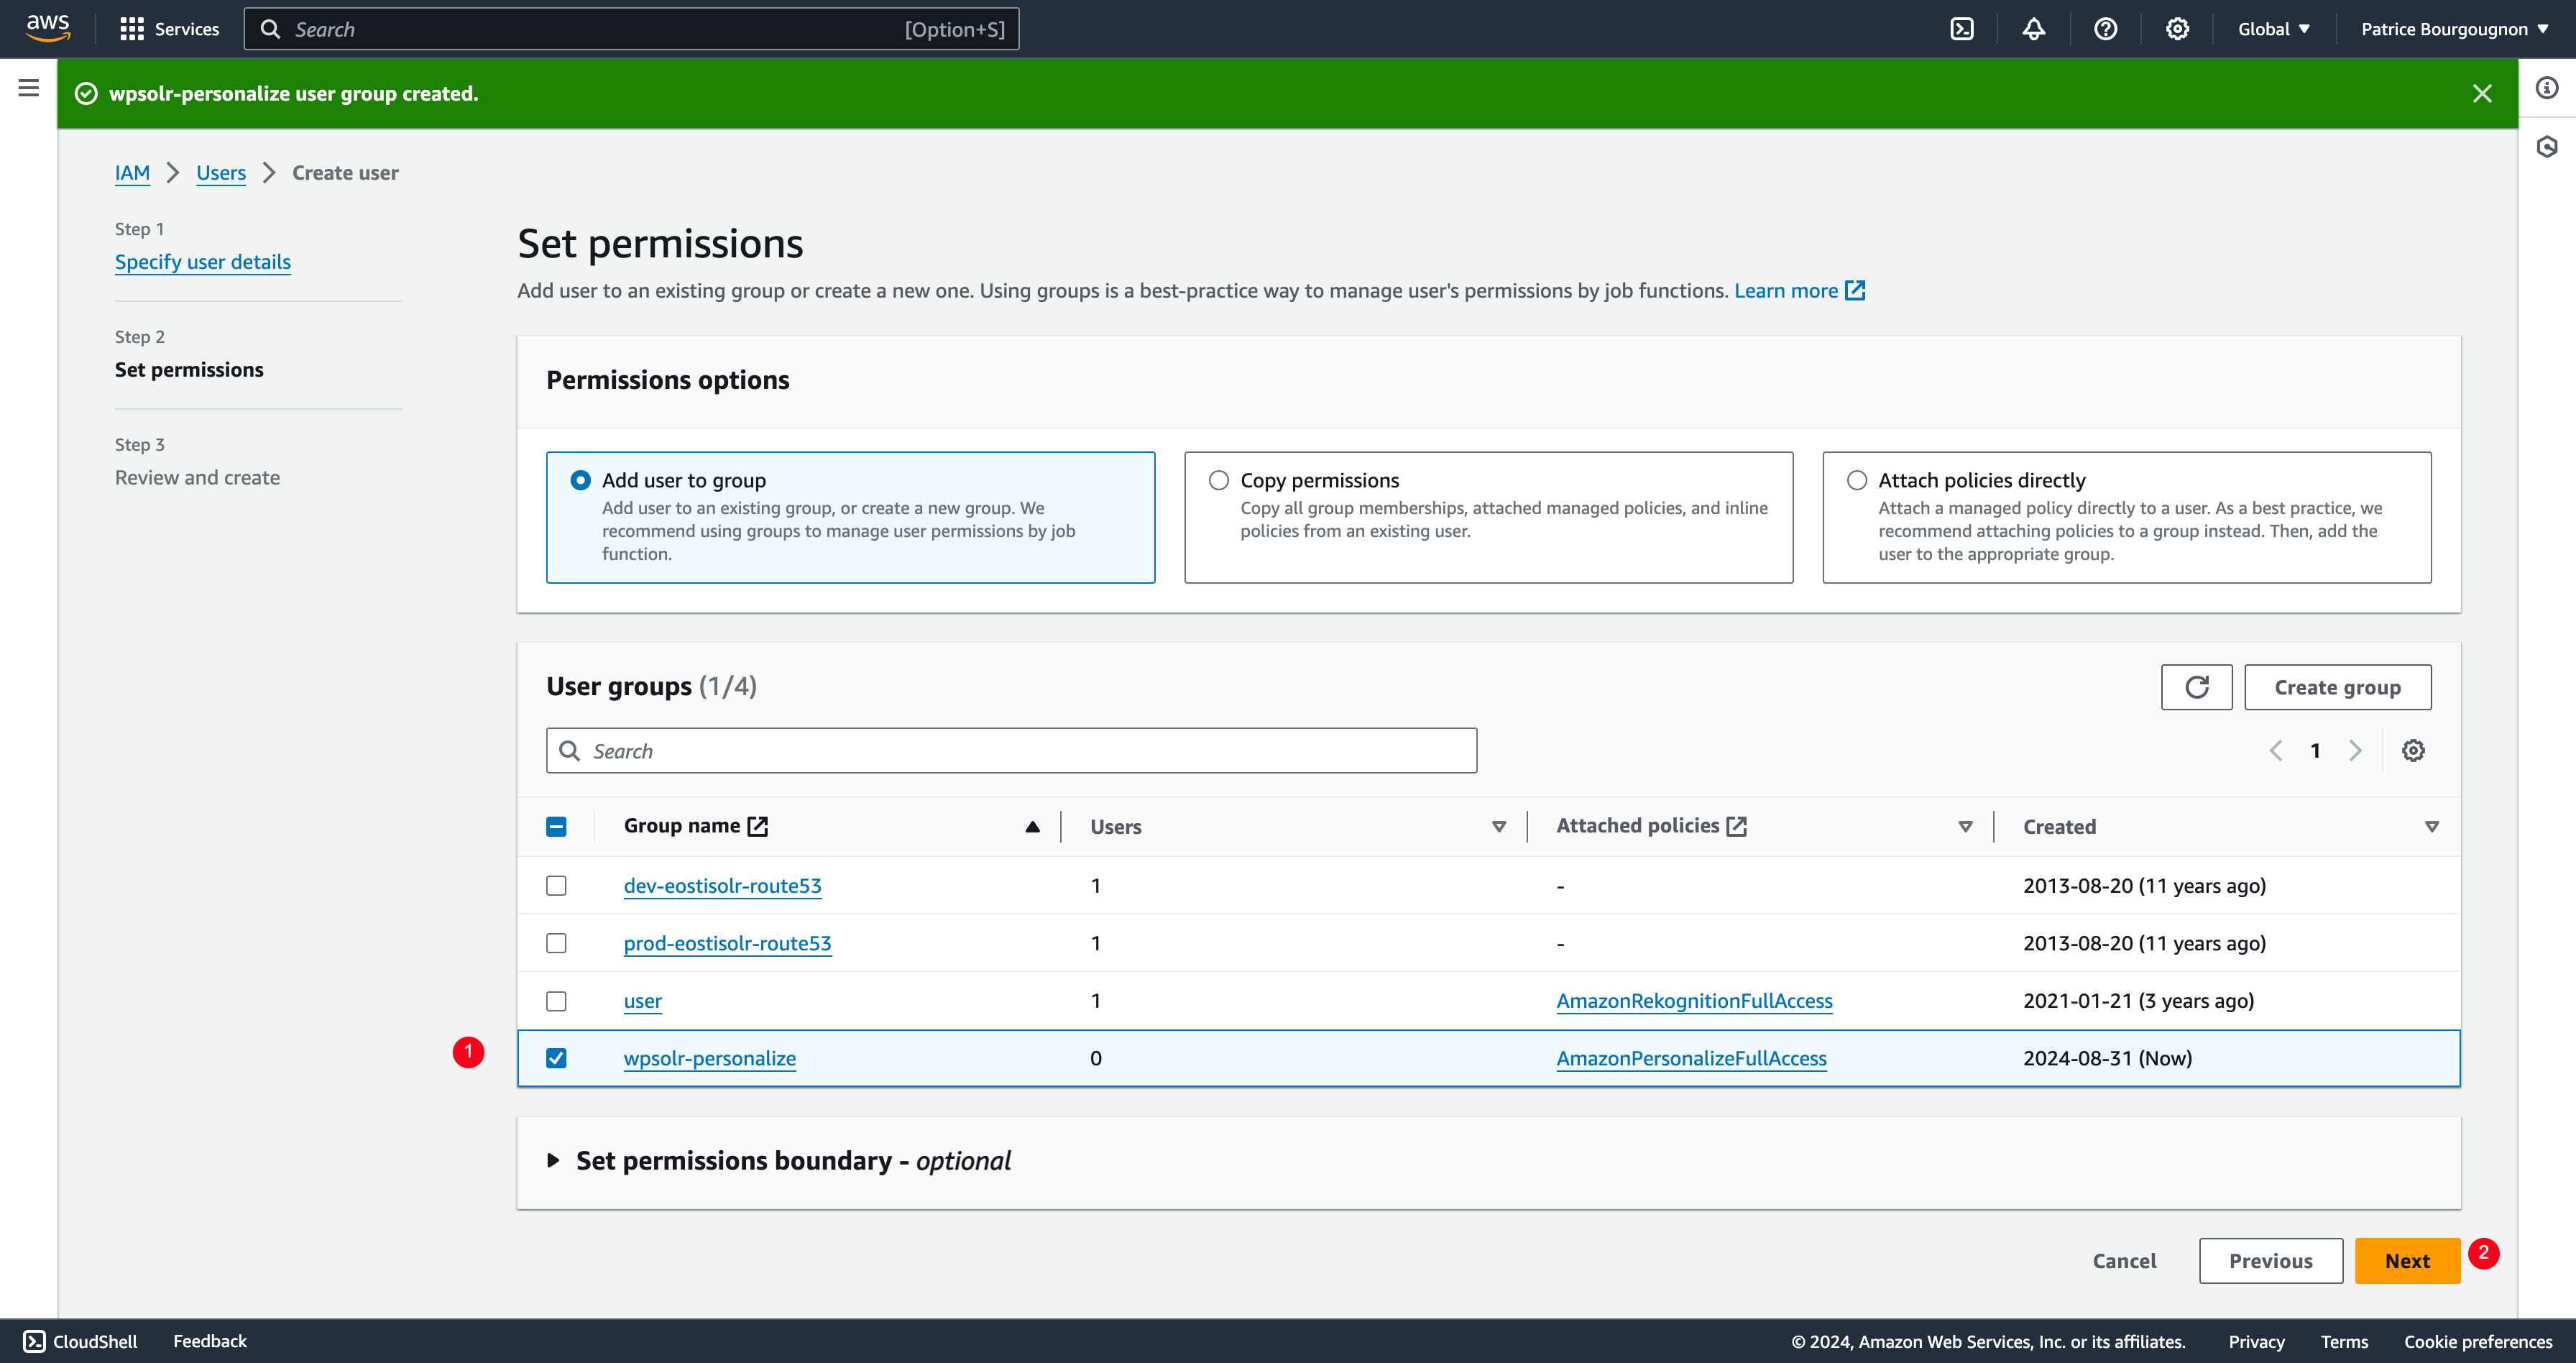
- Select the new group
- Click on button “Next”
Create the user
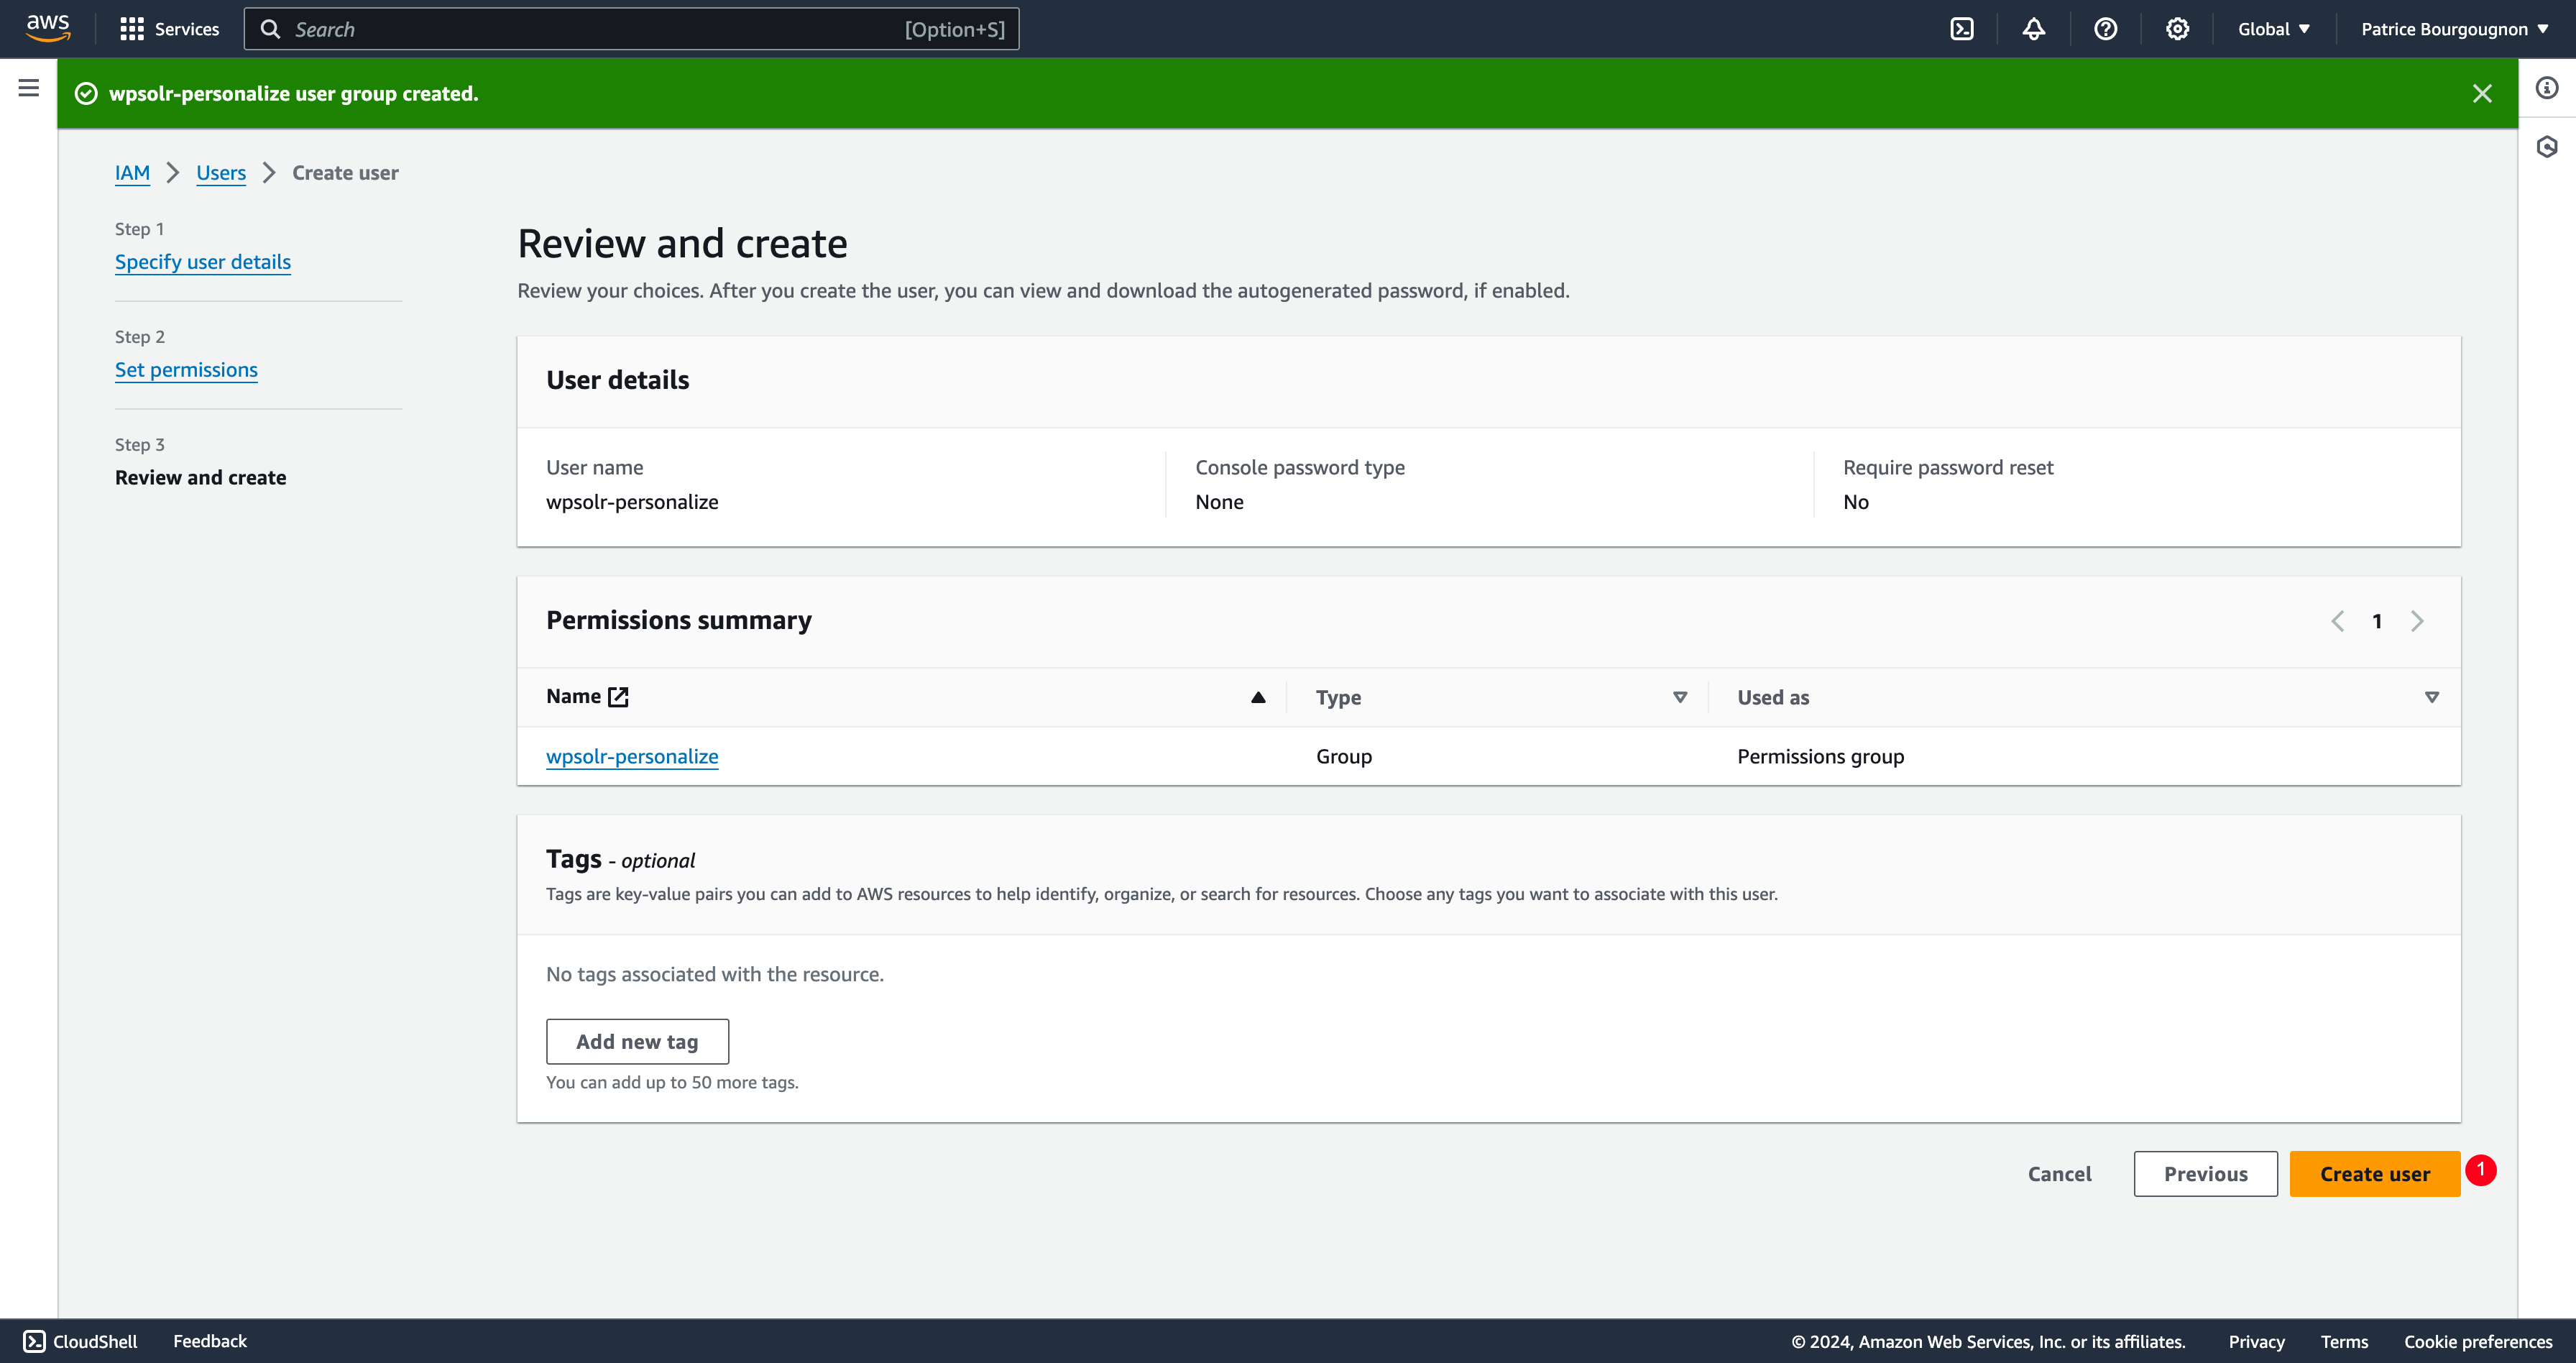
- Click on button “Create user”
Open the user definition
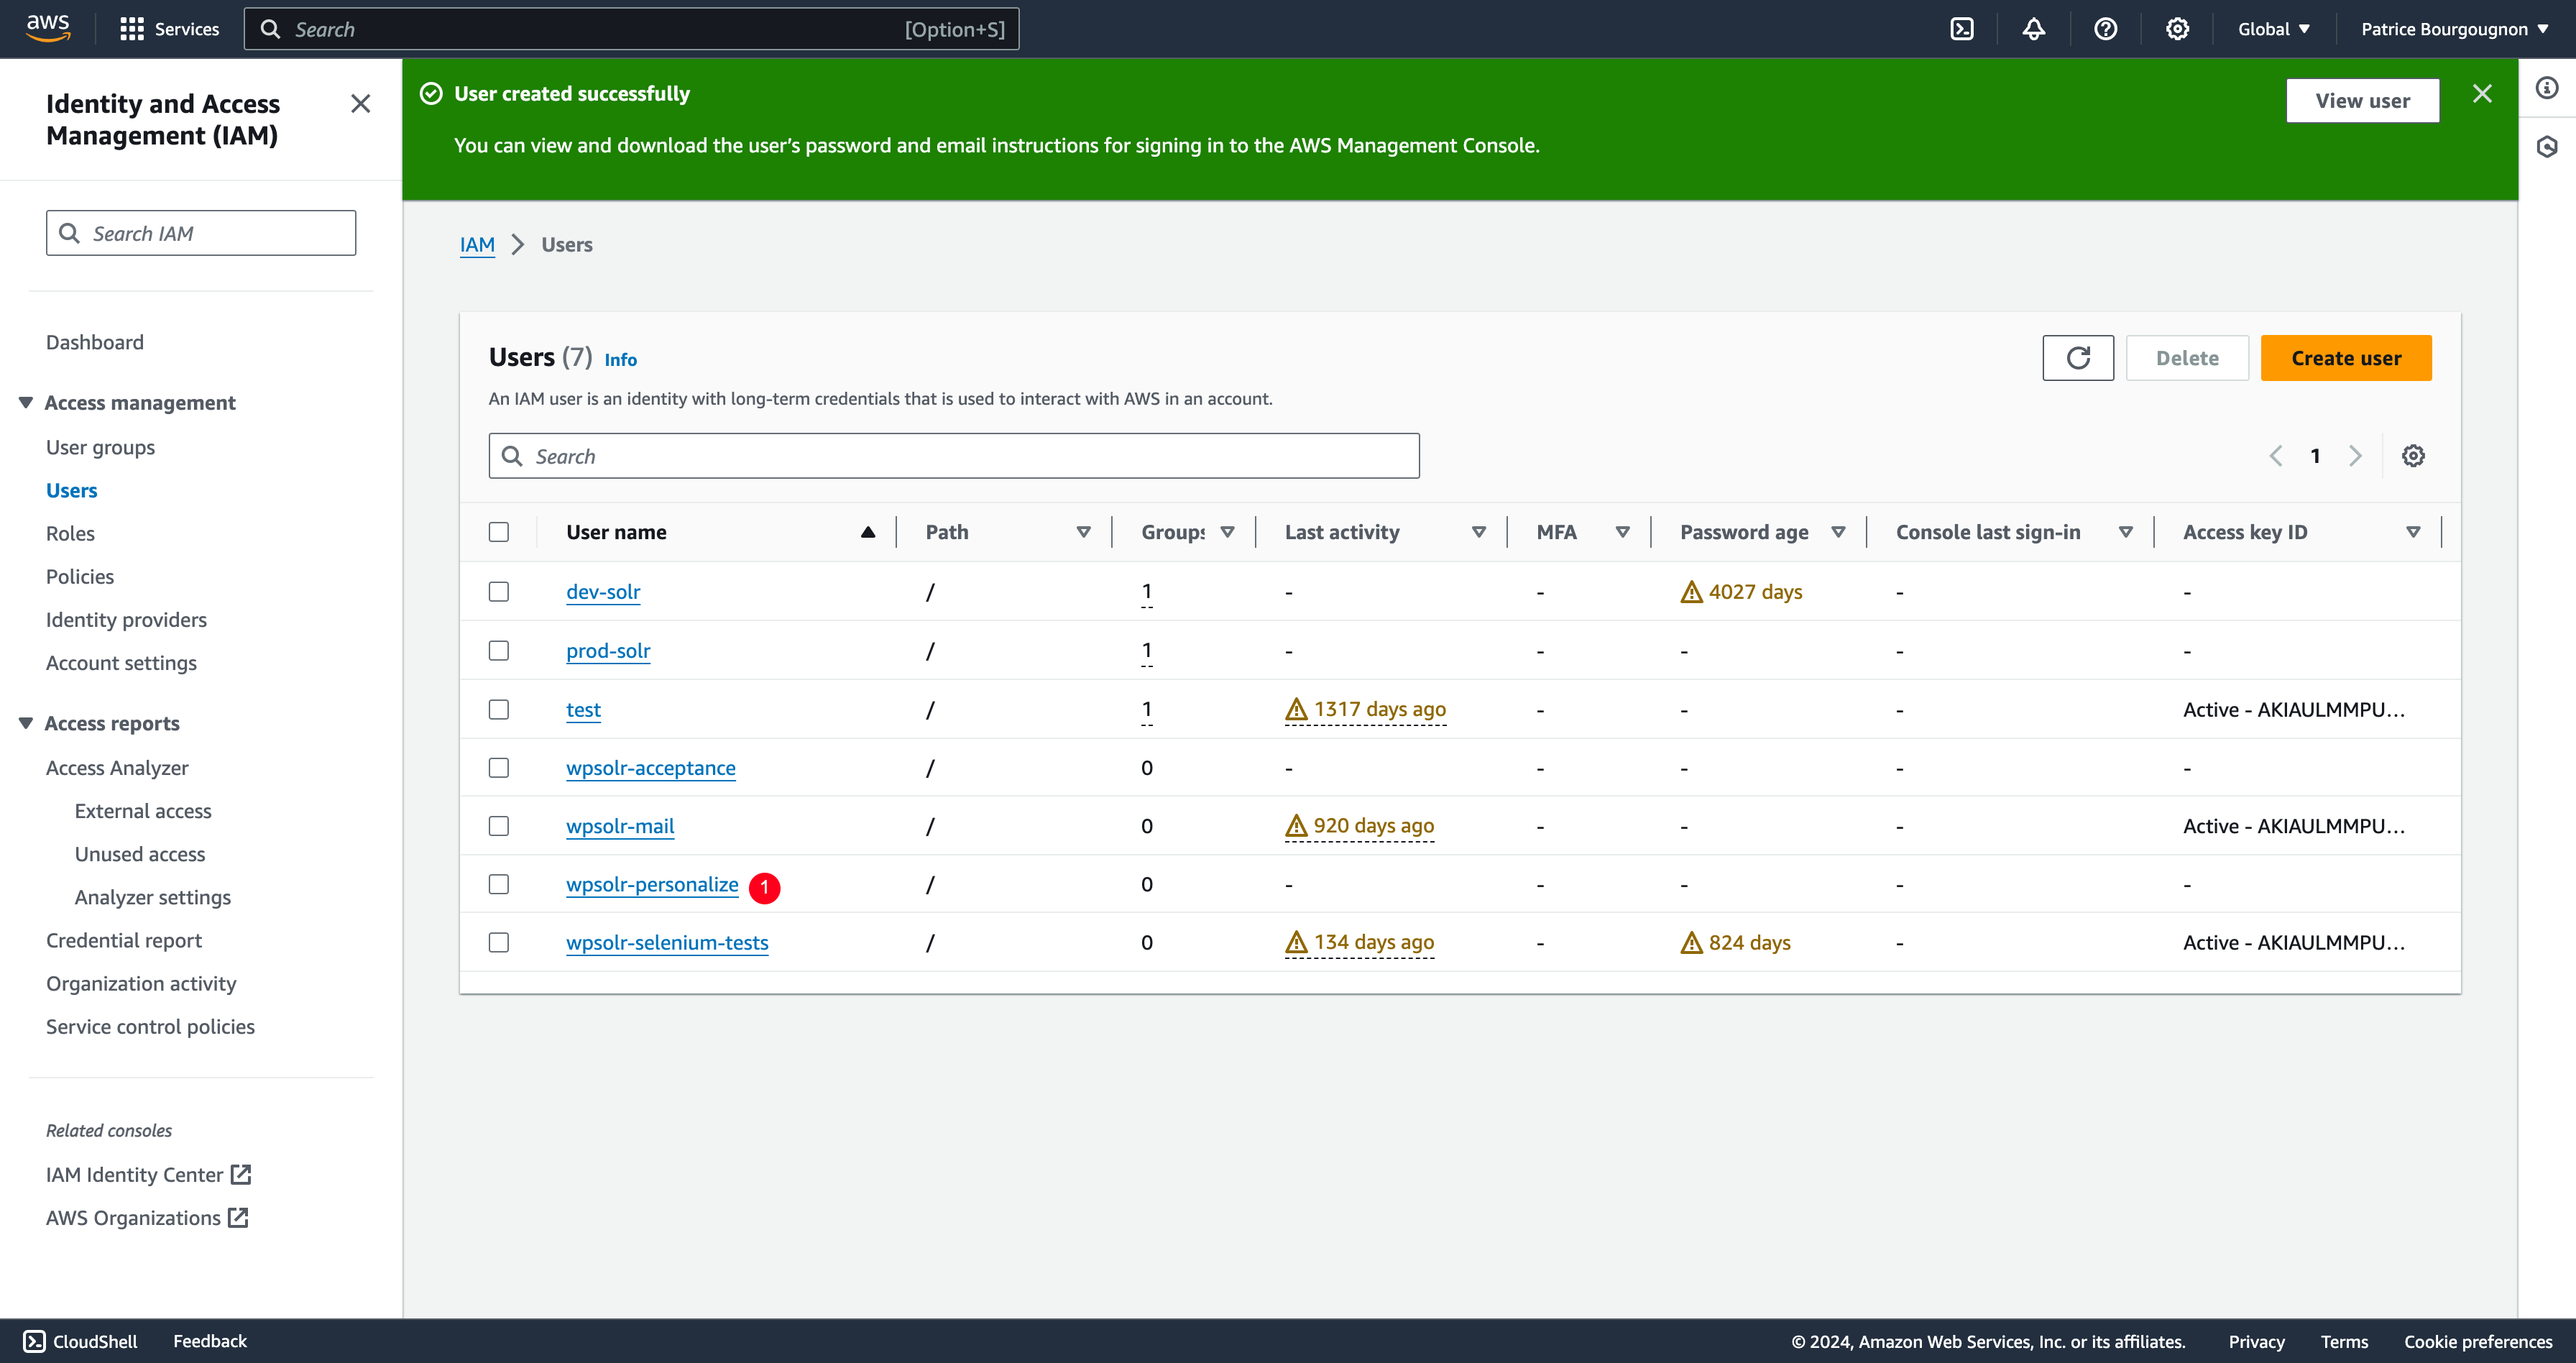
- Click on the link of your new user to open its settings
Create access key for the user
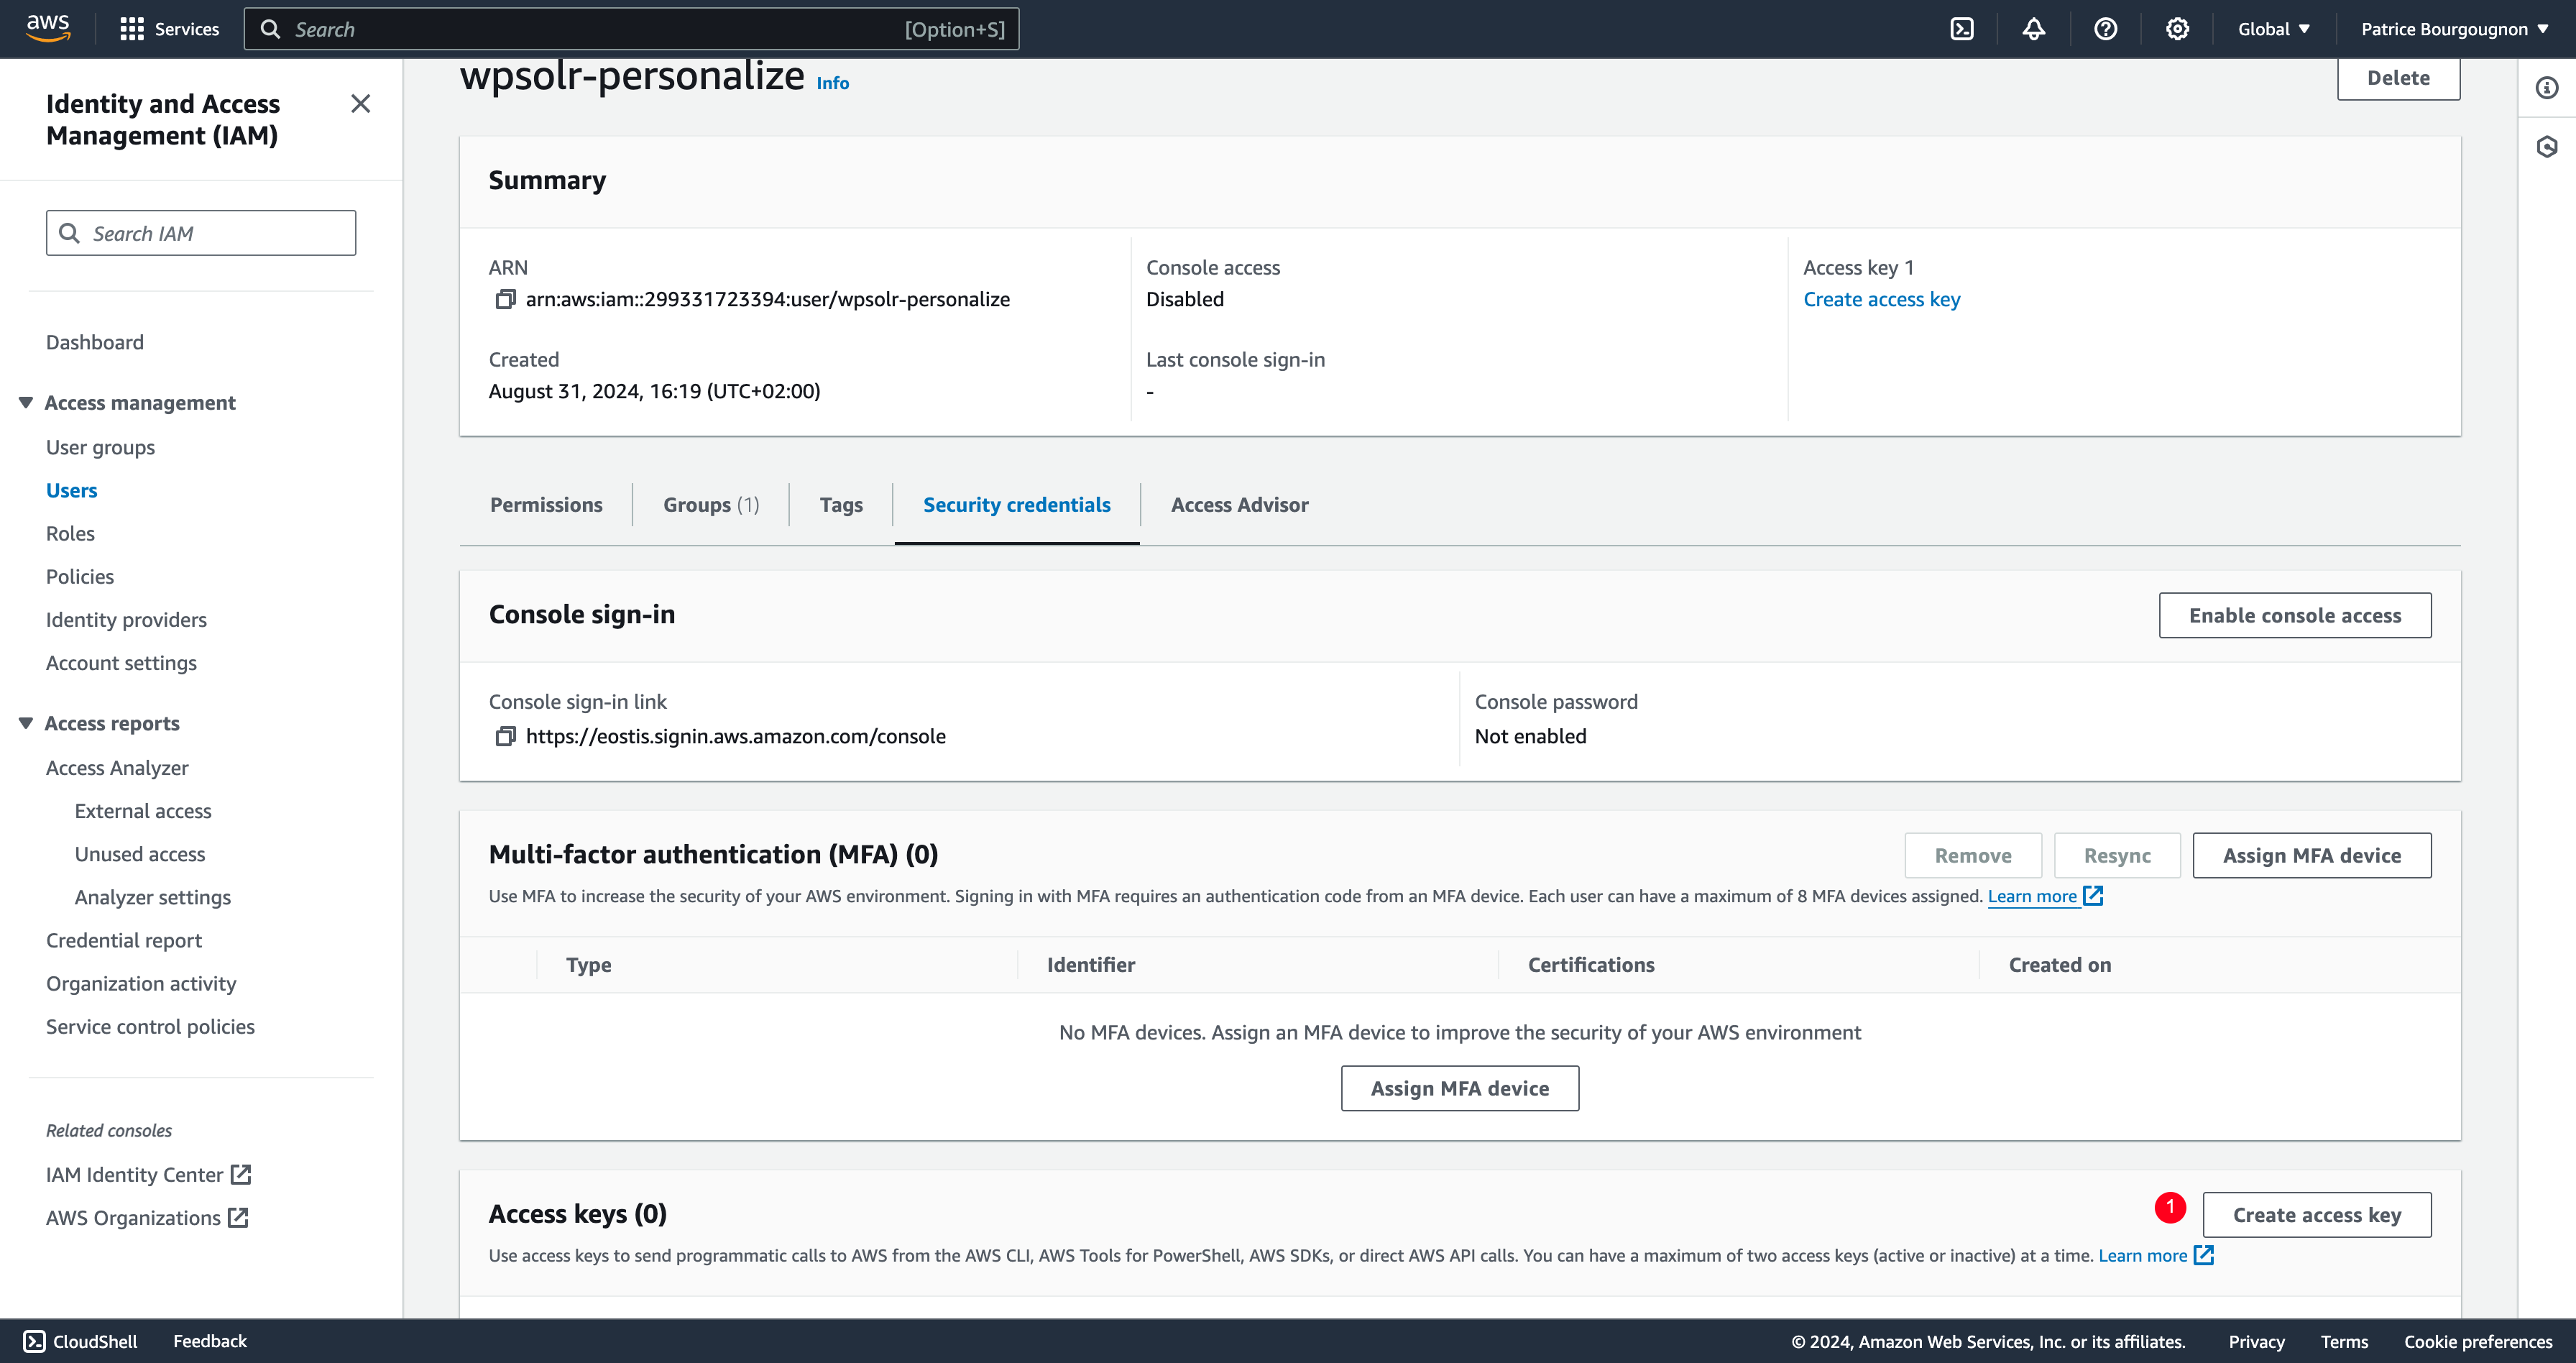
- Click on button “Create access key”
Generate access key for the user
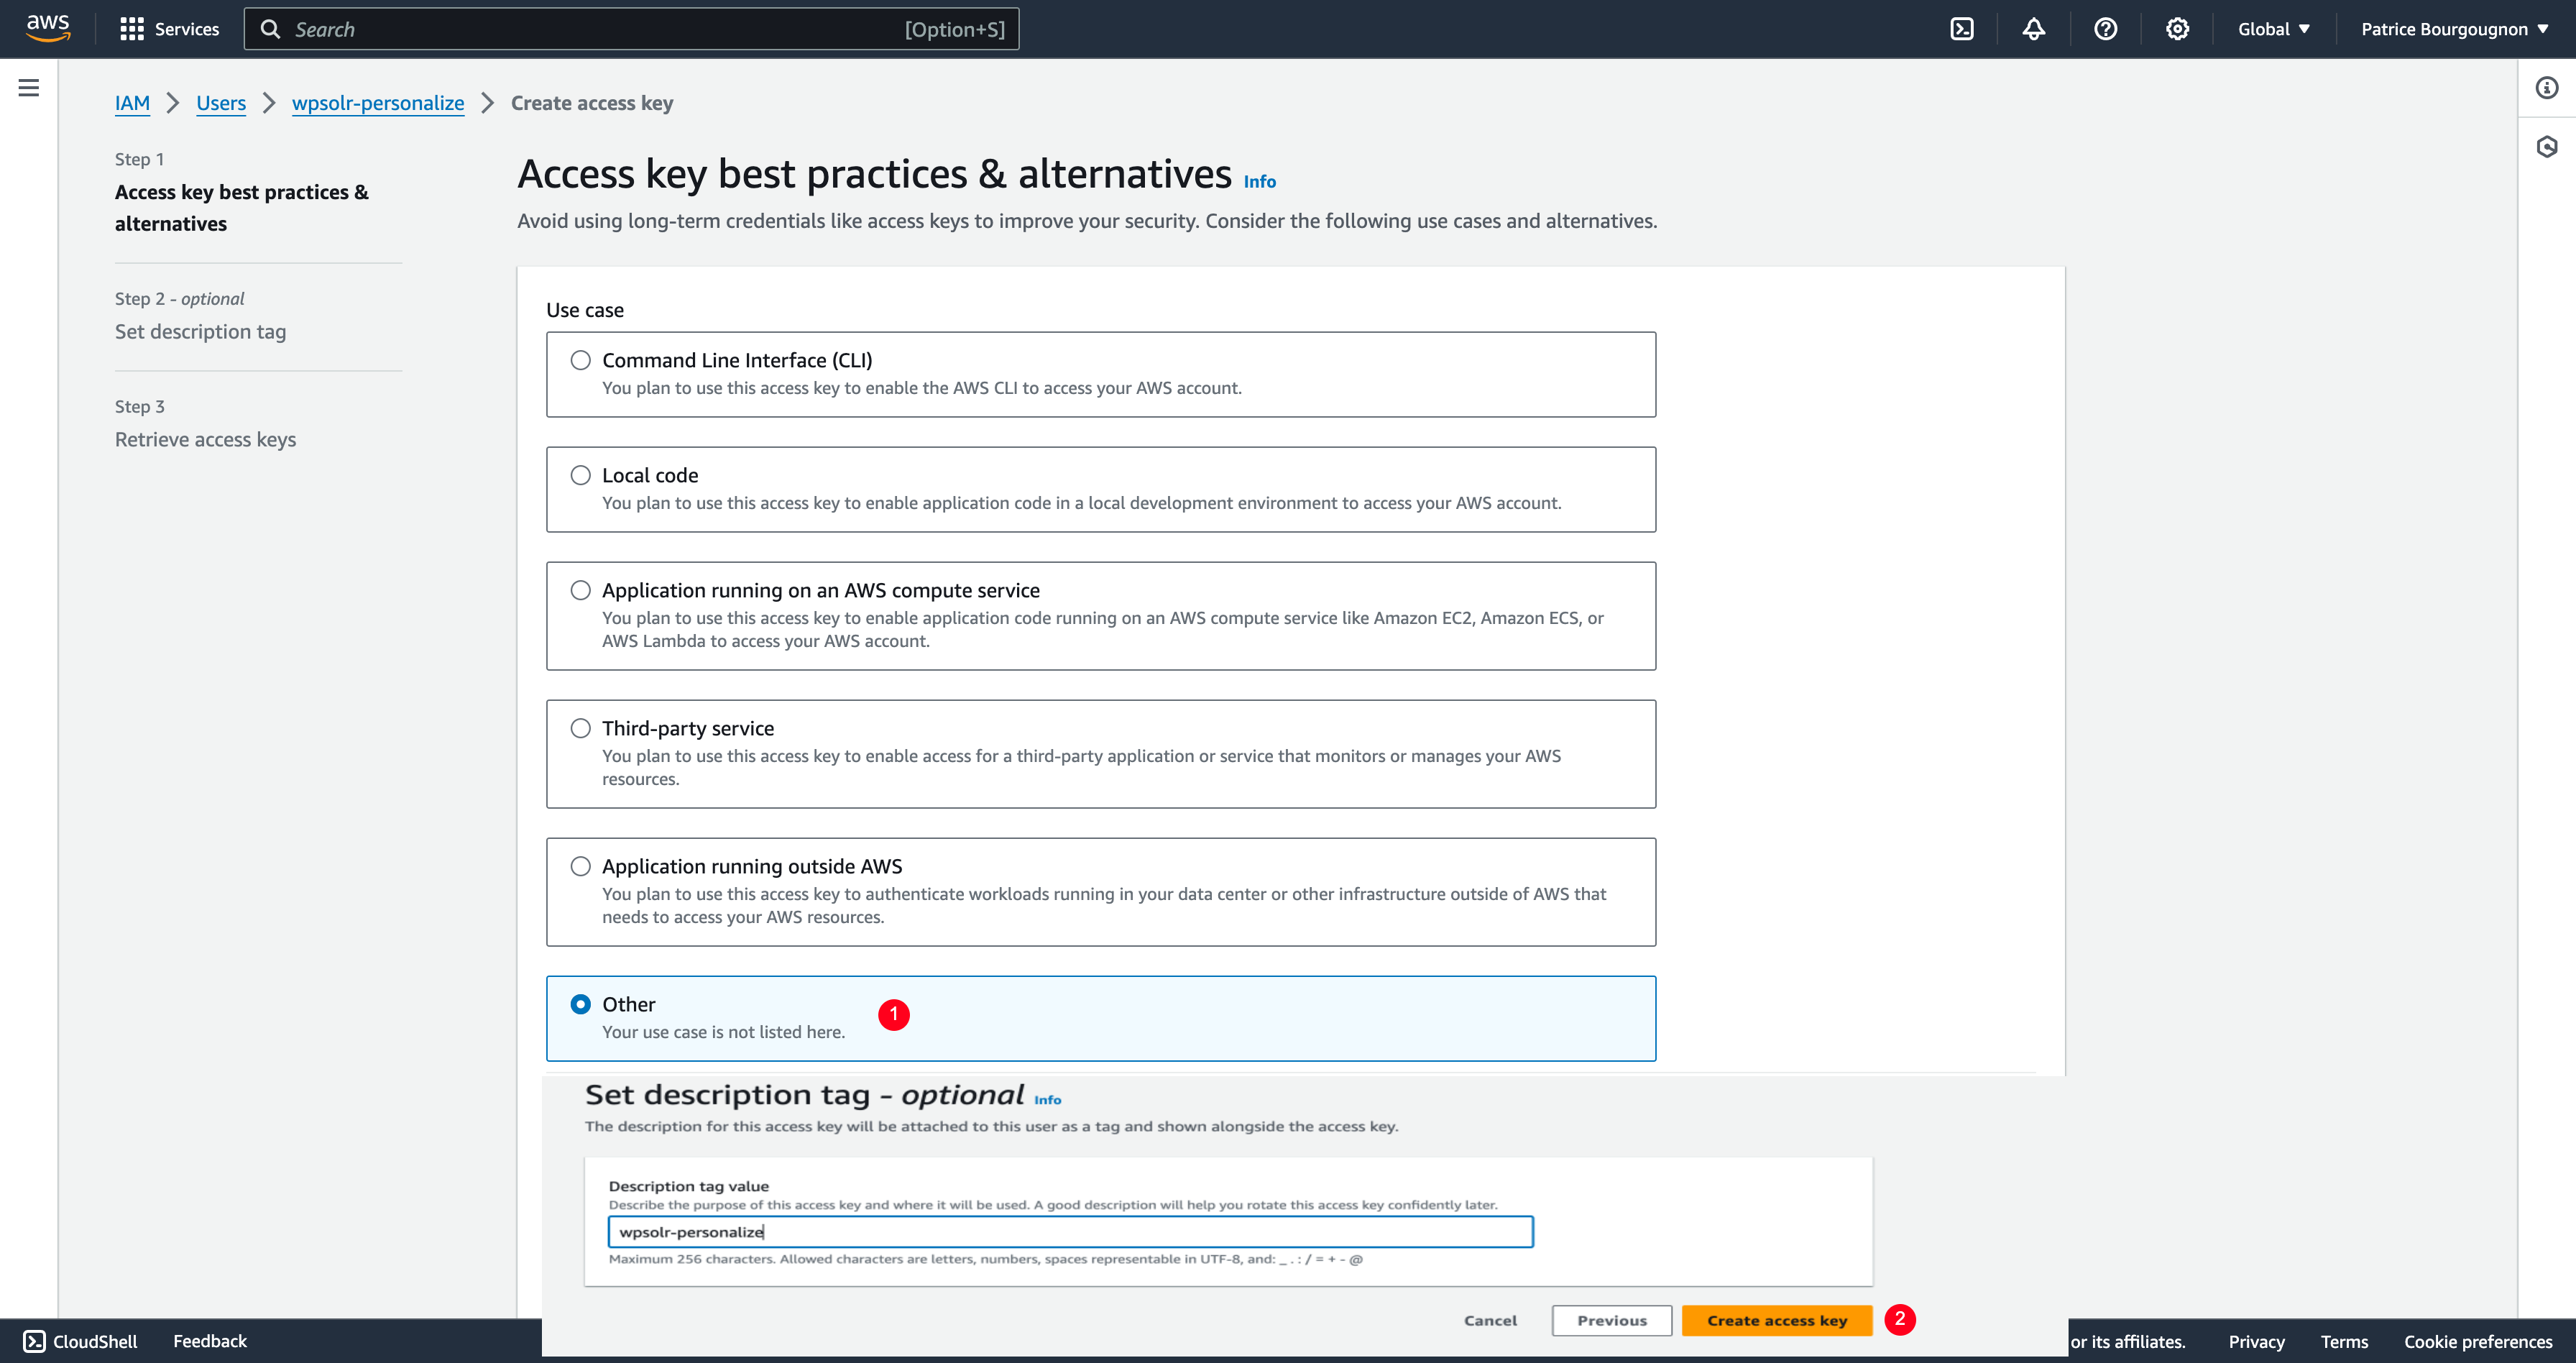
- Select use case “other”
- Click on button “Create access key”
Retrieve access key for the user
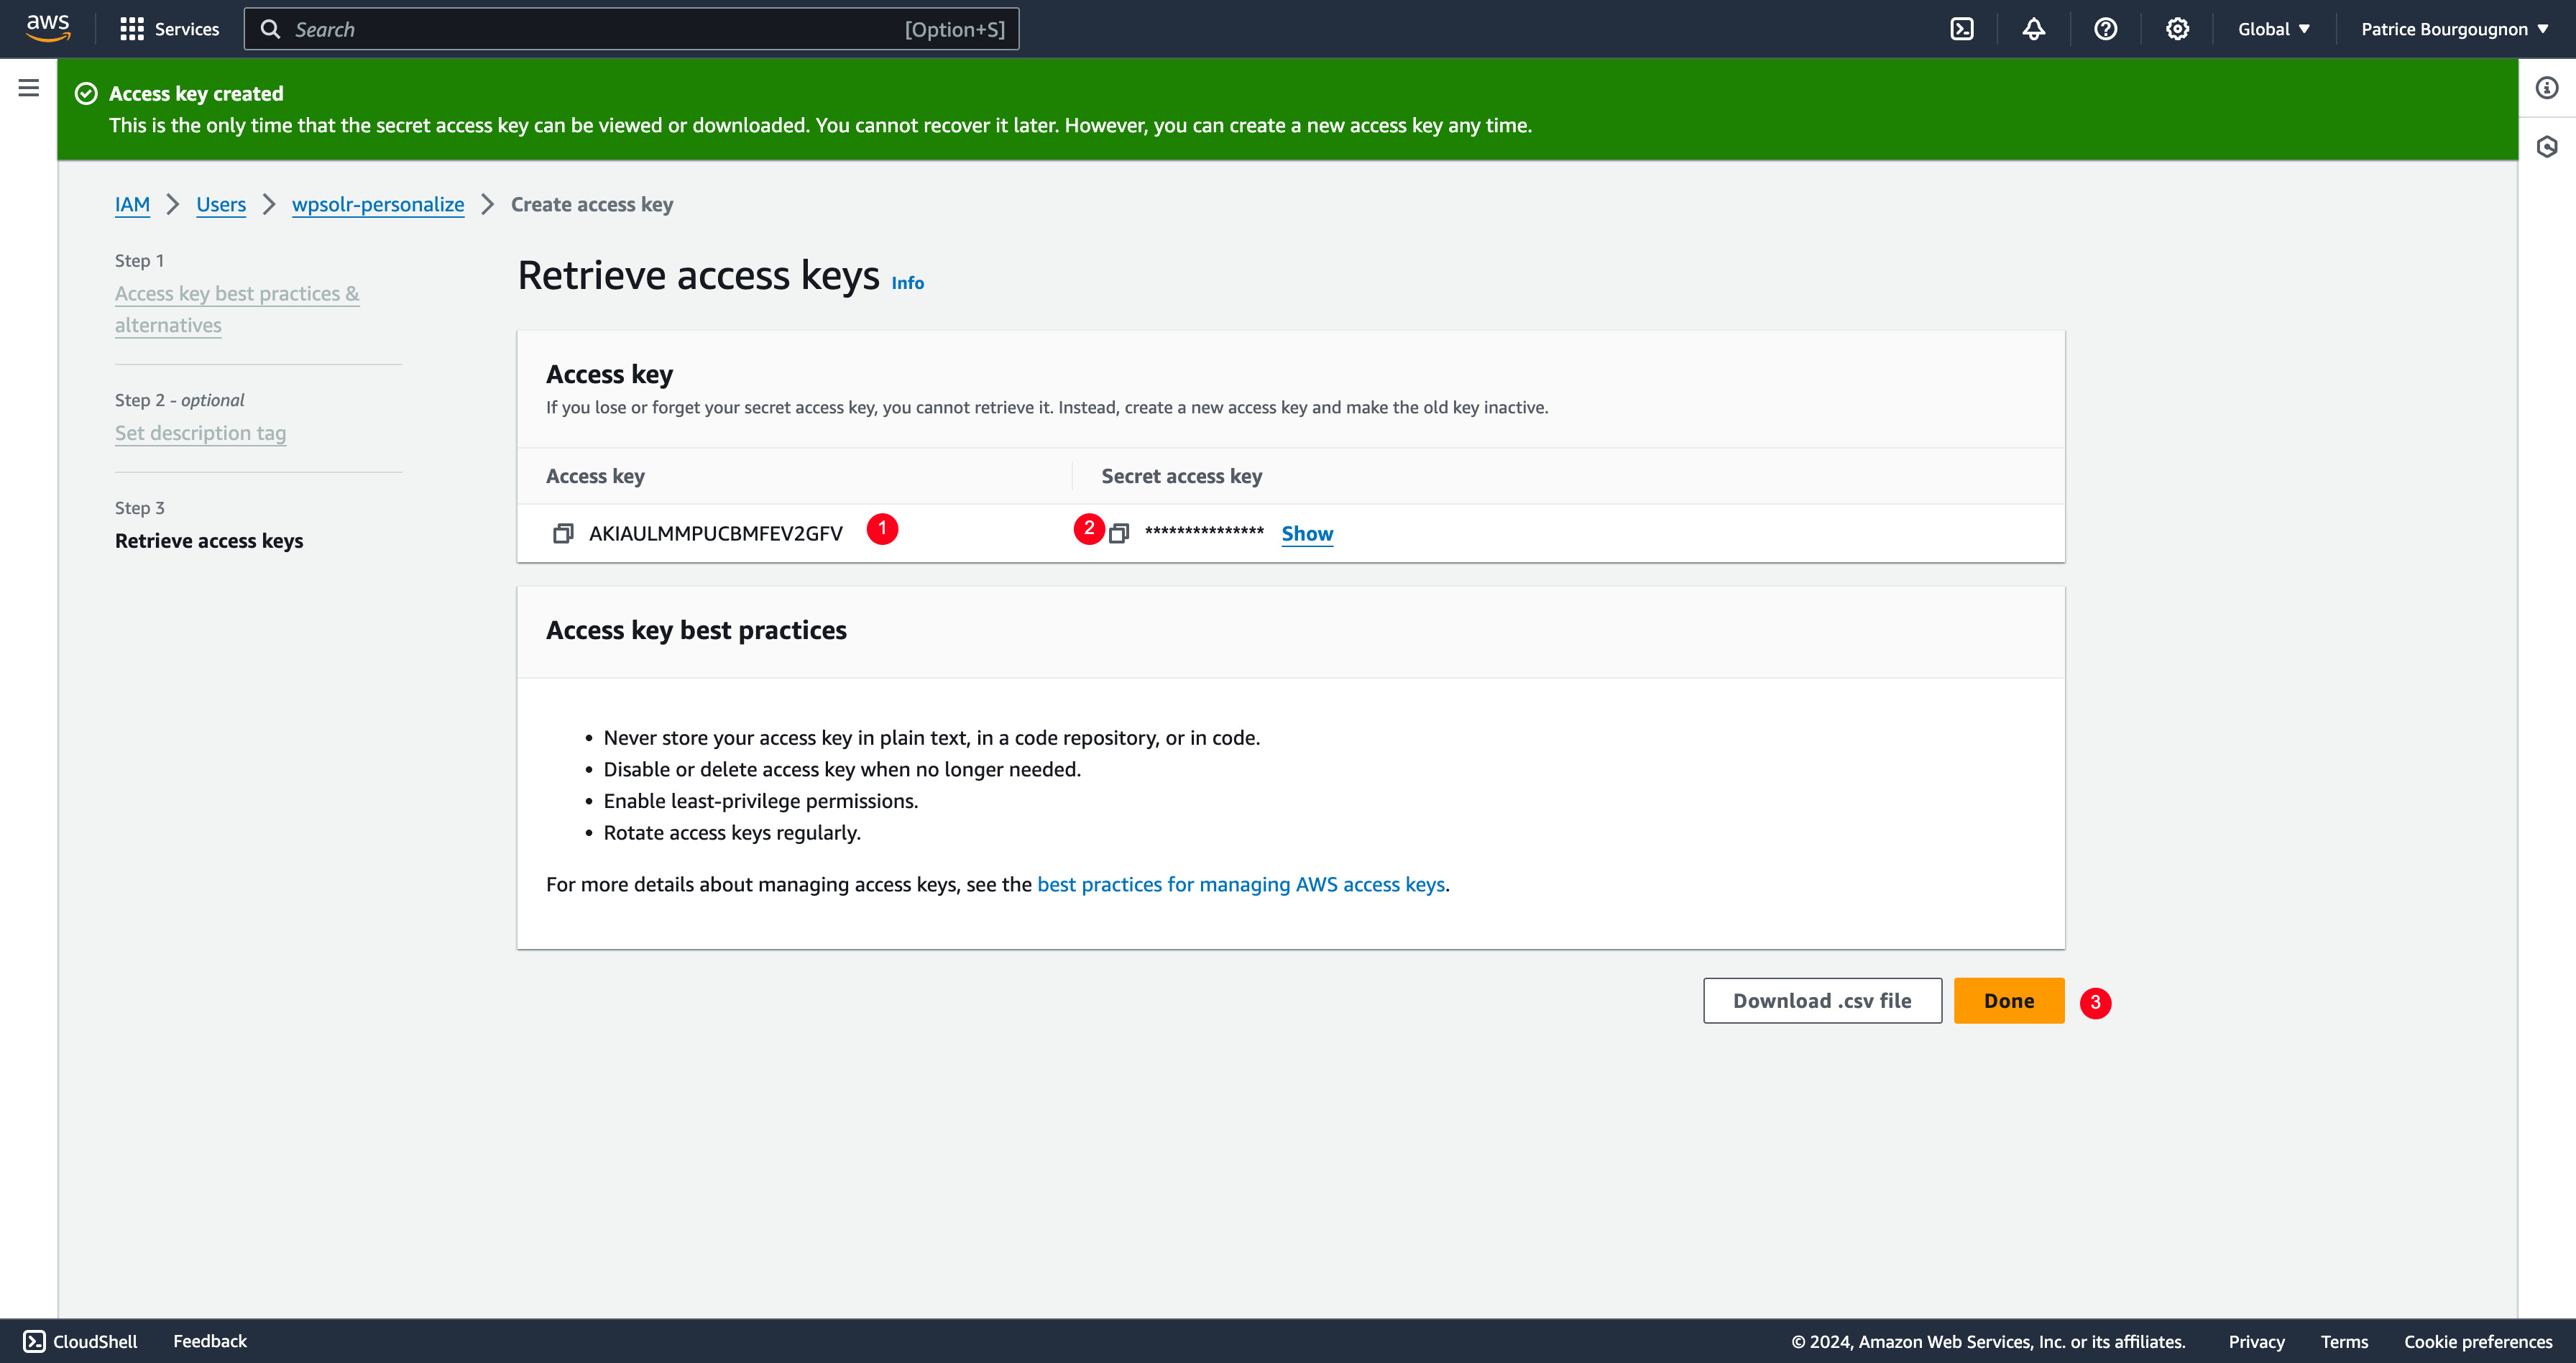
- Copy access key for later when creating the settings from WPSolr
- Copy secret access key for later when creating the settings from WPSolr
- Click on button “Done” to confirm the key creation.
Create a WPSolr index
Display the index screen
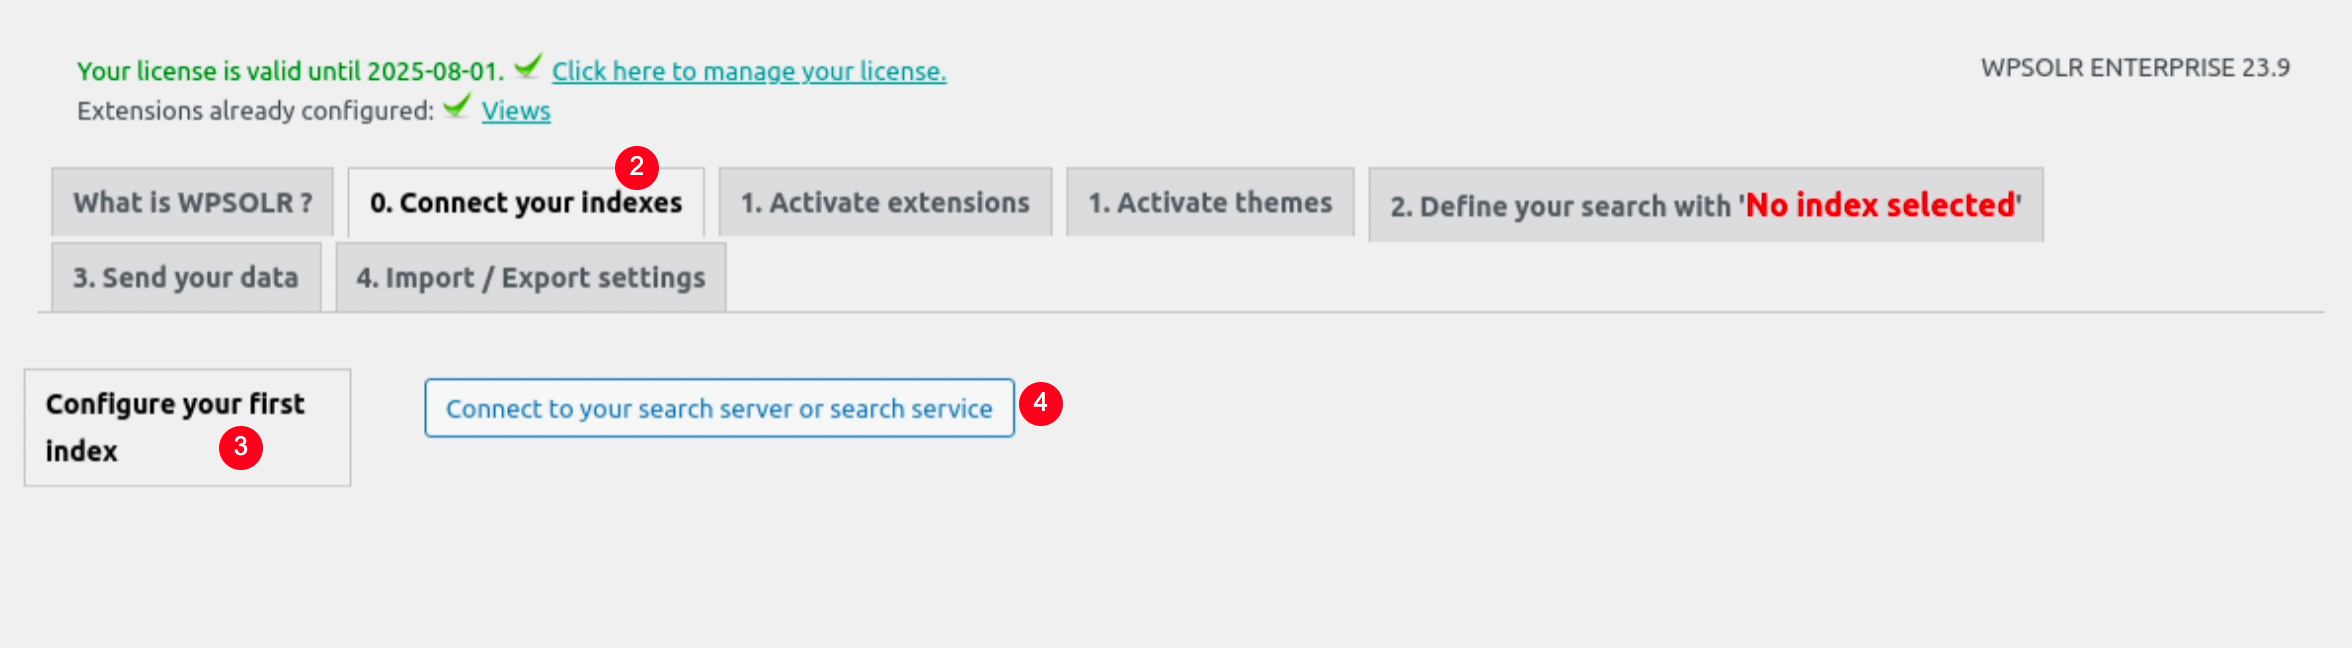
- Click on the WPSolr menu
- Click on the “0. Connect your indexes” tab
- Click on the “Configure your index” tab
- Click on the “Connect to your server or service” button
Select the “Amazon Personalize” engine
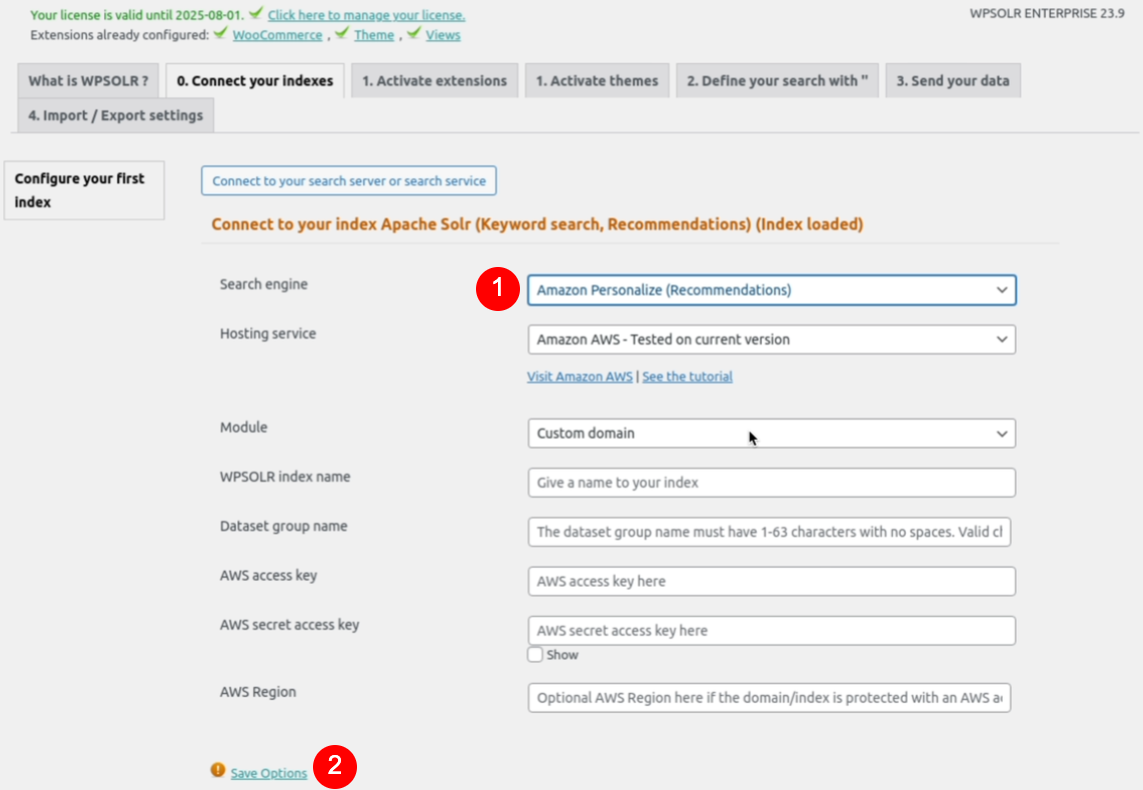
- Choose engine “Amazon Personalize” in the select box
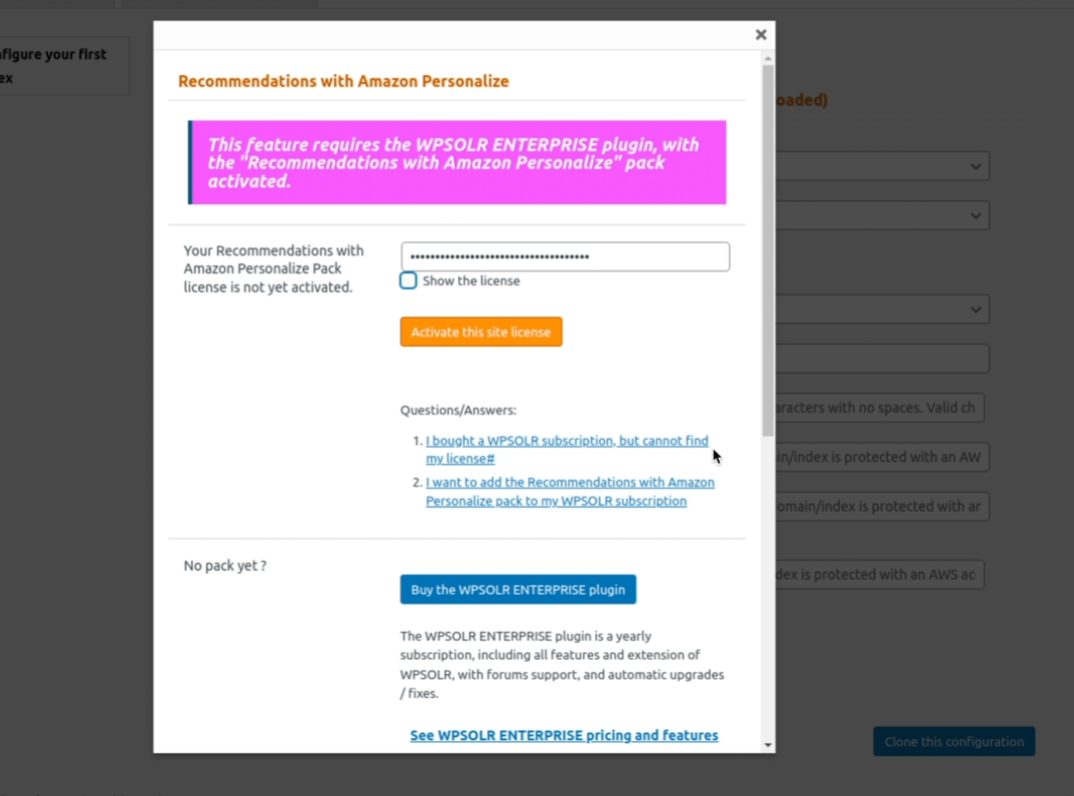
- Click the license link to activate your license for engine “Amazon Personalize”
Activate the license for the “Amazon Personalize” engine
Set your index settings
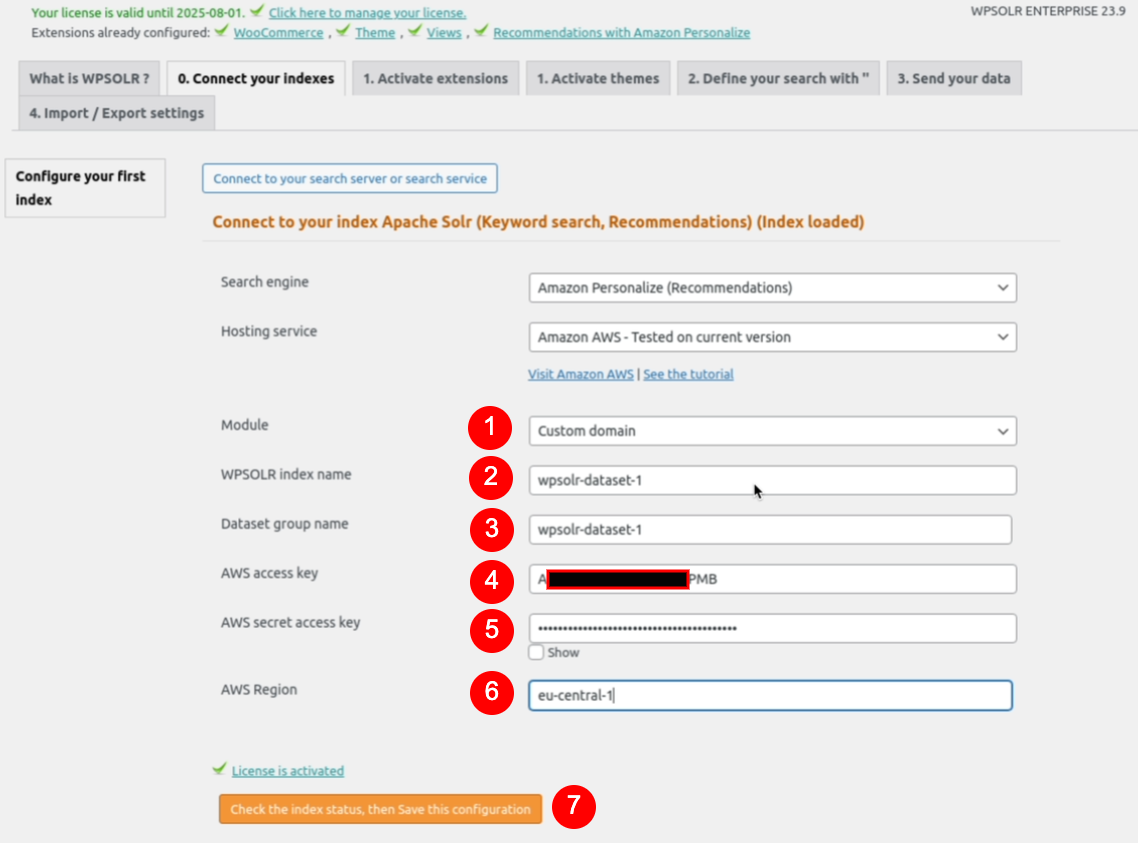
- Select a domain among “Custom” and “E-commerce”
- Set a name for your index inside WPSolr
- Set a name for your Amazon Personalize dataset group
- Copy the AWS access key ID you create earlier
- Copy the AWS secret access key you create earlier
- Set the AWS region you want to create your Amazon Personalize settings into
- Click the button “Check the index status”. It will create a dataset goup and its 3 datasets on your behalf.
Check the datasets and their schemas created for your index
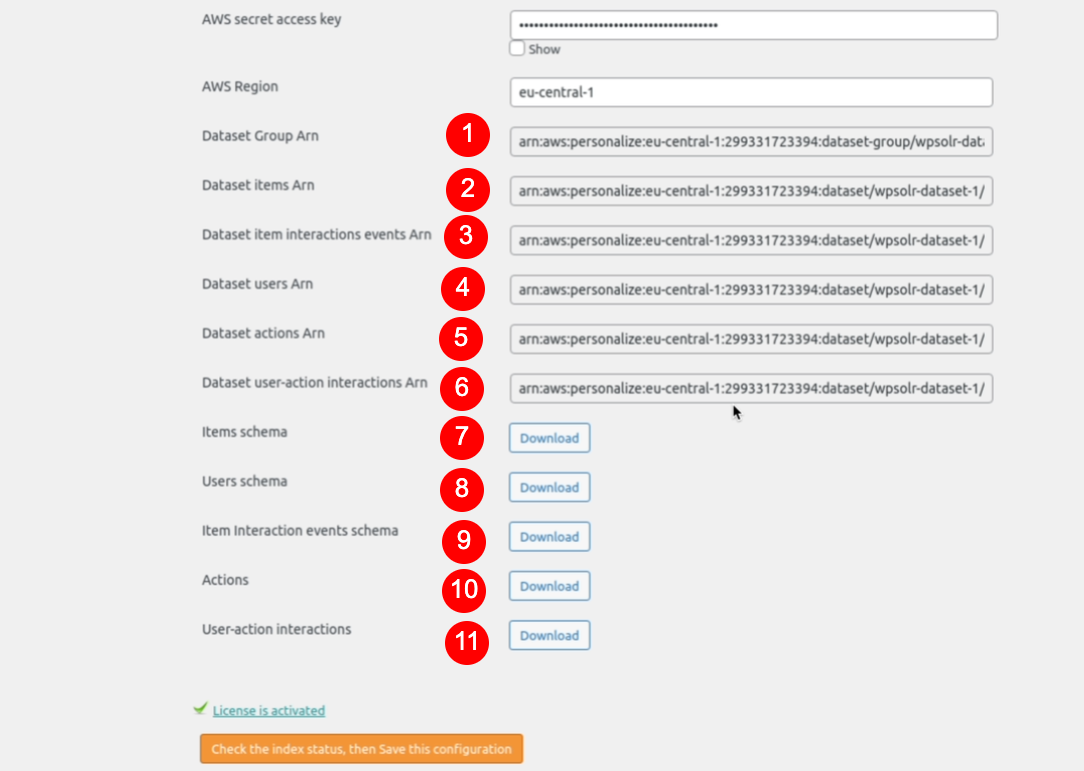
- Arn of the dataset group created for this index
- Arn of the dataset items created for this index
- Arn of the dataset item interaction events created for this index
- Arn of the dataset users created for this index
- Arn of the dataset actions created for this index
- Arn of the dataset user-action interactions events created for this index
- Click “Download” to see the items schema in a pop-up
- Click “Download” to see the user schema in a pop-up
- Click “Download” to see the item interaction events schema in a pop-up
- Click “Download” to see the actions schema in a pop-up
- Click “Download” to see the user-action interactions events schema in a pop-up
Configure the data to index
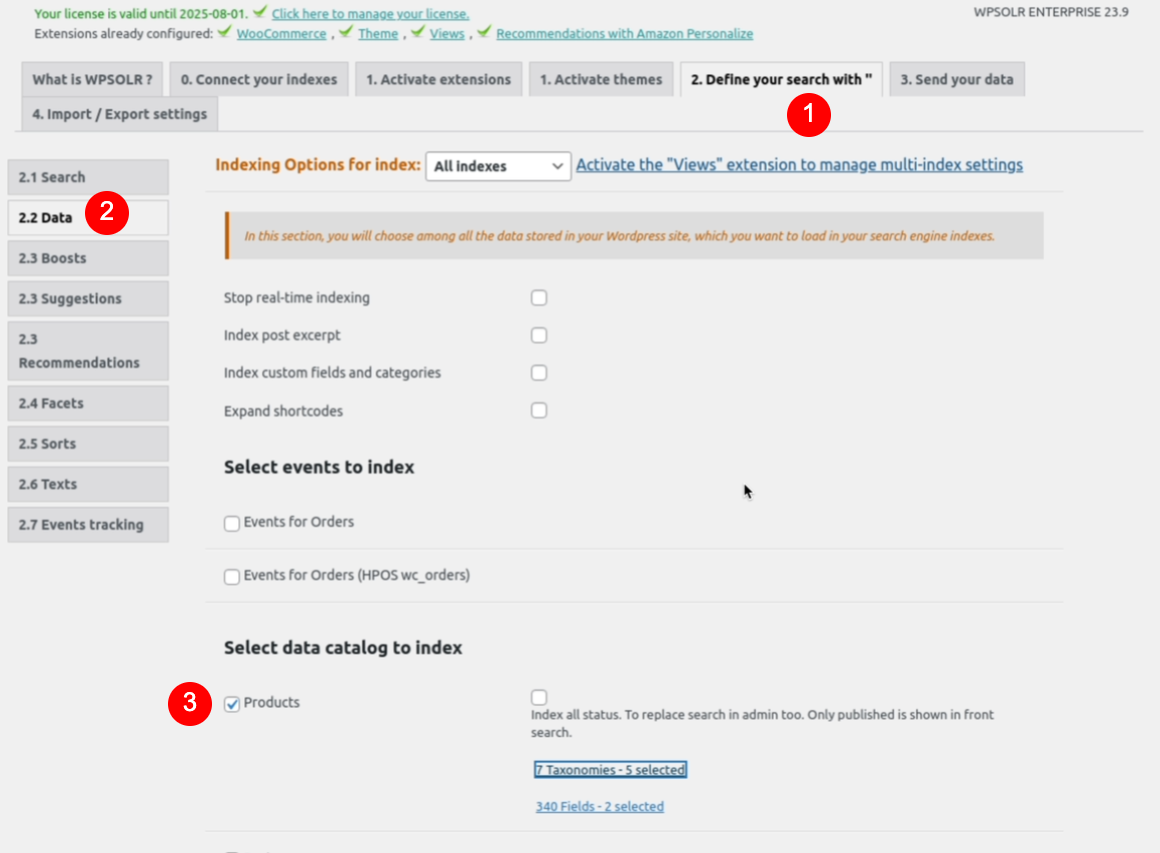
Configure post types to index
Configure order events to index
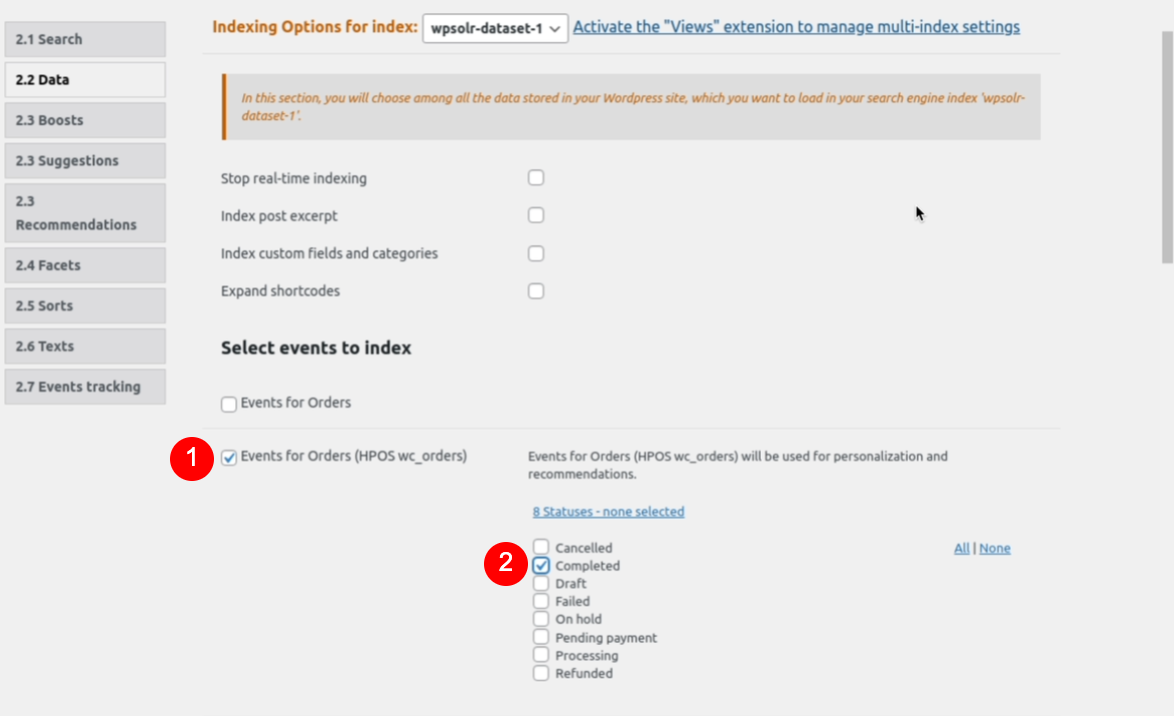
- Select the order event type (post type or HPOS)
- Select the order status that will be indexed (here only completed order events are indexed)
Index data
Select the data to be indexed
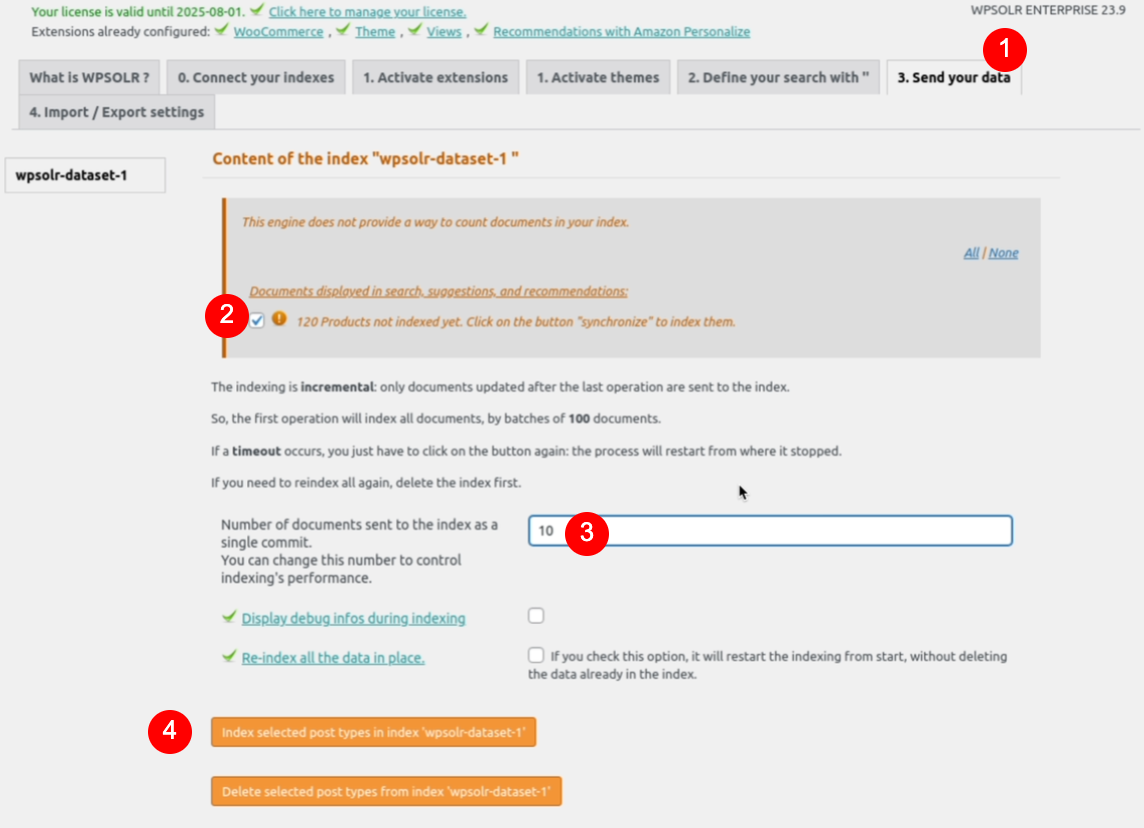
- Select the indexing tab
- Select the data you want to index
- Limit the batch size to “10” (maximum accepted by Amazon Personalize)
- Click on the button to start indexing
Index the data in batch of 10 maximum
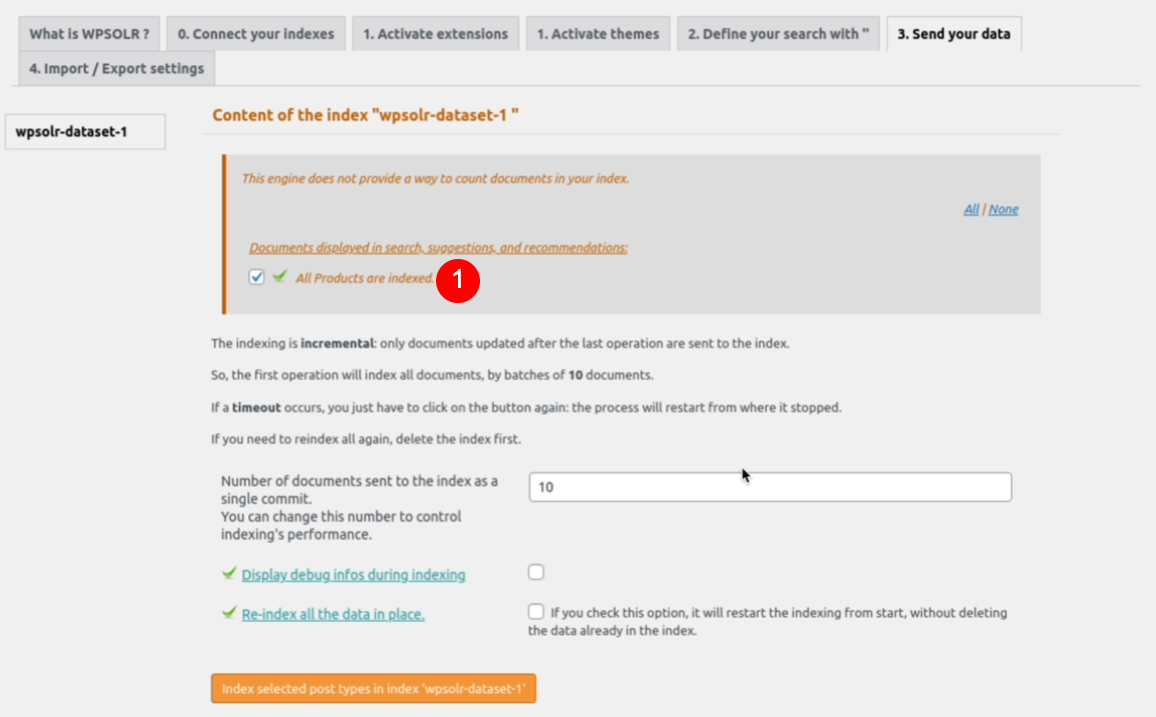
- All the data is indexed
Vizualize the schema of items in WPSolr
After indexing, the items schema was updated automatically and uploaded to the items dataset. You can visualize it on the server, or on your WPSolr index.
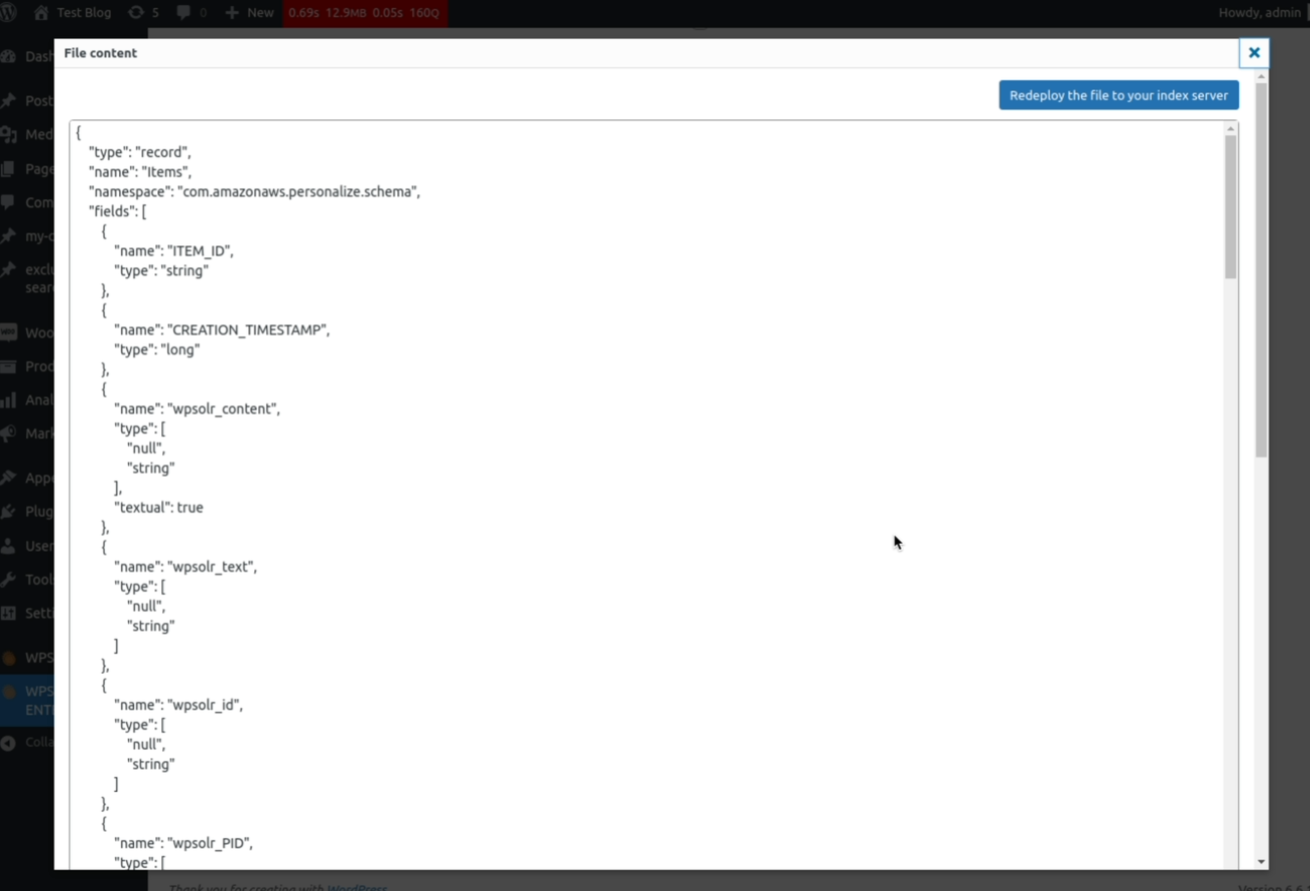
- Items schema displayed on the index when clicking on the download item schema button.
Vizualize the schema of items in Amazon Personalize
Open the Amazon personalize service
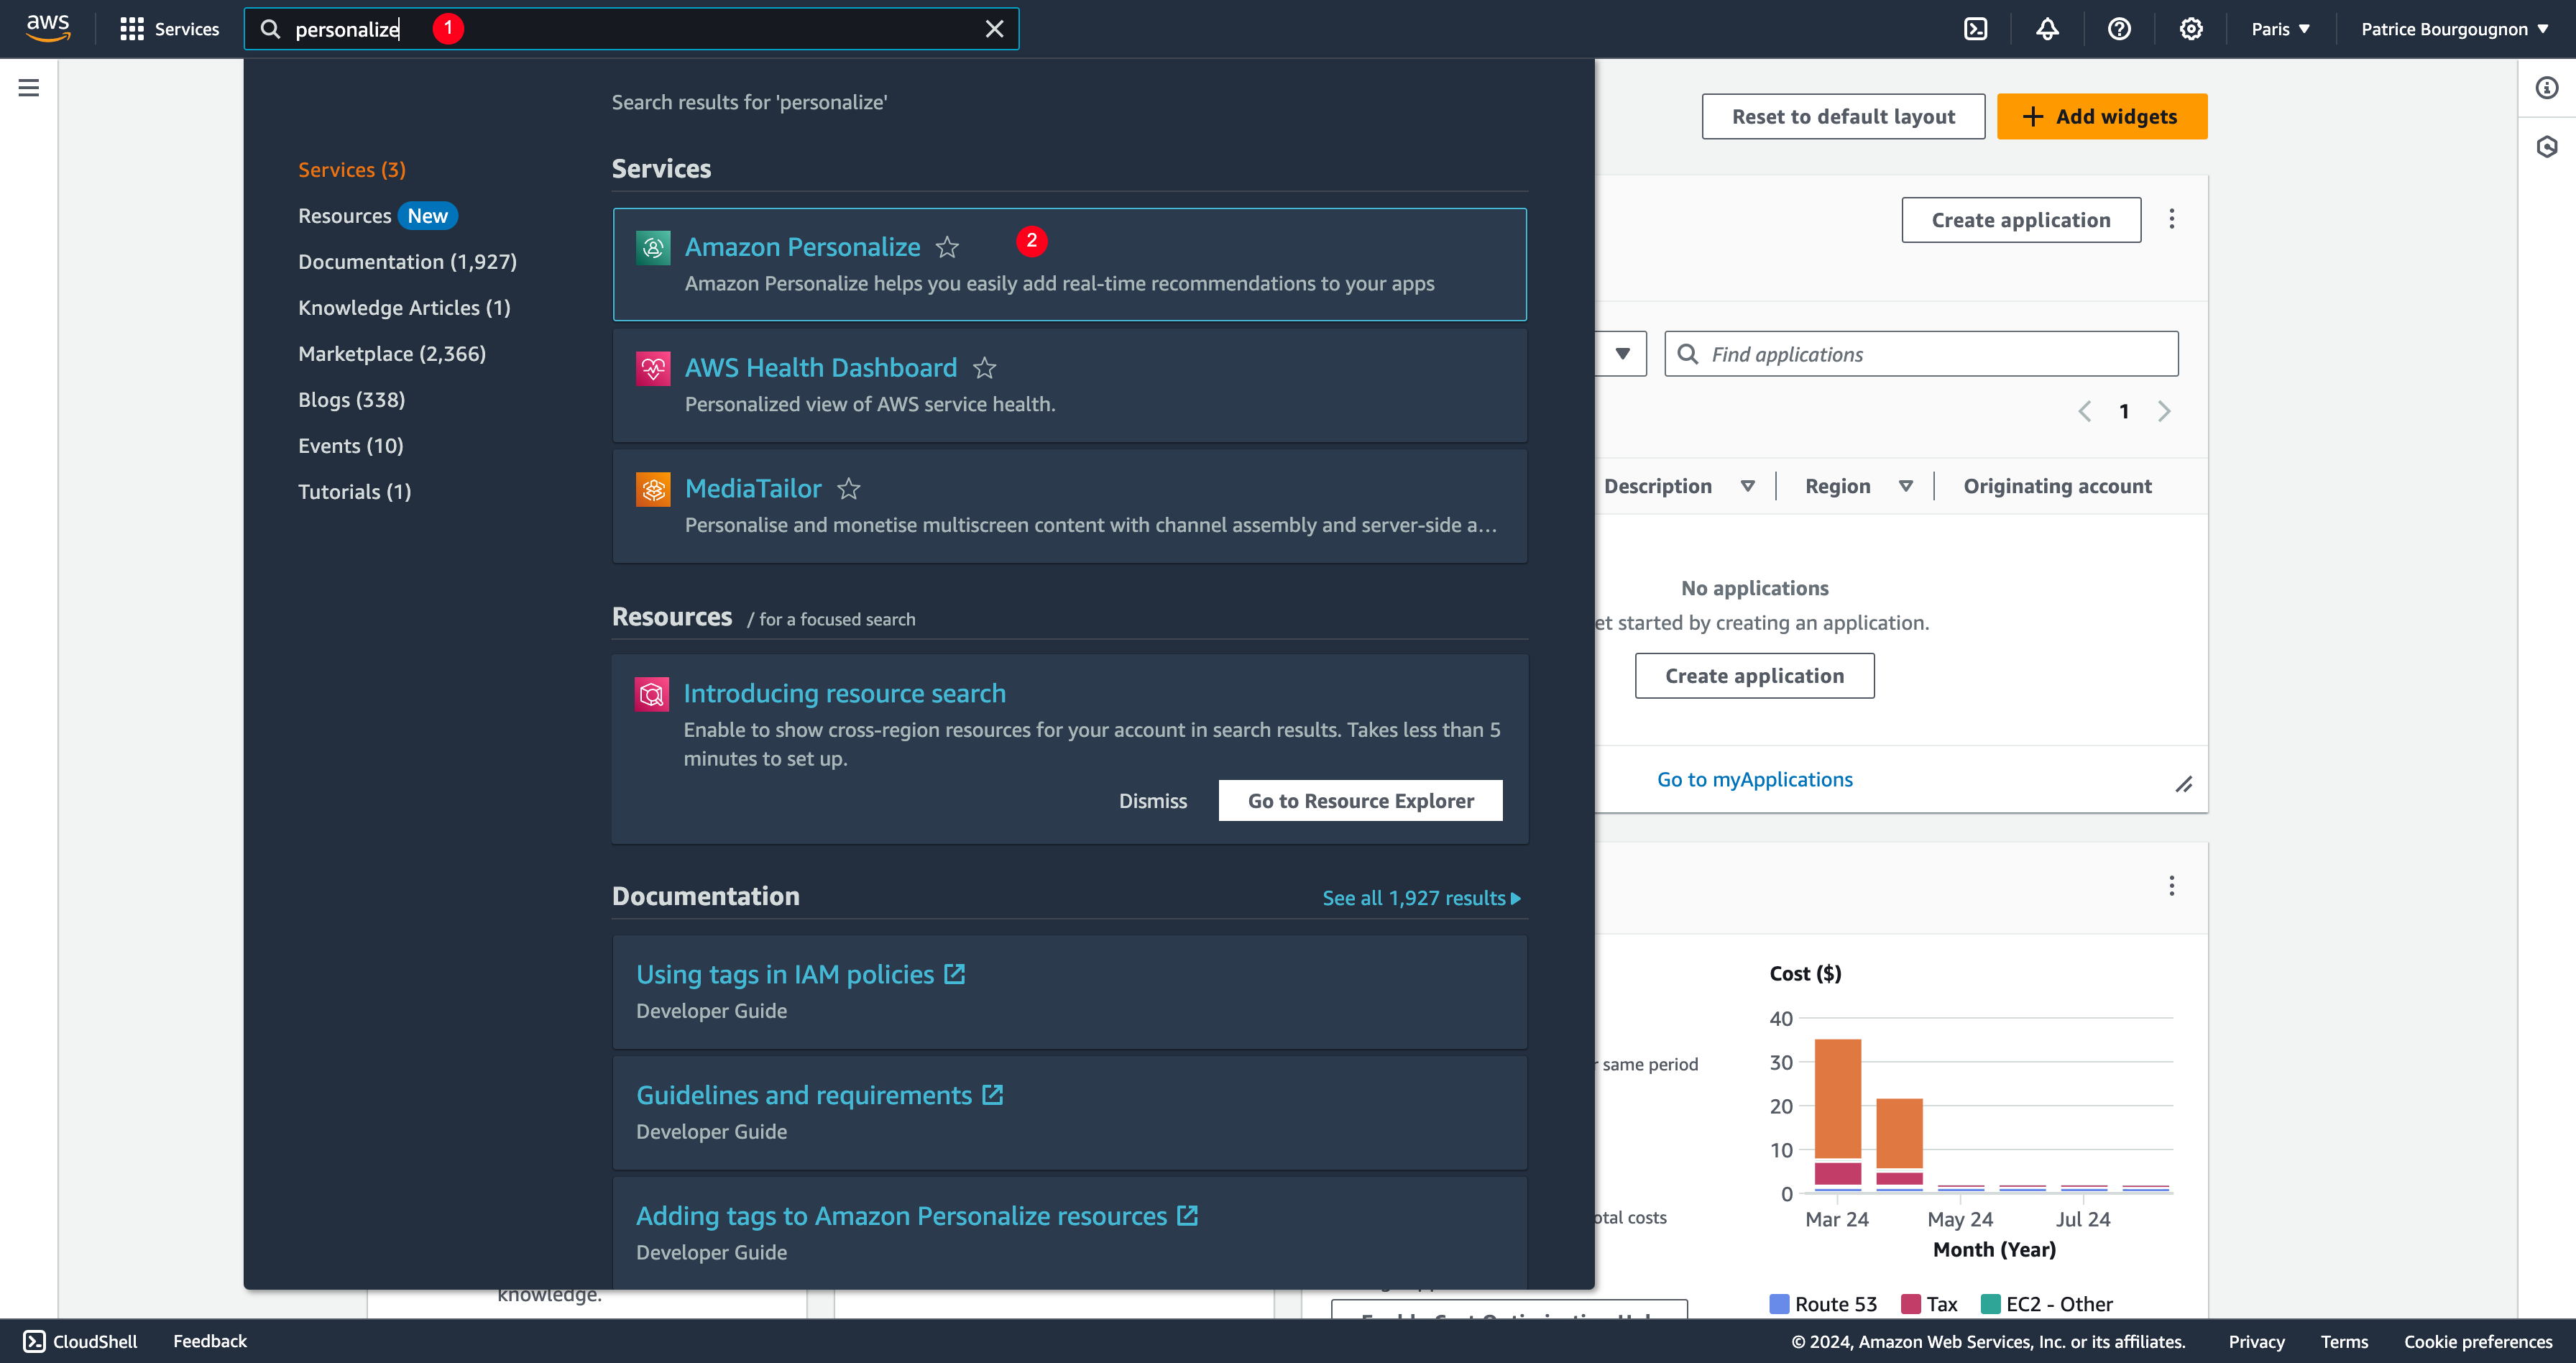
- Type “personalize” in the search bar
- Click on the “Amazon Personalize” service in search results
Select the AWS region
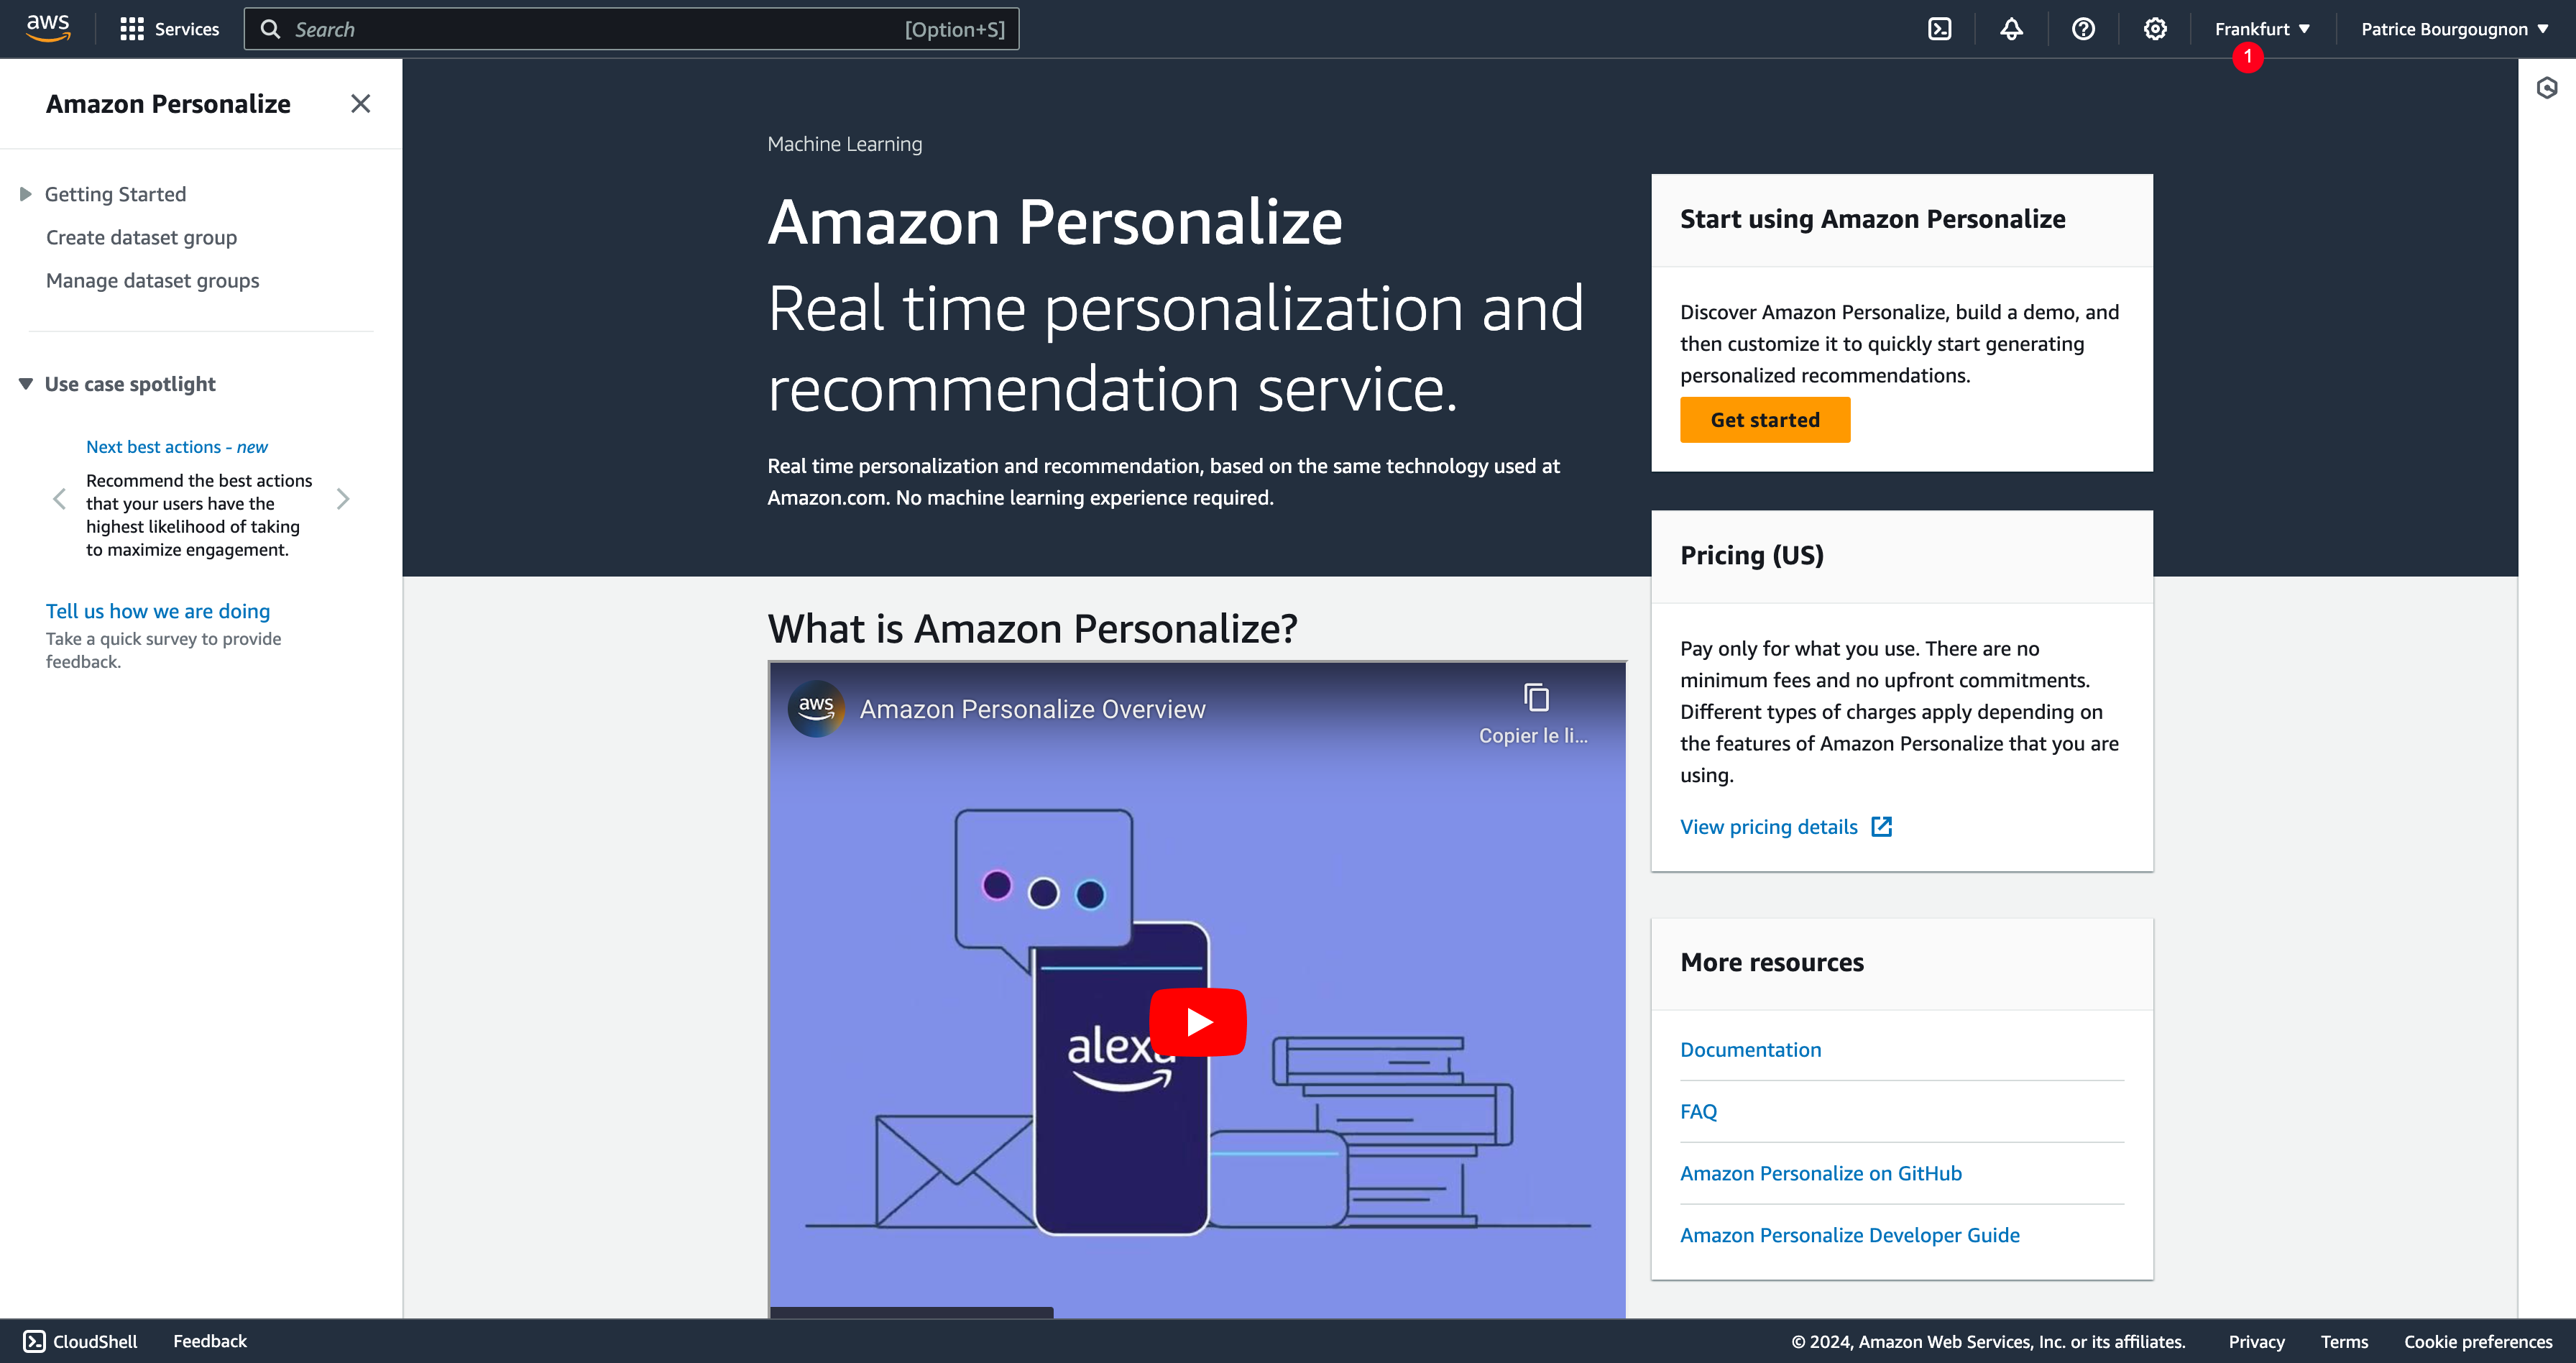
- Select the same region you selected in WPSolr settings
Check the datasets created automatically for your index
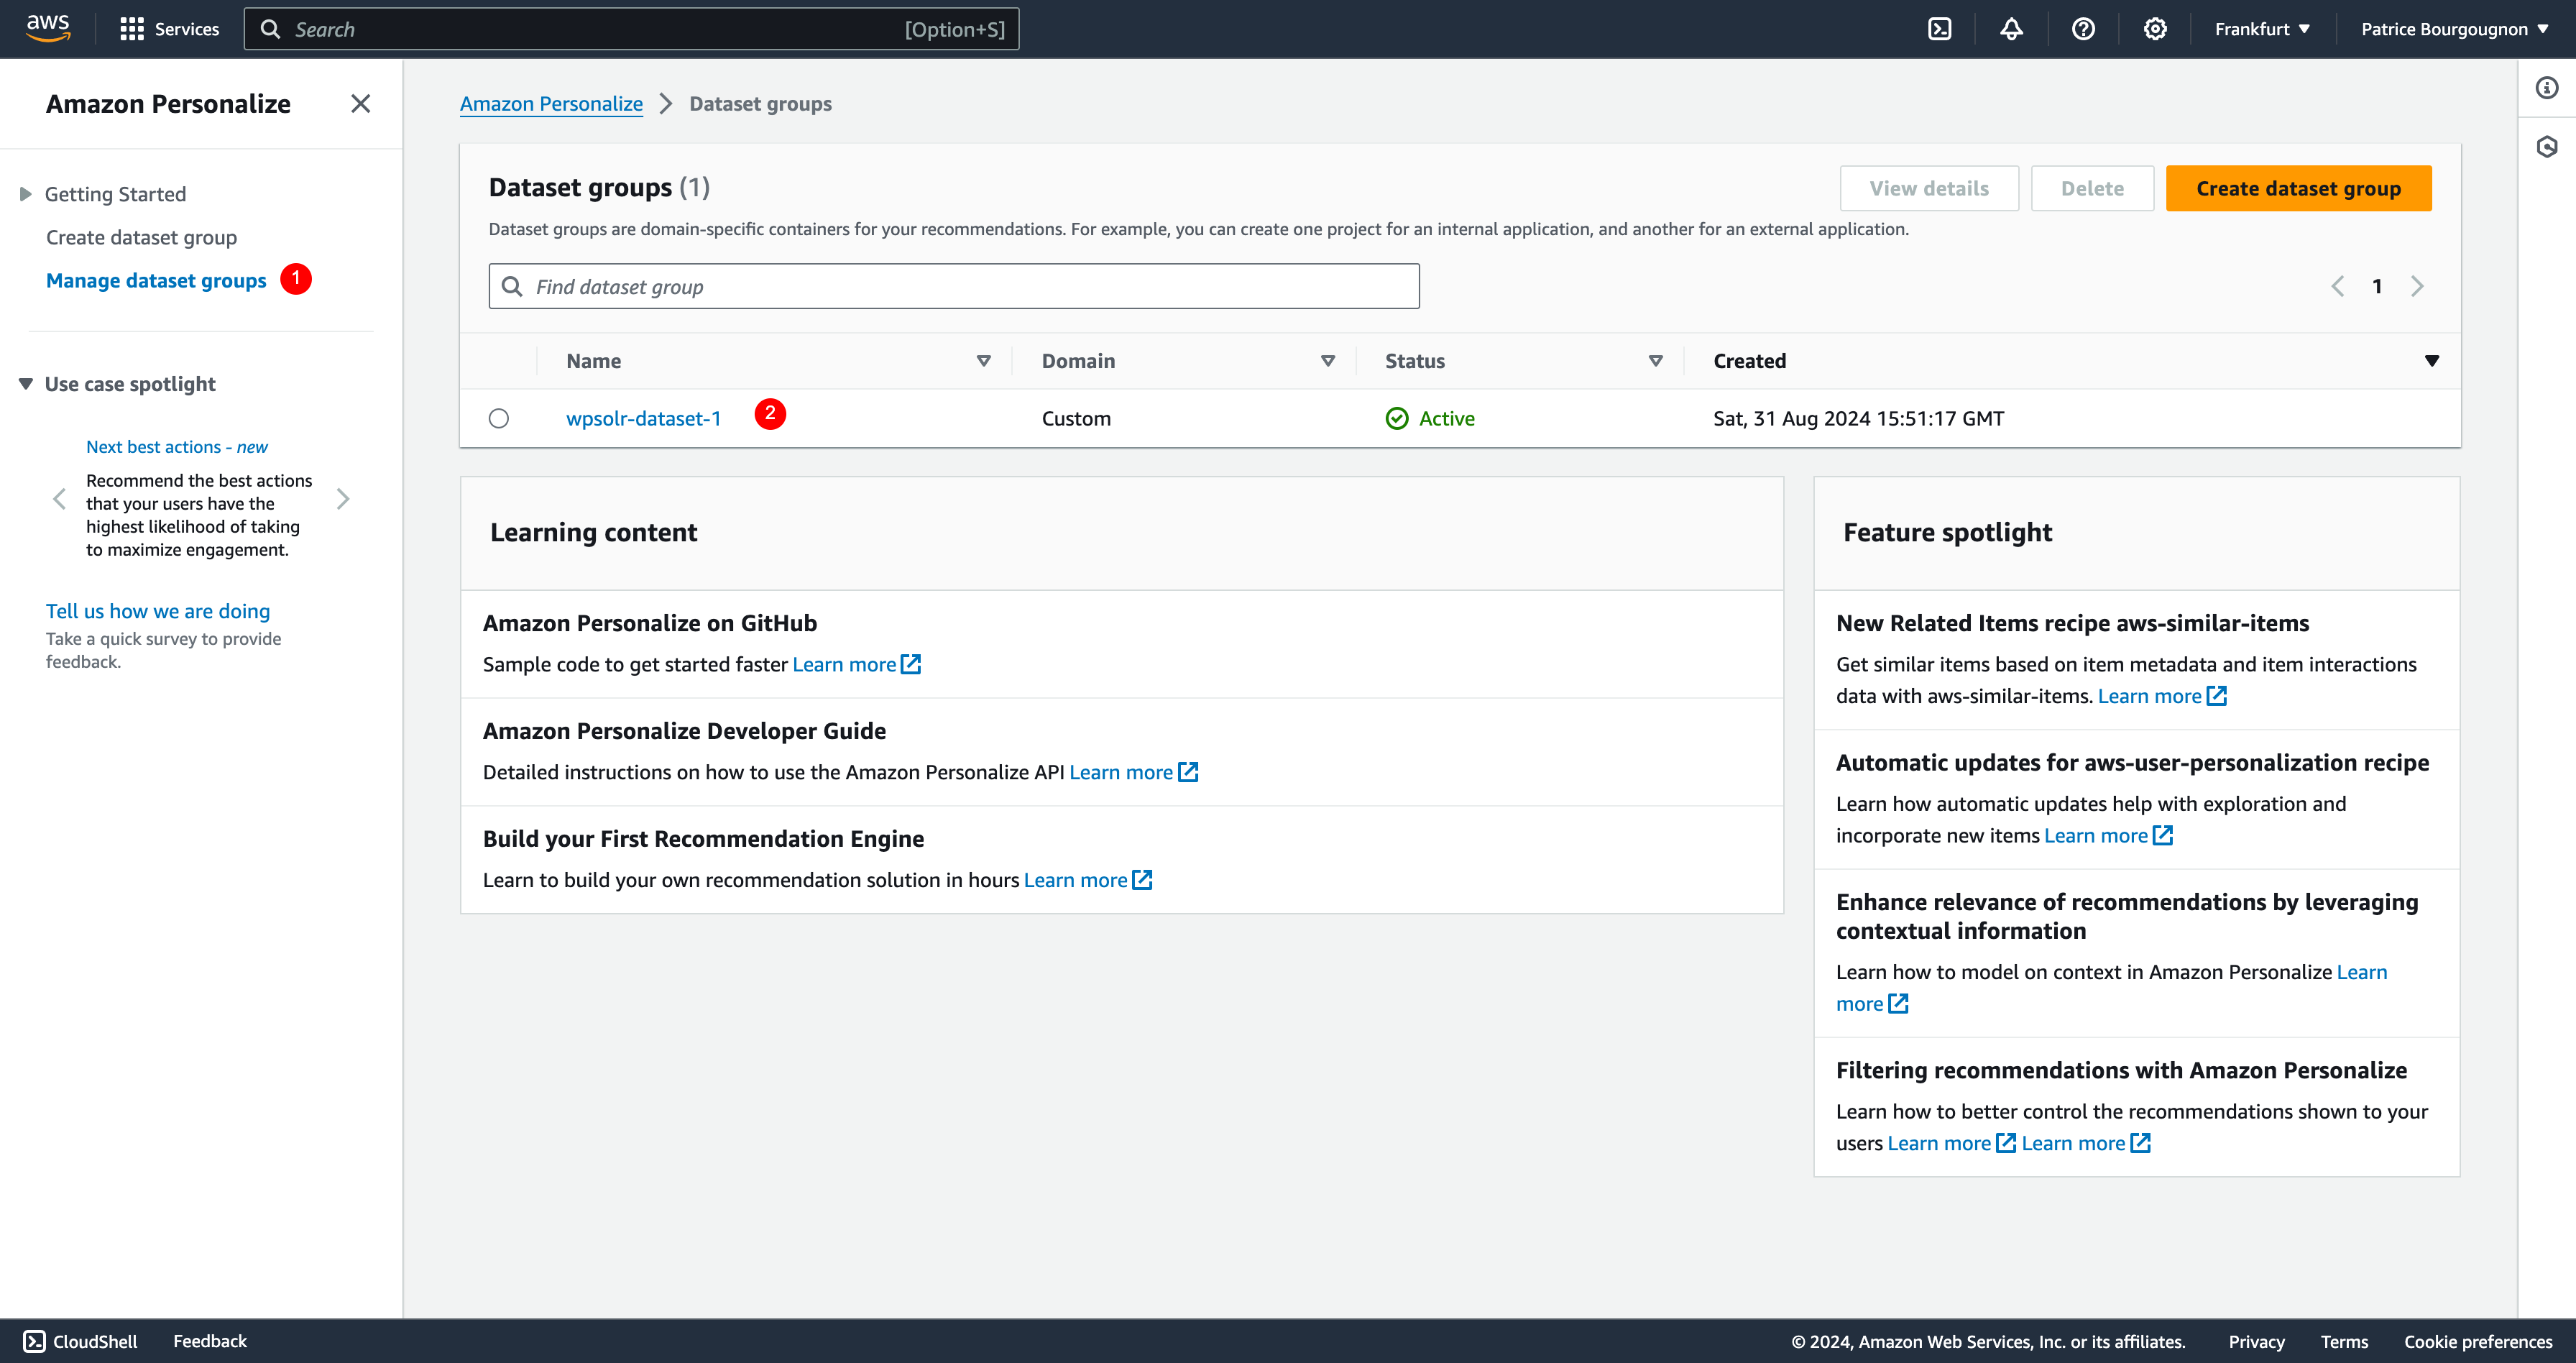
- Click the dataset groups menu
- Click on the dataset group to show its details
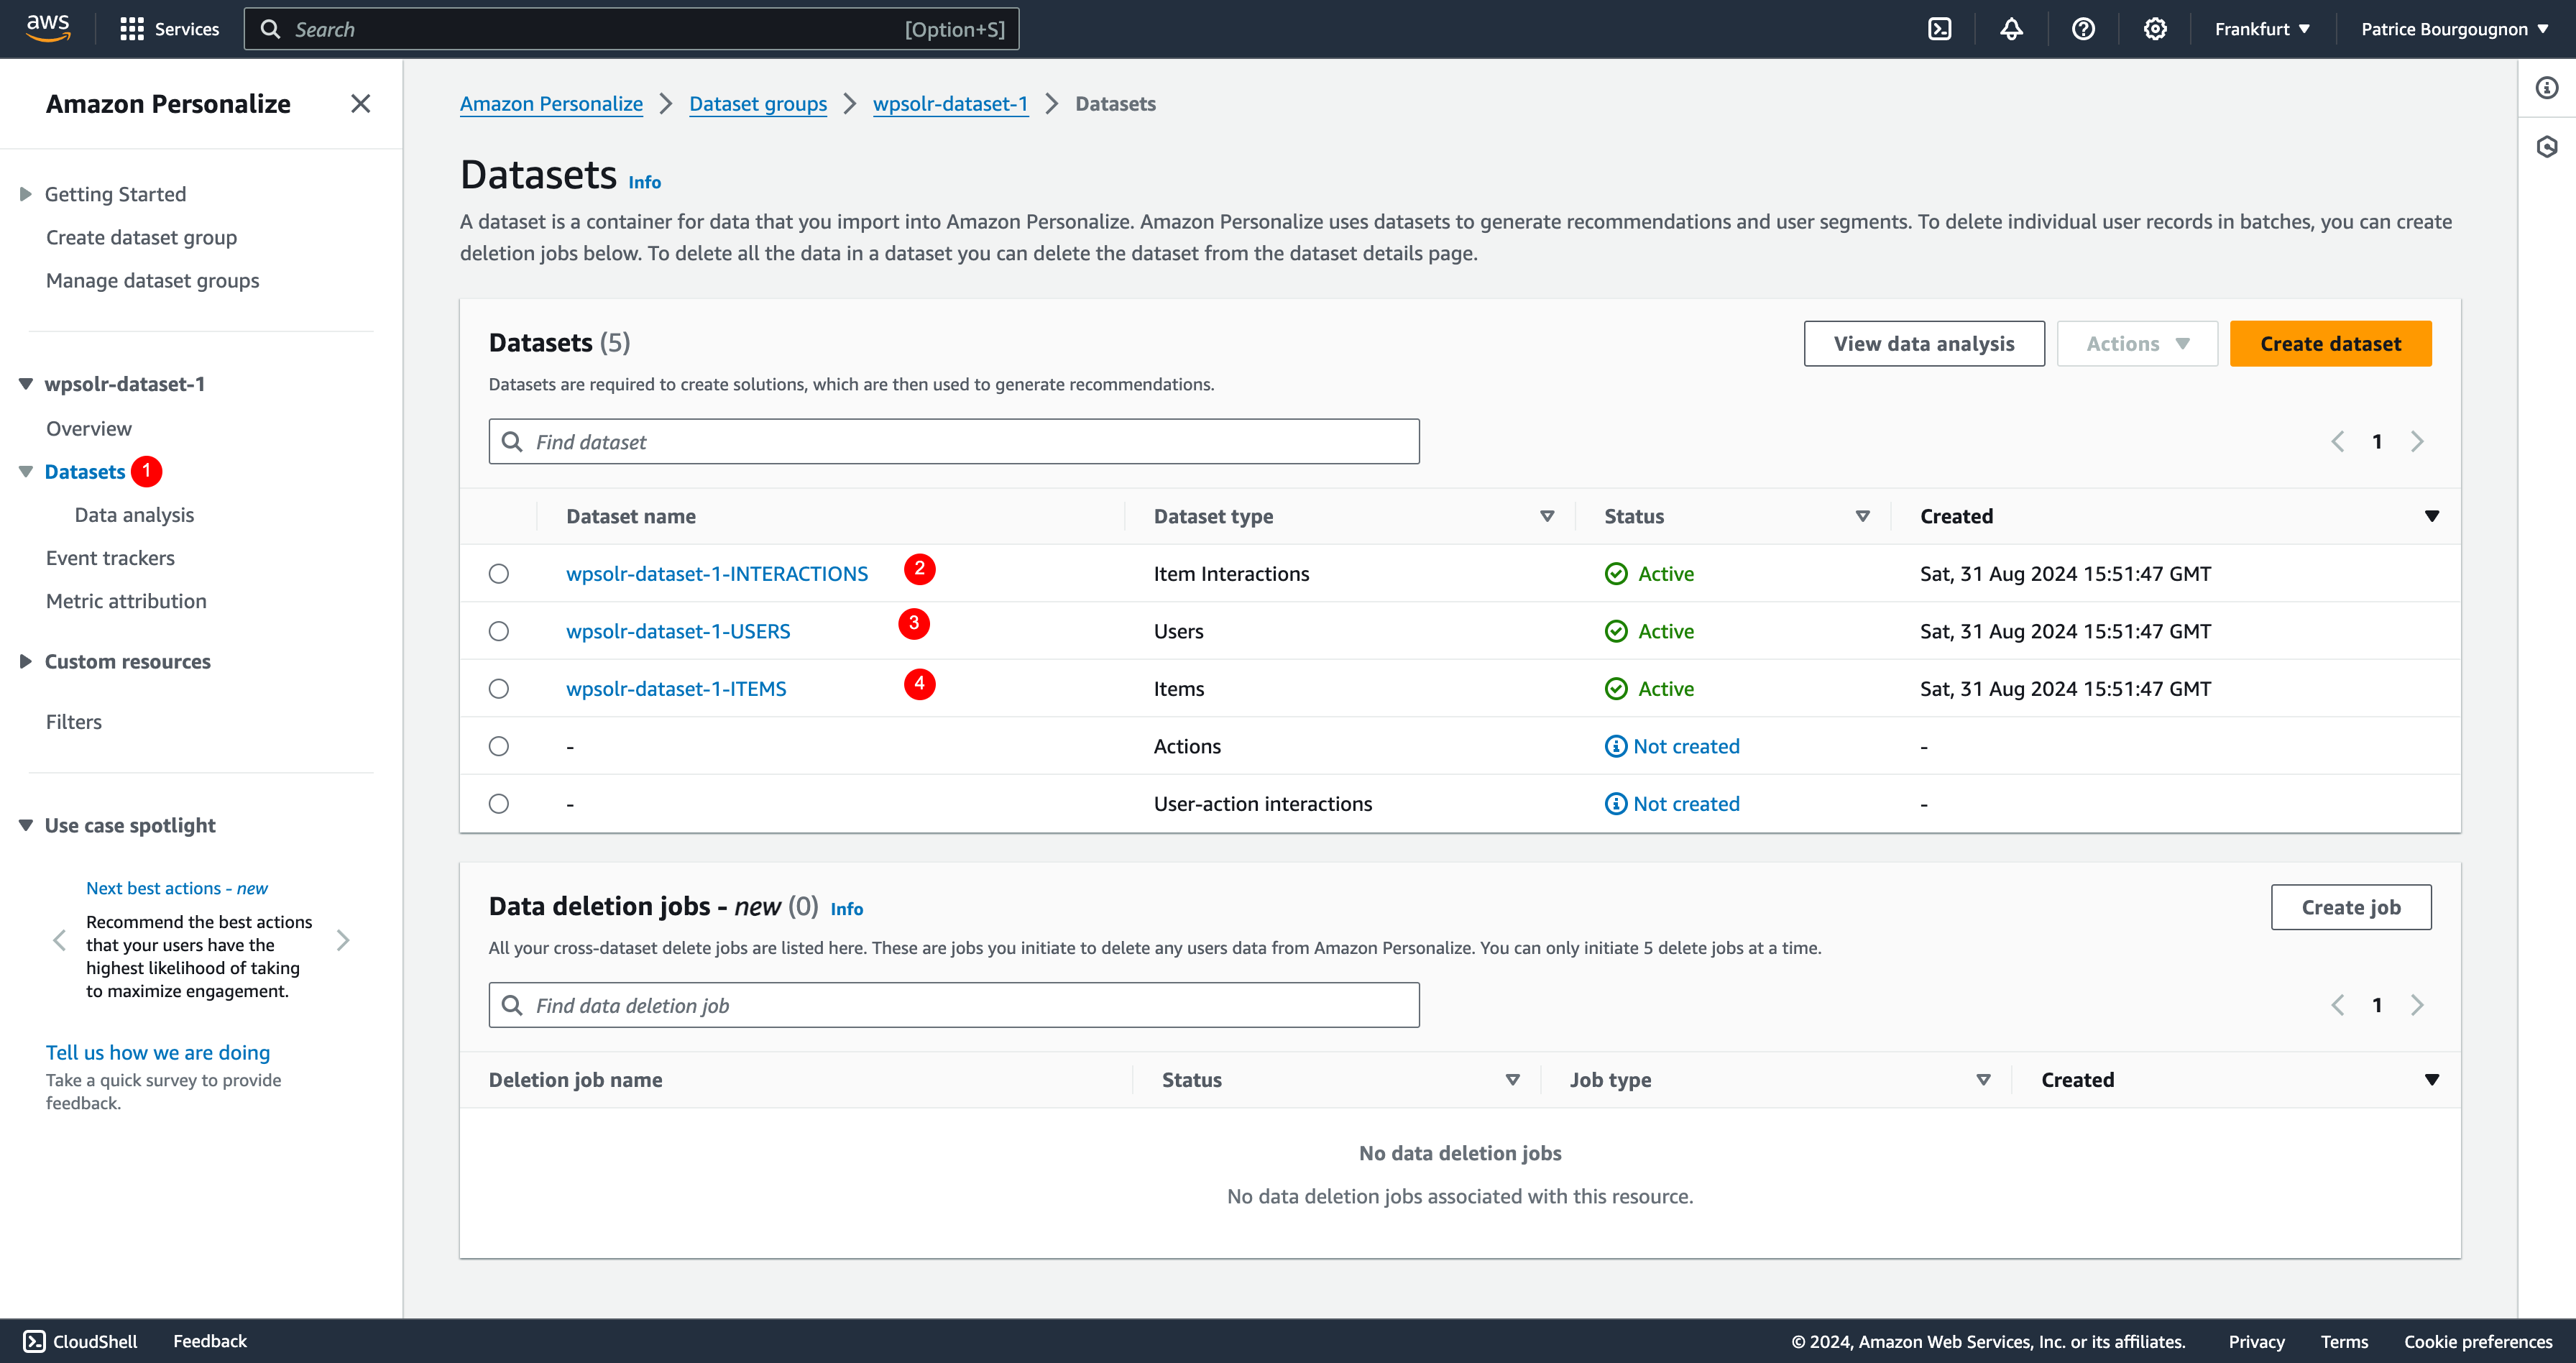
- Click the datasets menu
- Click on the datasets to show their details
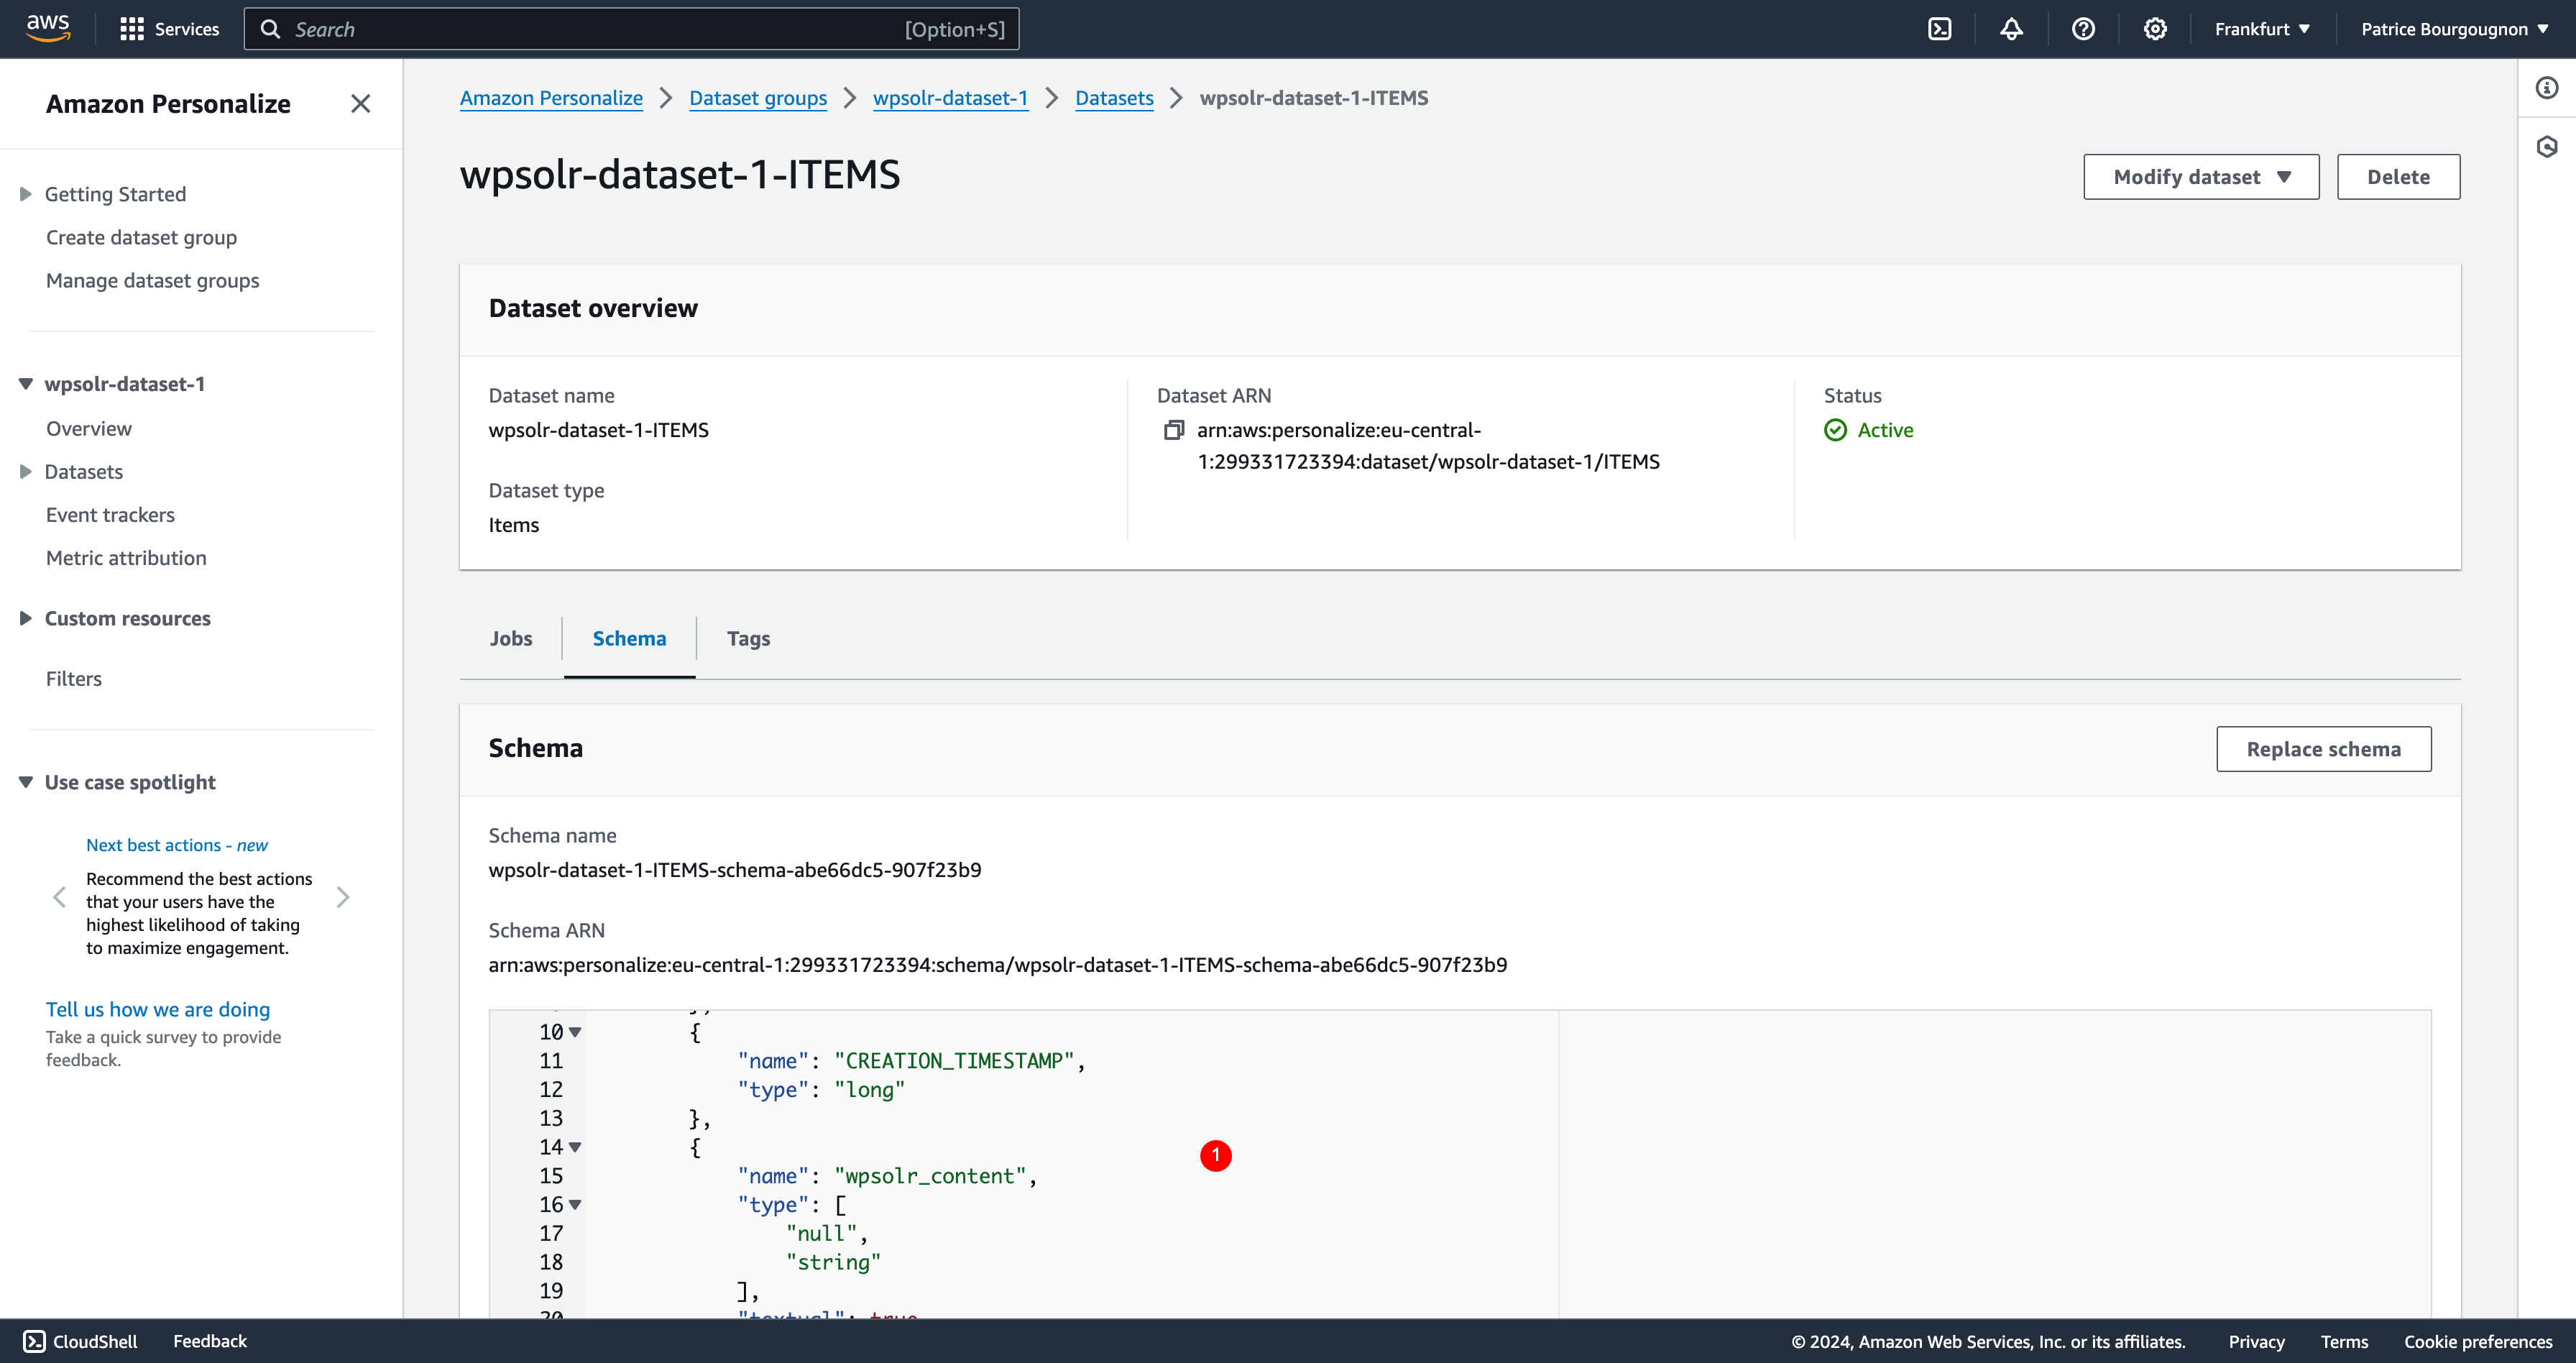
- Items schema displayed on the items dataset on Amazon Personalize.
Index events
Select the events to be indexed
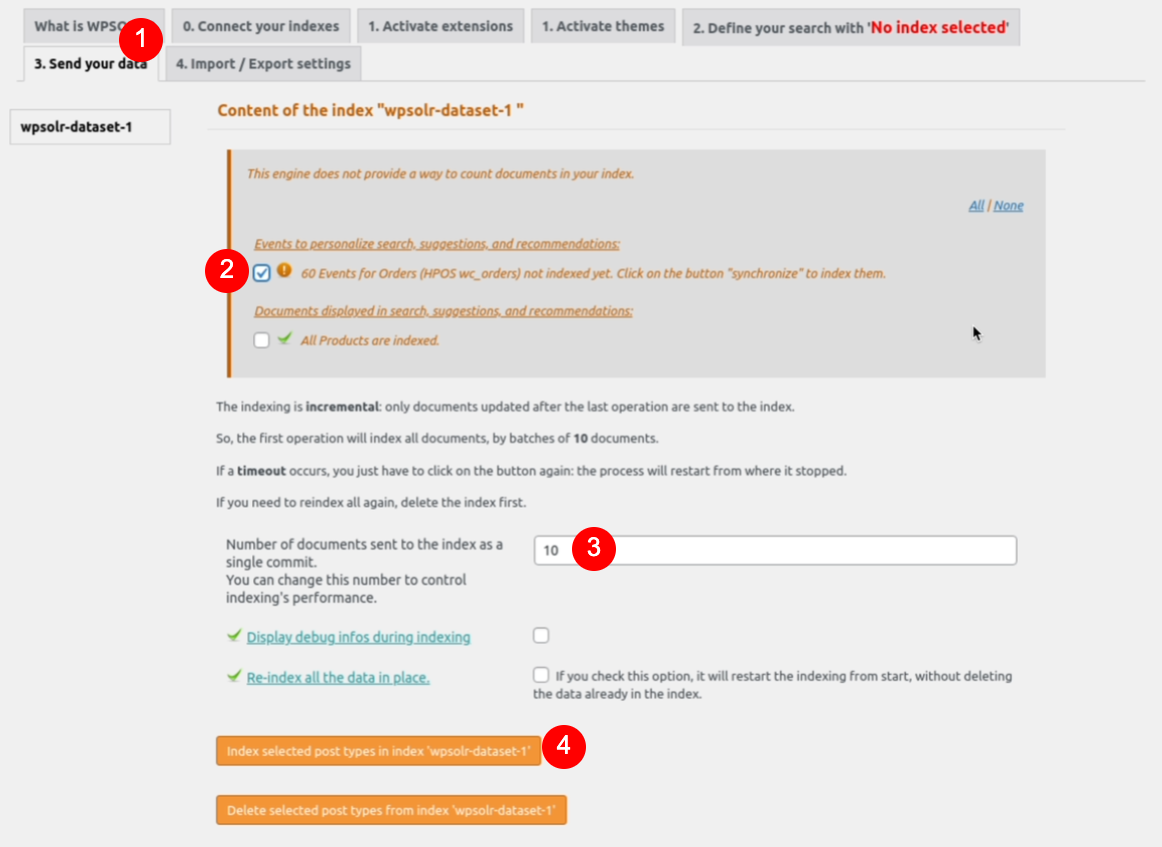
- Select the indexing tab
- Select the events you want to index
- Limit the batch size to “10” (maximum accepted by Amazon Personalize)
- Click on the button to start indexing
Index the events in batch of 10 maximum
- All the events are indexed
Index test events
To help you test your settings on a dev/test environment, WPSolr provides a way to generate “fake” events that will be ingested in the item-interaction events dataset.
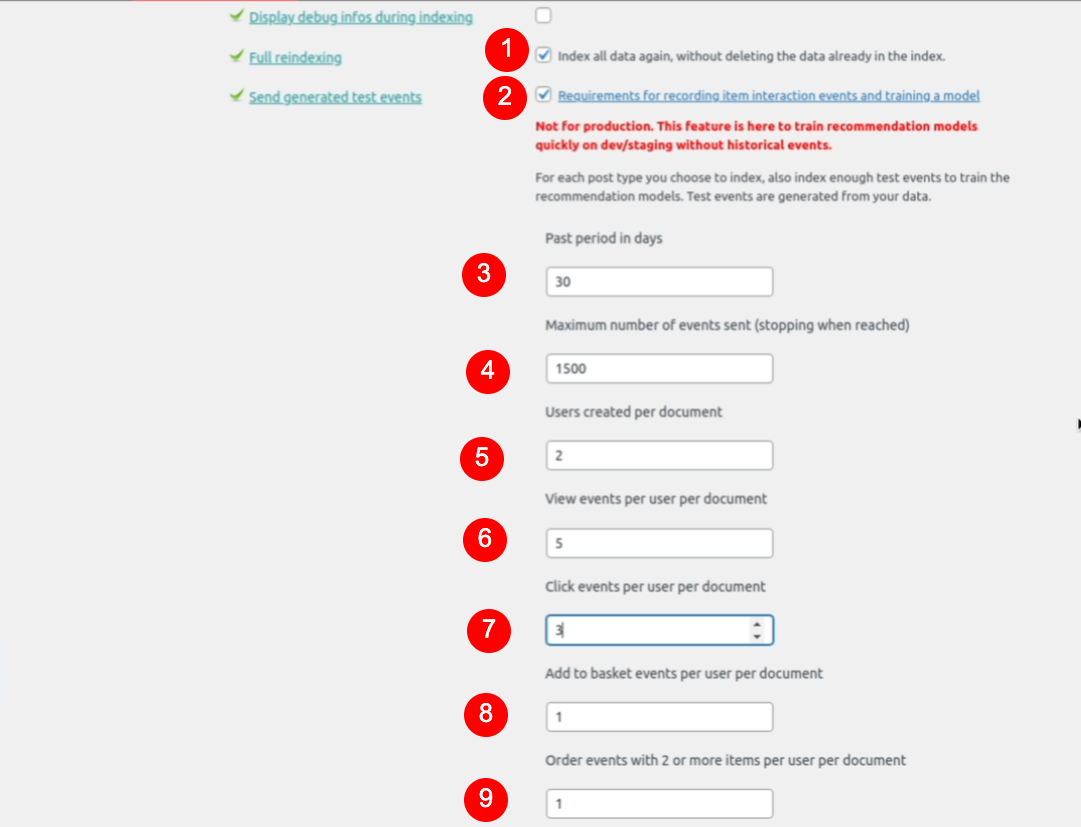
- Check full reindex option if you already indexed your post types
- Check option “Send test events”
- Set a period in the past for the test events. Their creation date will be generated randomly in this period
- Set a maximum of events. If it is reached, the process will stop. Just know that AmaZon personalize requires 1000 events minimum to allow training a model (creating a solution version)
- Set a number of users created per post type indexed
- Set a number of “view” events created per post type indexed
- Set a number of “click” created per post type indexed
- Set a number of “add to basket” created per post type indexed
- Set a number of “purchase” events created per post type indexed
Analyse your datasets
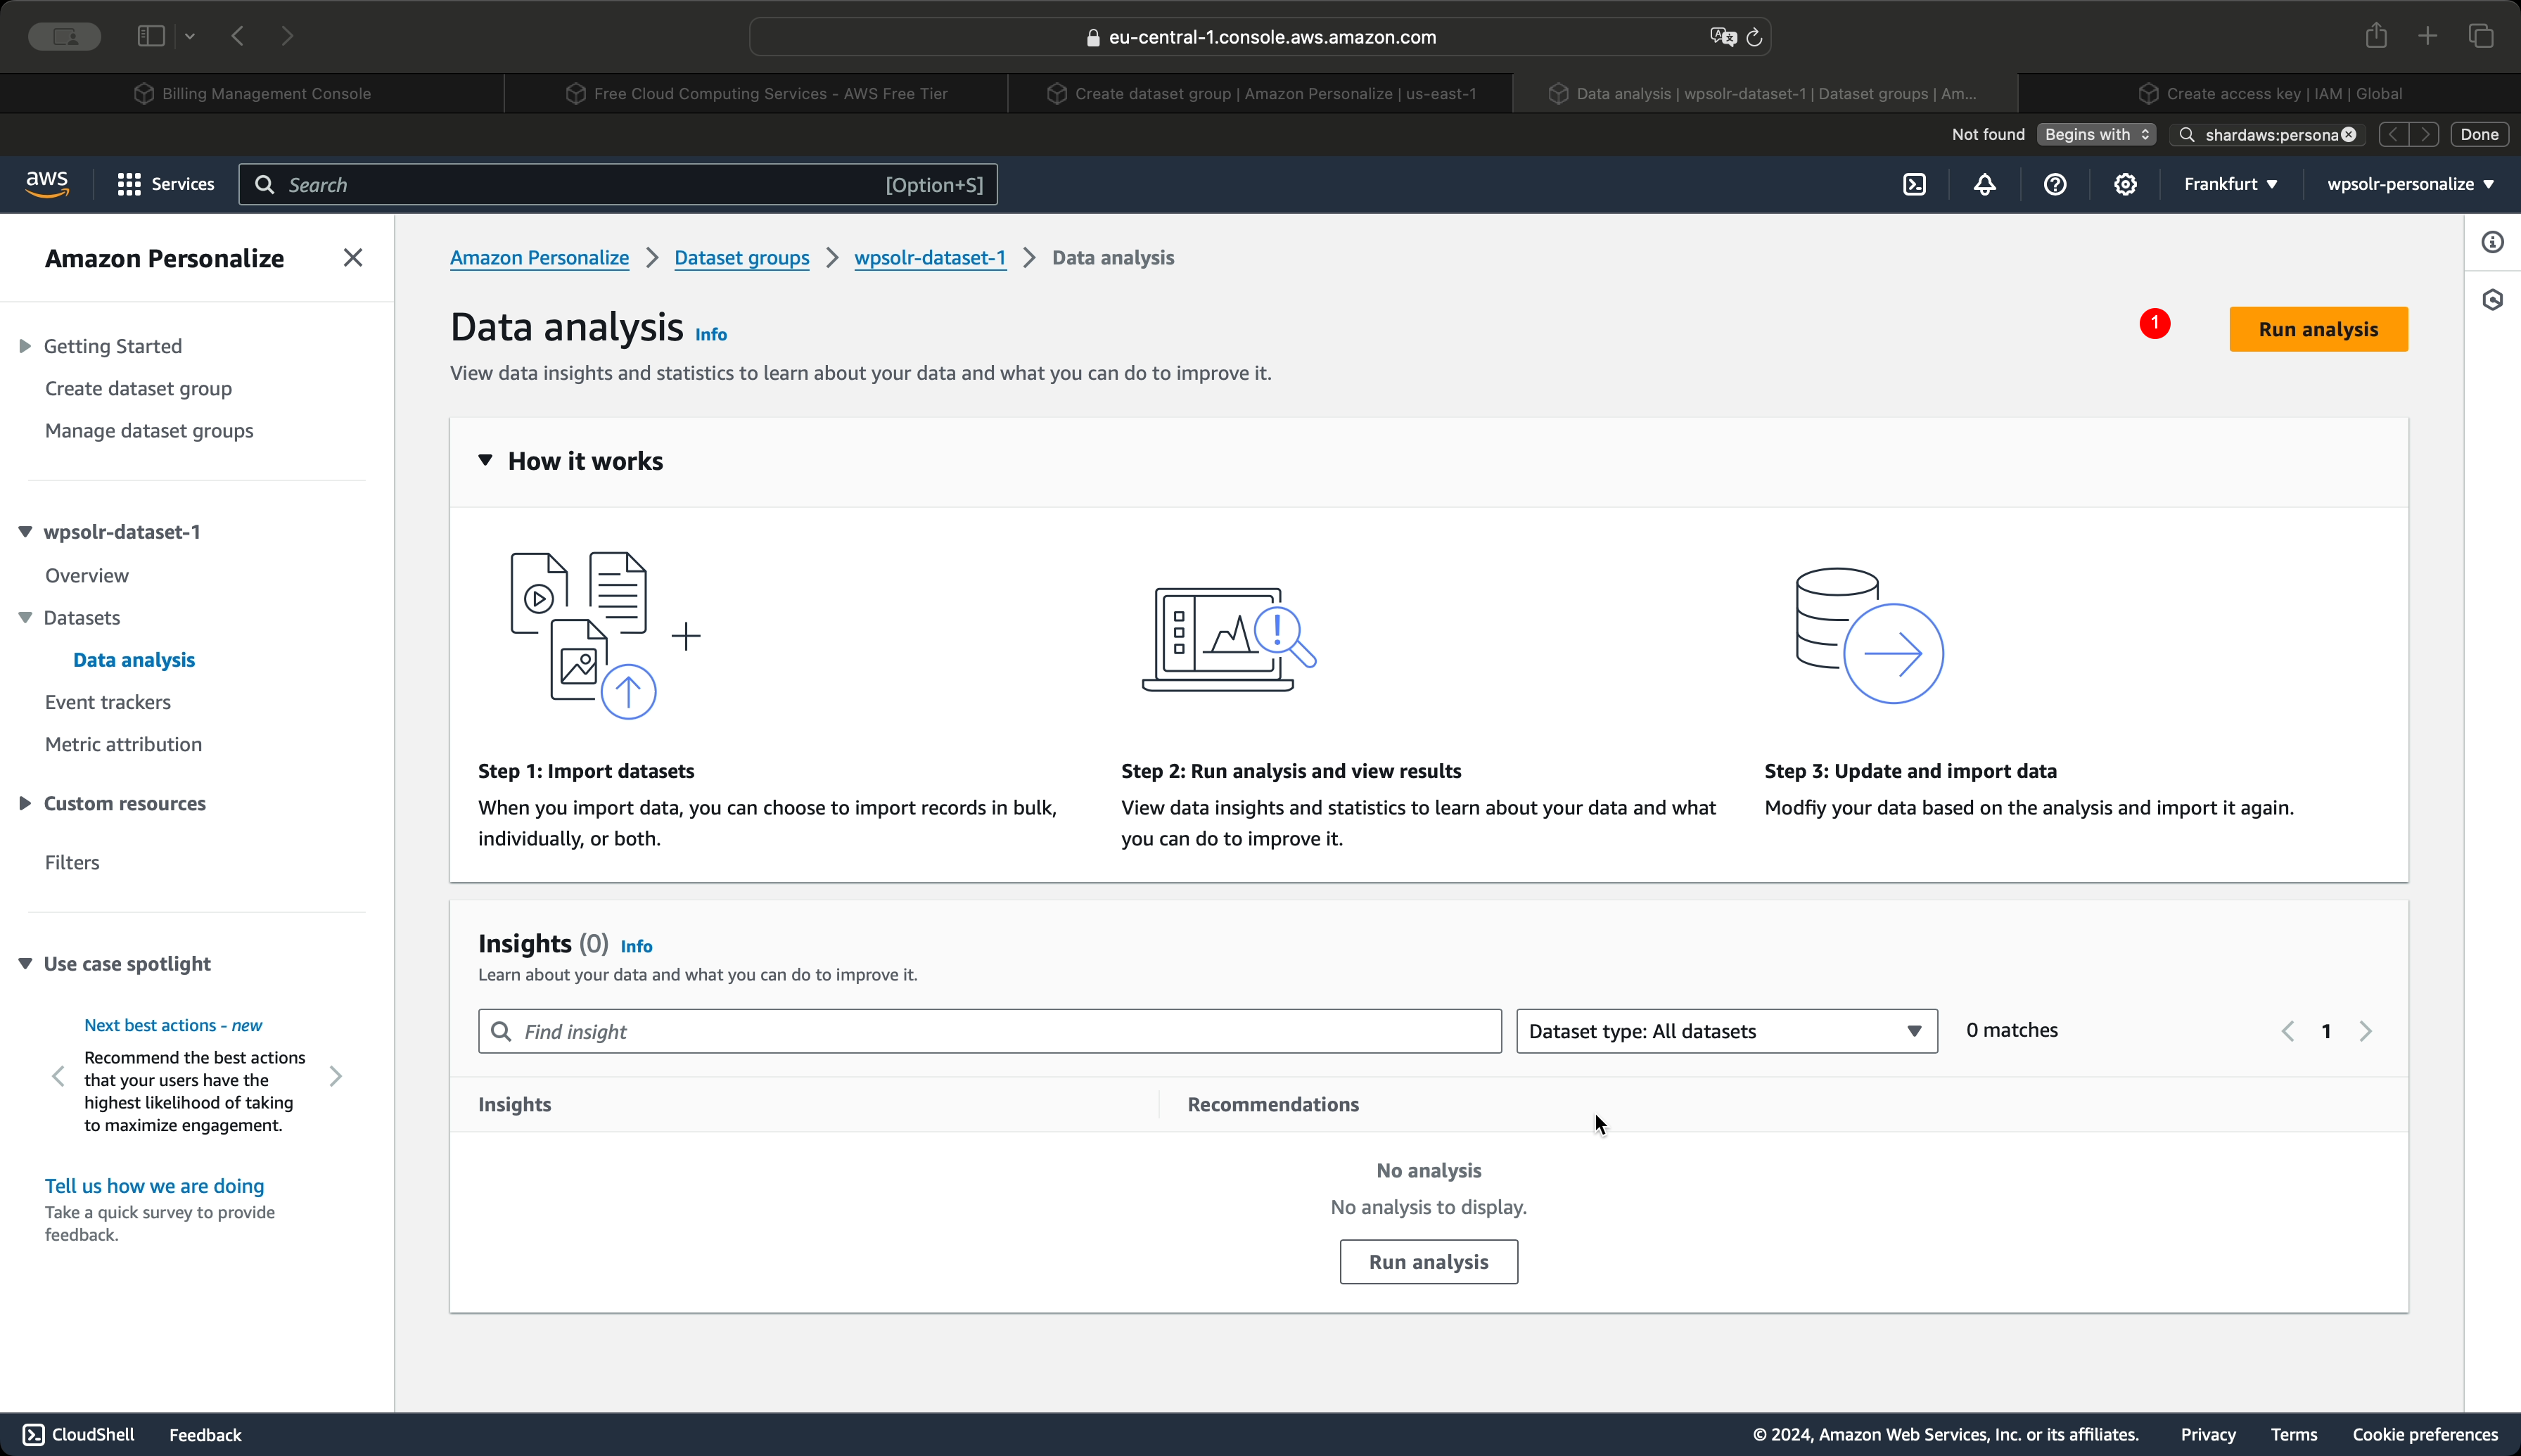
- Start analysis of your datasets. I gives you hints on the quantity and quality of ingested data in all your datasets.
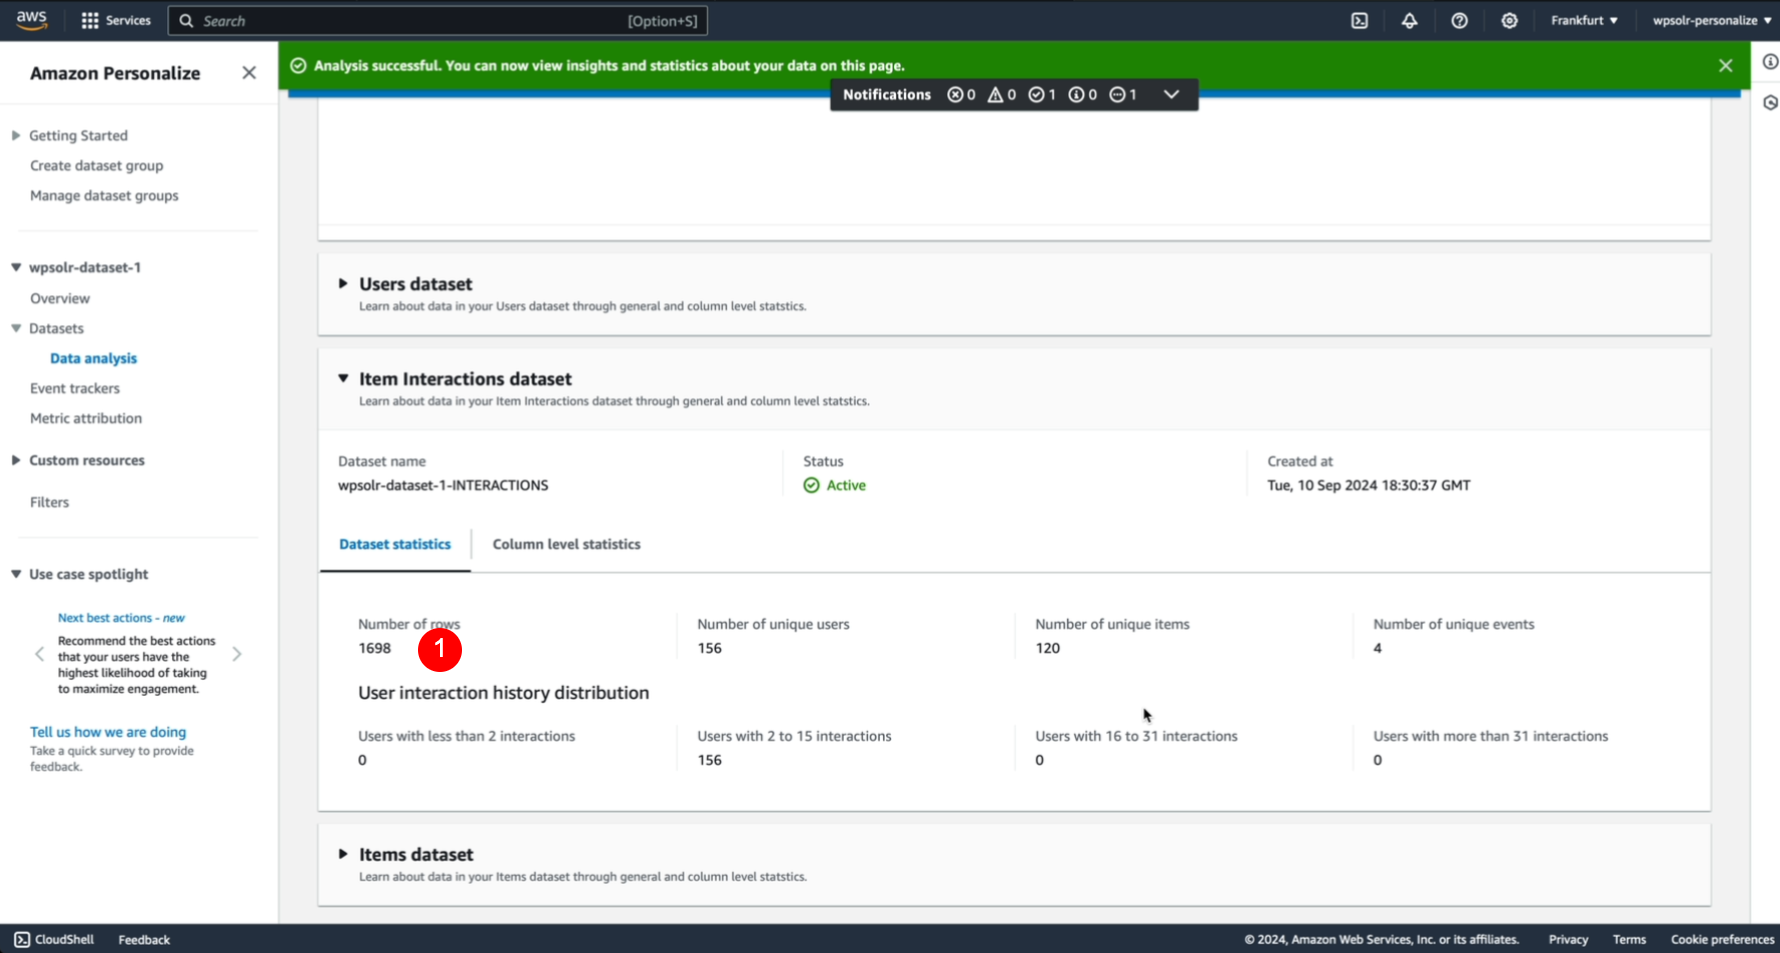
- Open a dataset to check its rows and columns quality.
Create a recommender
A recommender is basically the definition of how a specific ECOMMERCE domain’s model will be trained on your datasets data.
Select the menu “Recommenders”
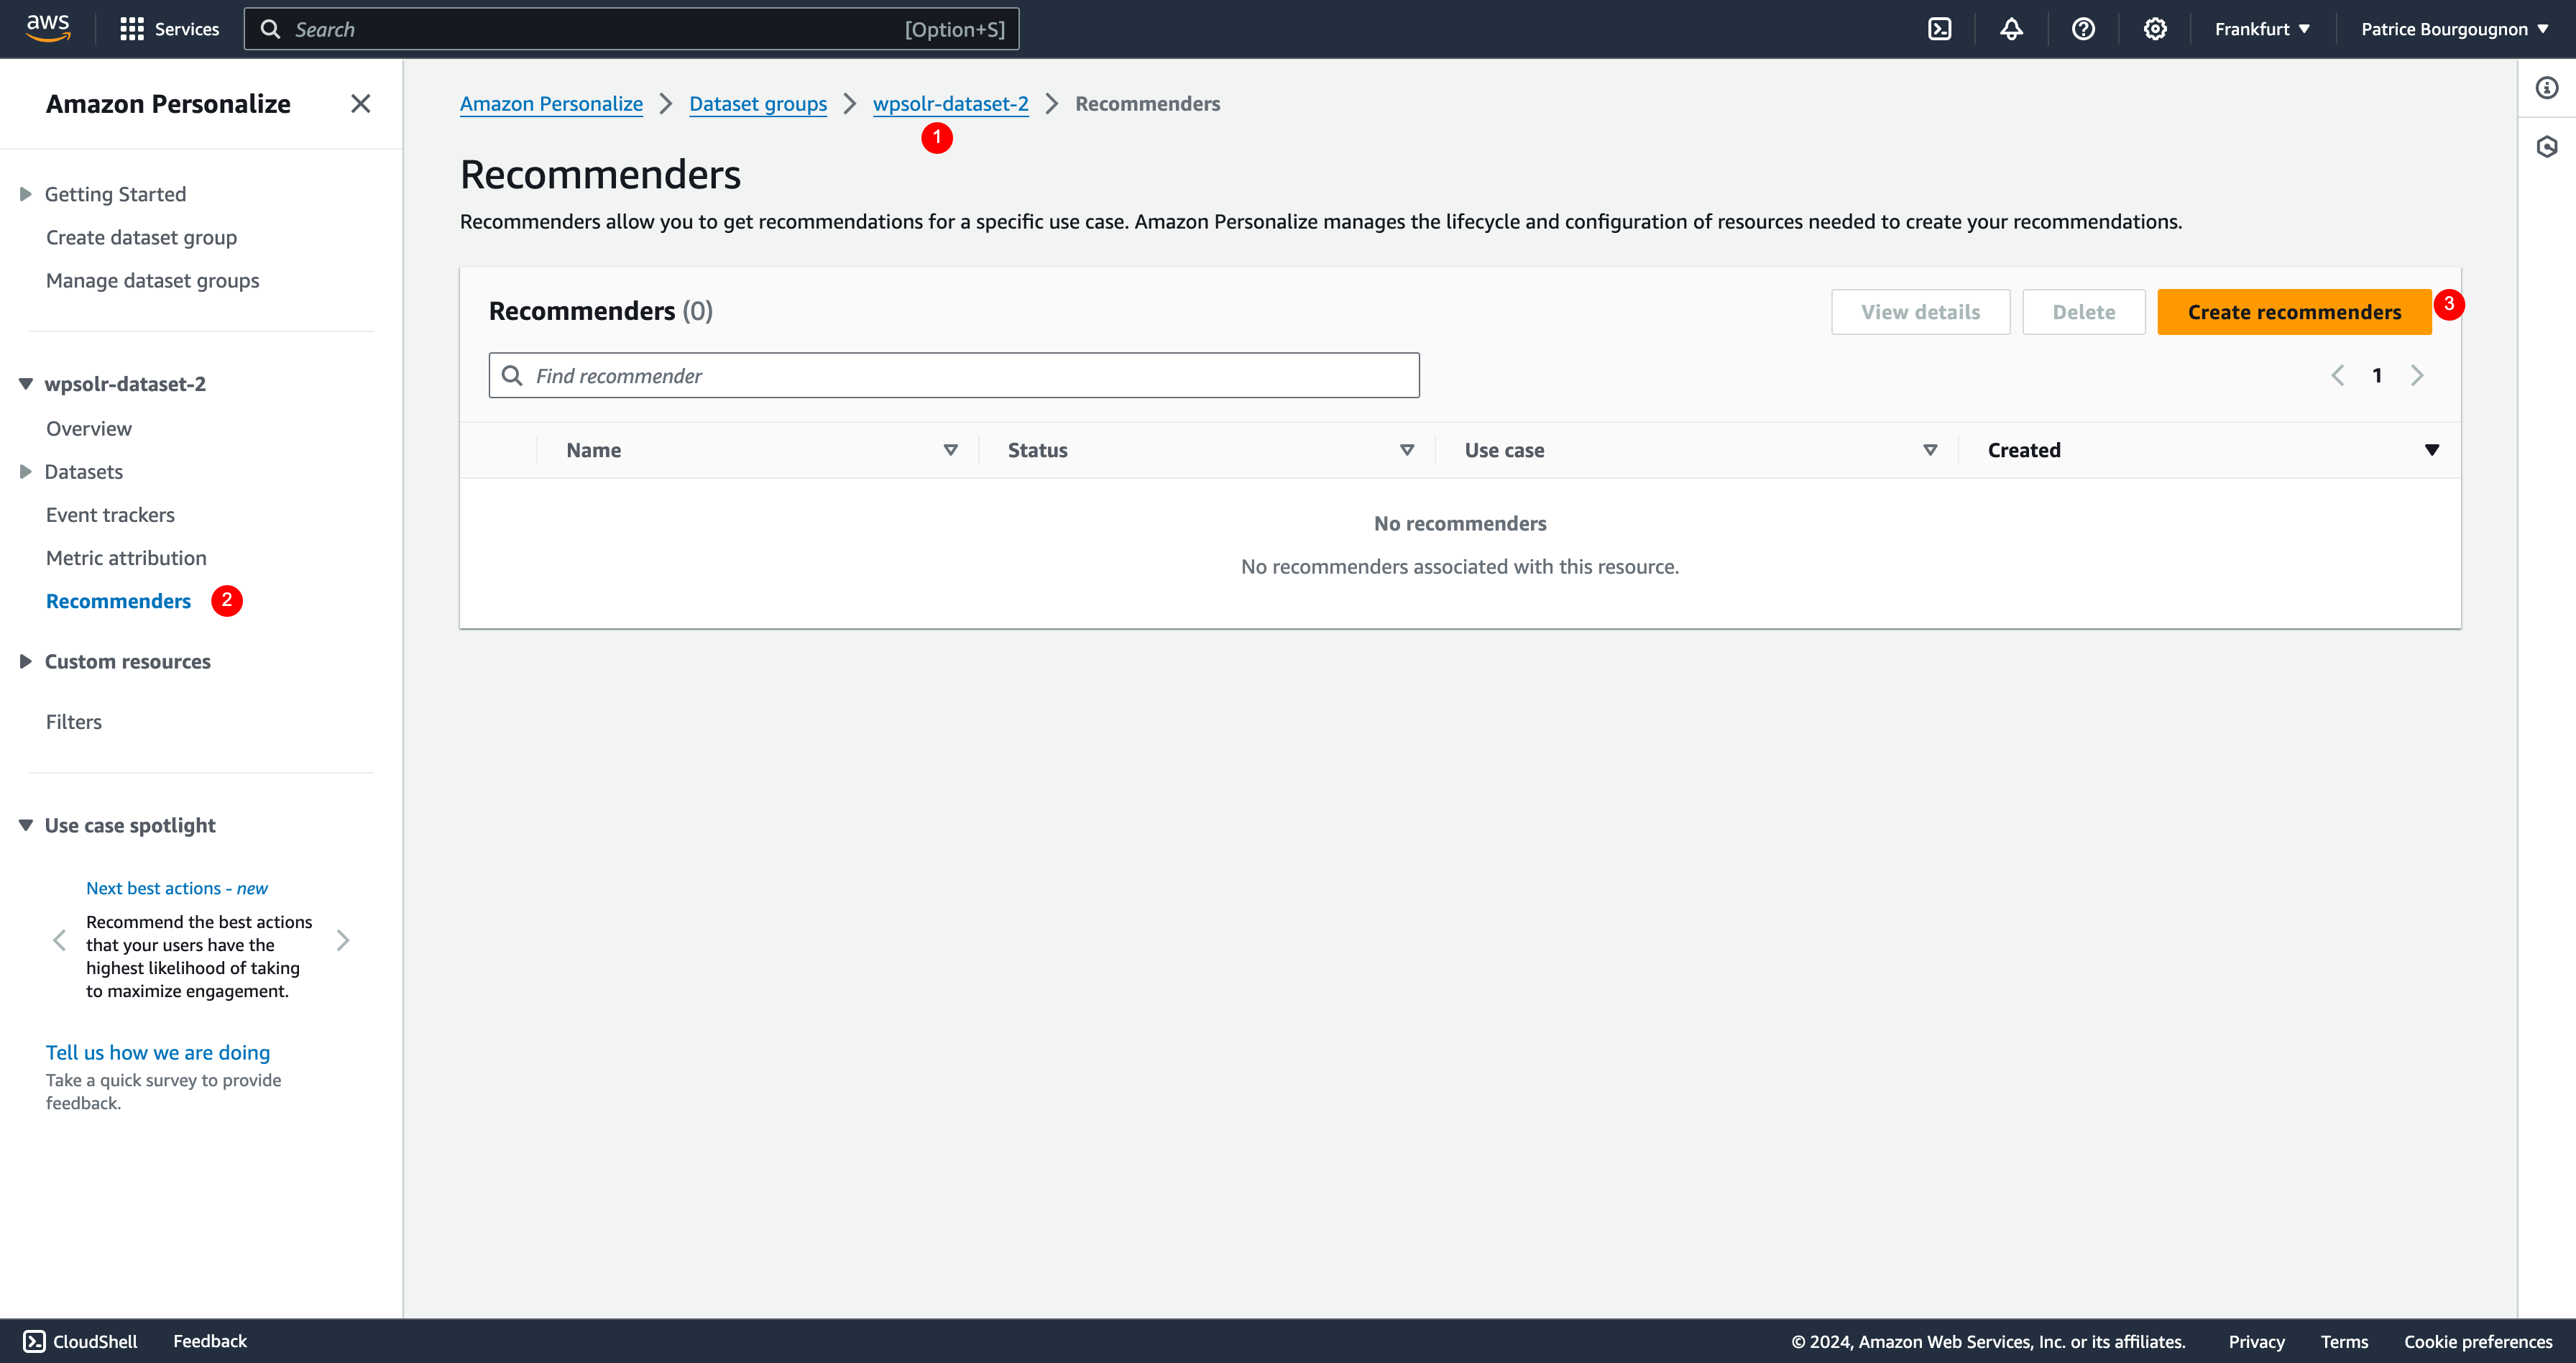
- Select a dataset created with the domain “ECOMMERCE”. Datasets with the domain “CUSTOM” will not display the menu
- Click on menu “Recommenders”
- Click on button “Create recommenders”
Recommenders use case
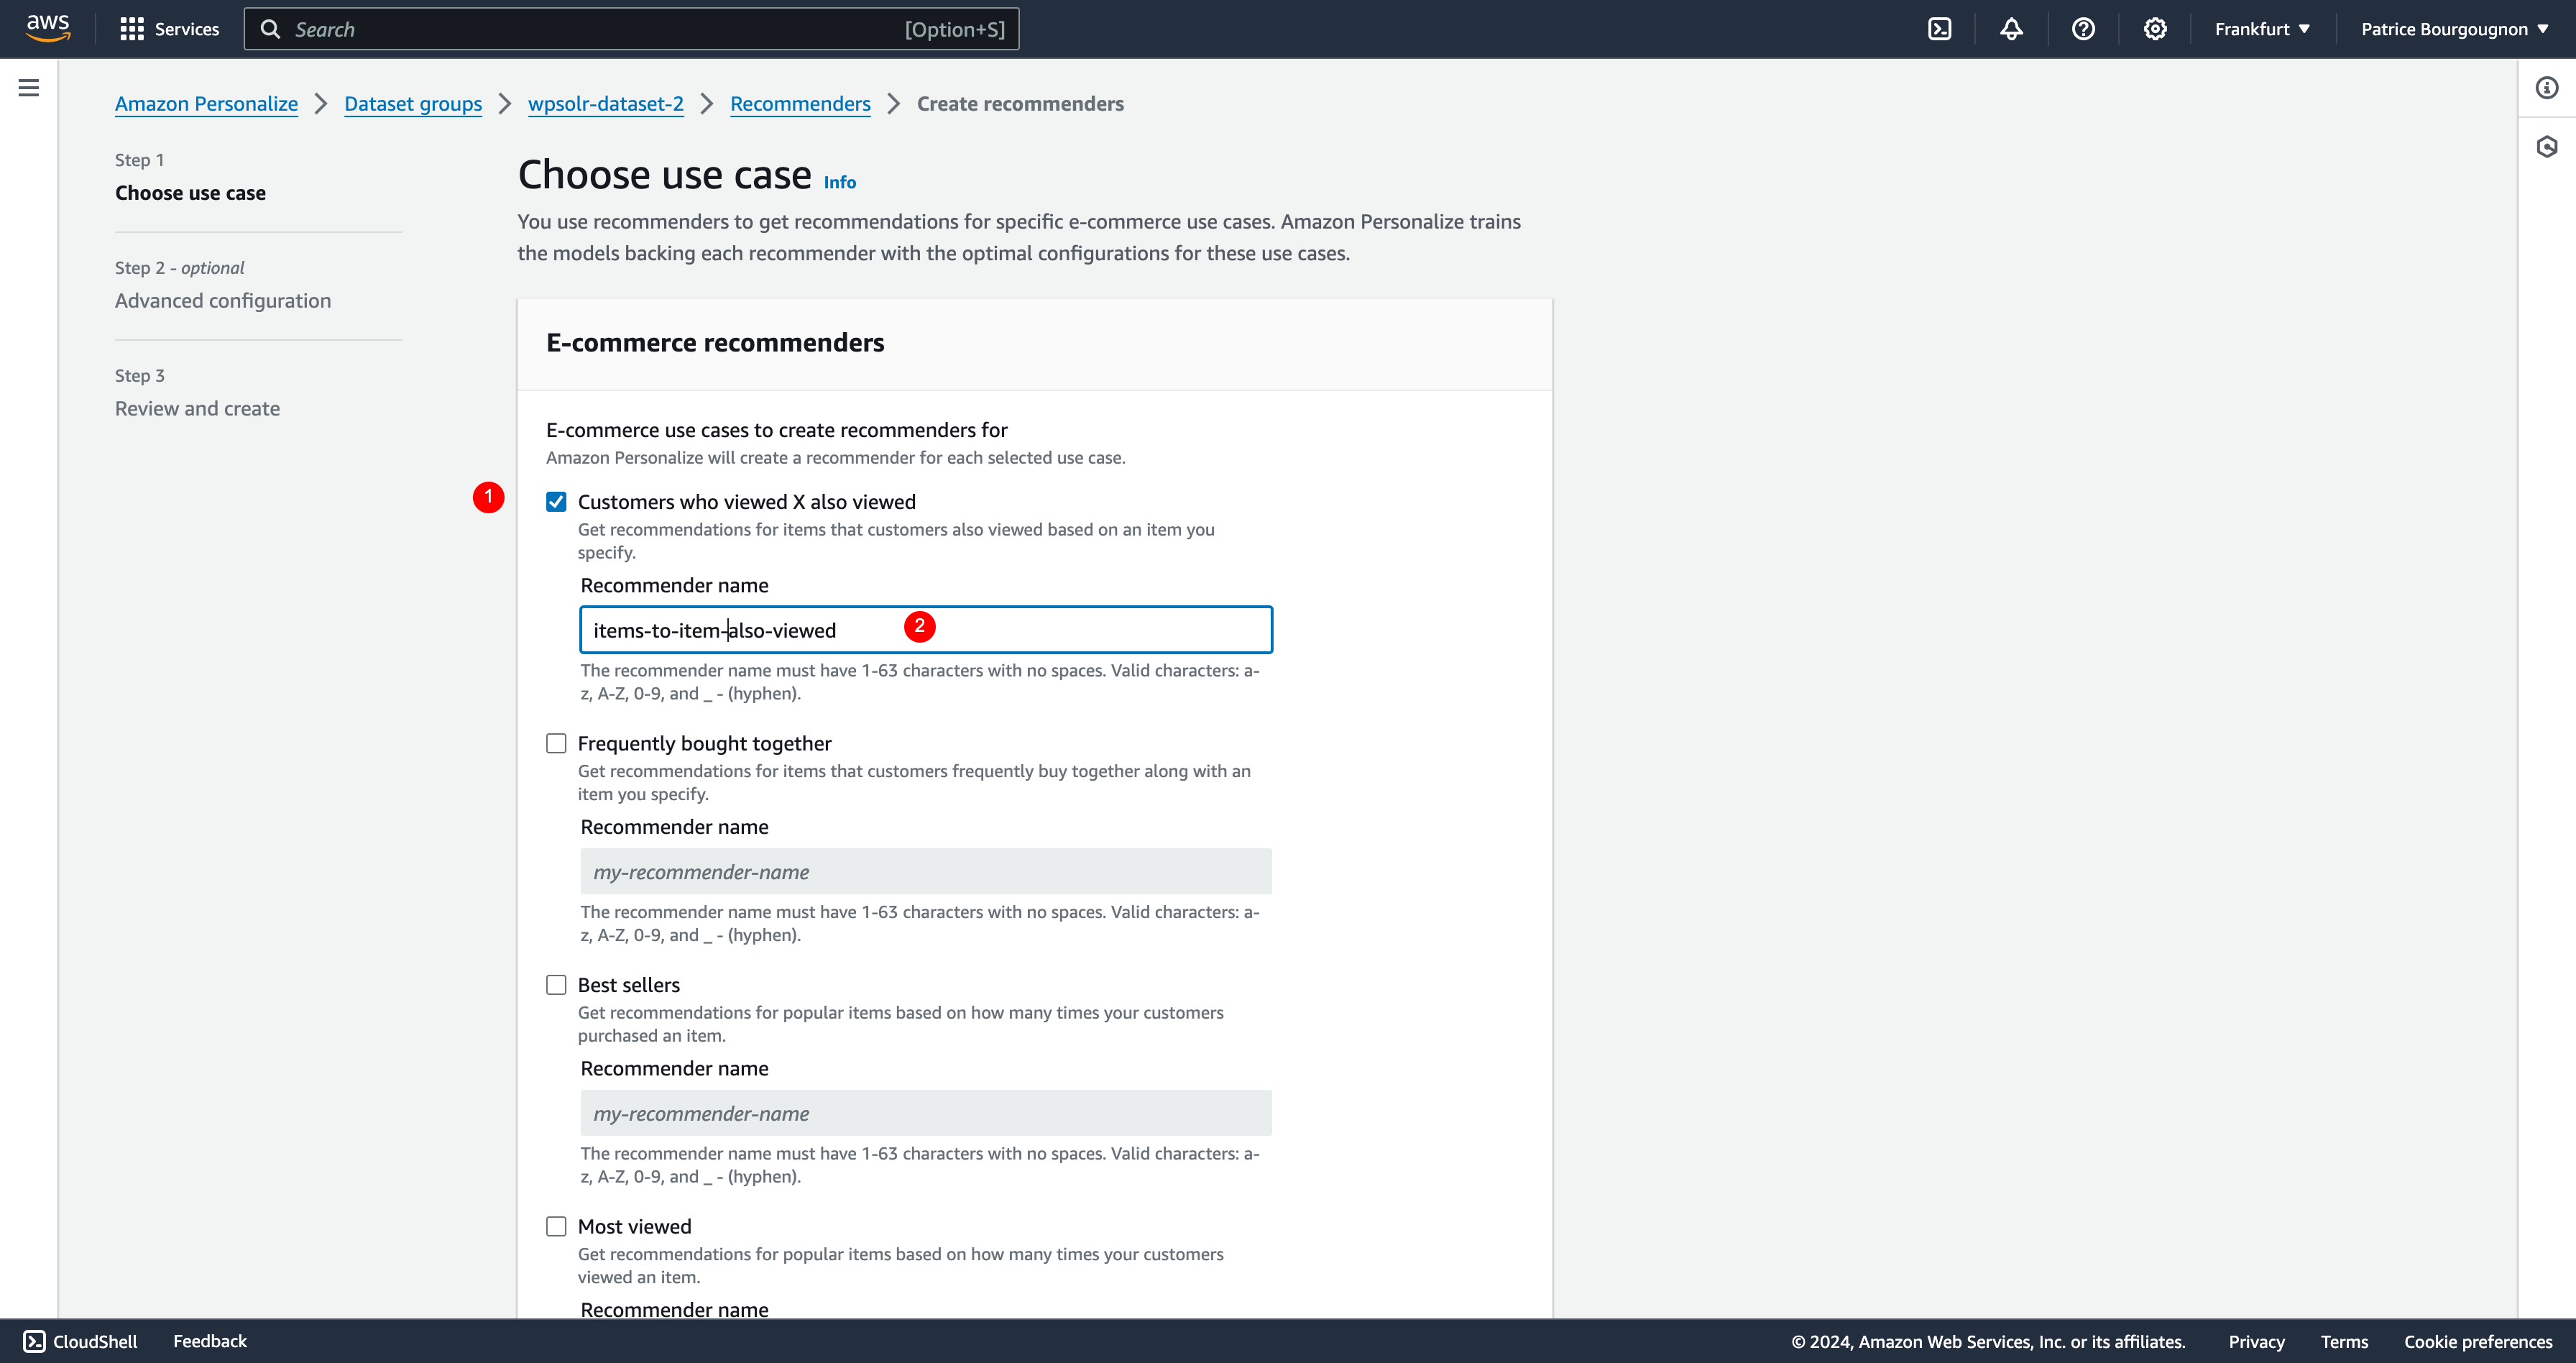
- Choose use cases you want to use as recommenders. One recommender will be created and billed per use case.
- Give use cases a name. This name will appear in WPSolr later.
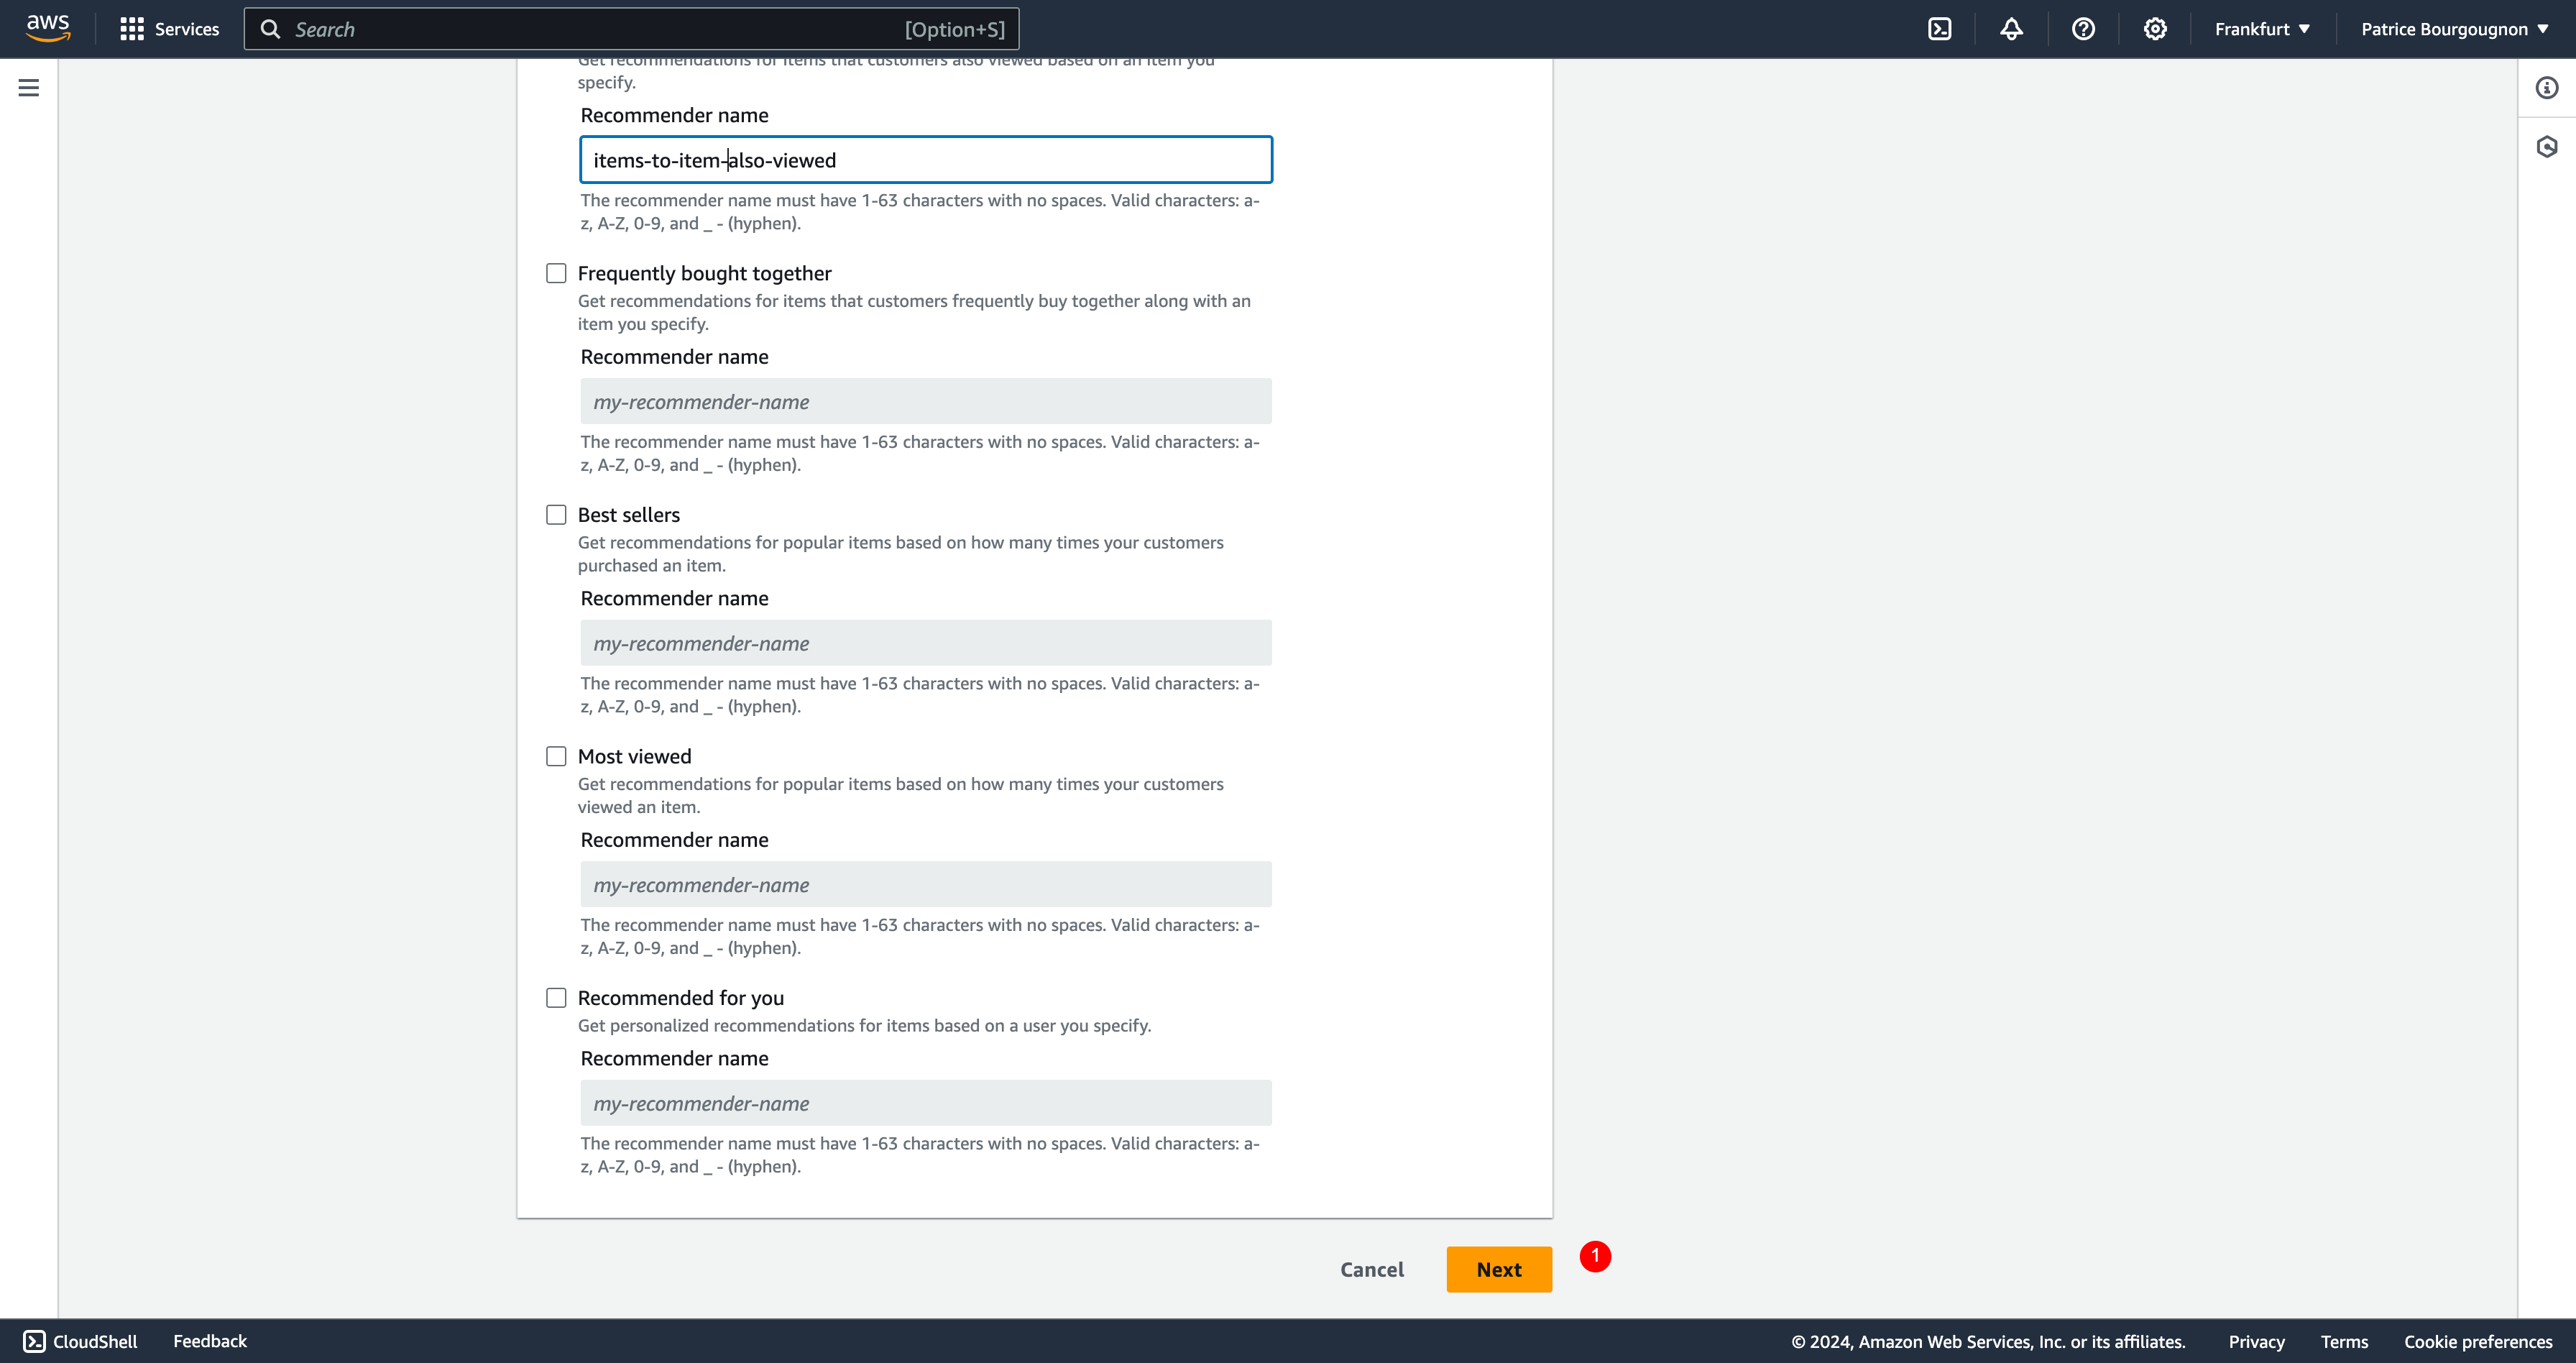
- Click on button “Next”
Recommenders advanced settings
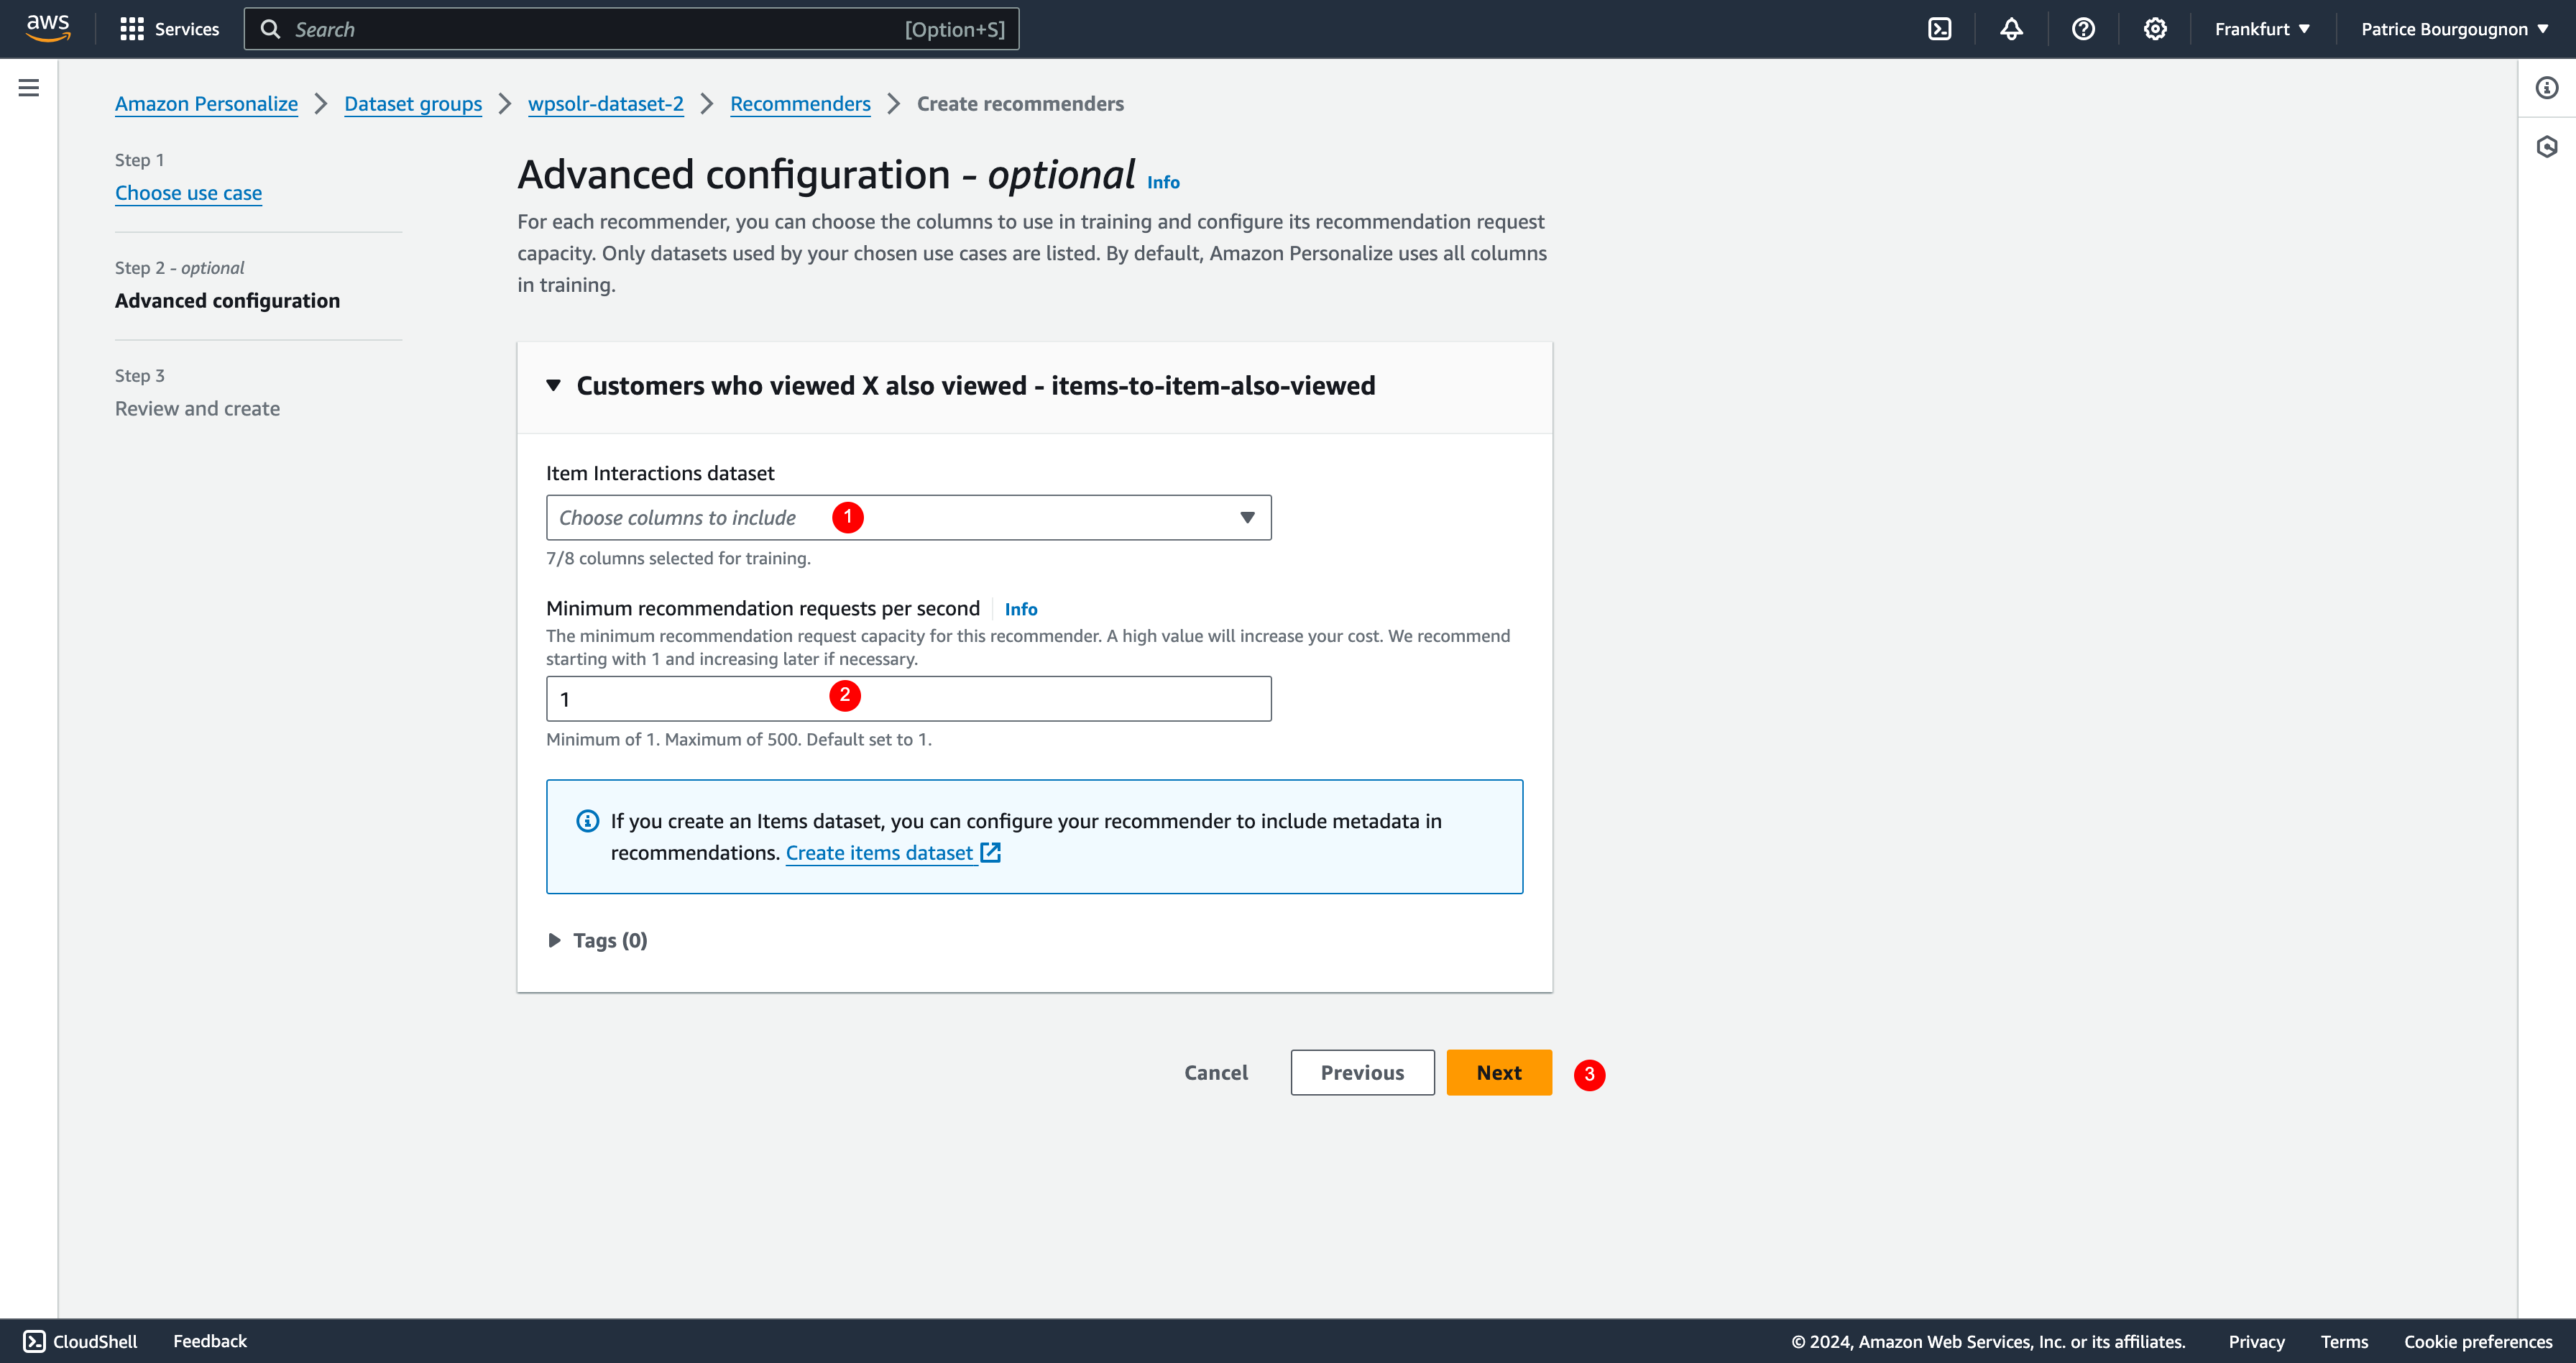
- Select the event fields you want to use for training
- Use “1”, which is the minimum billed query per second as long the recommender is active. Recommenders can be deactivated.
- Click button “Next”
Create recommenders
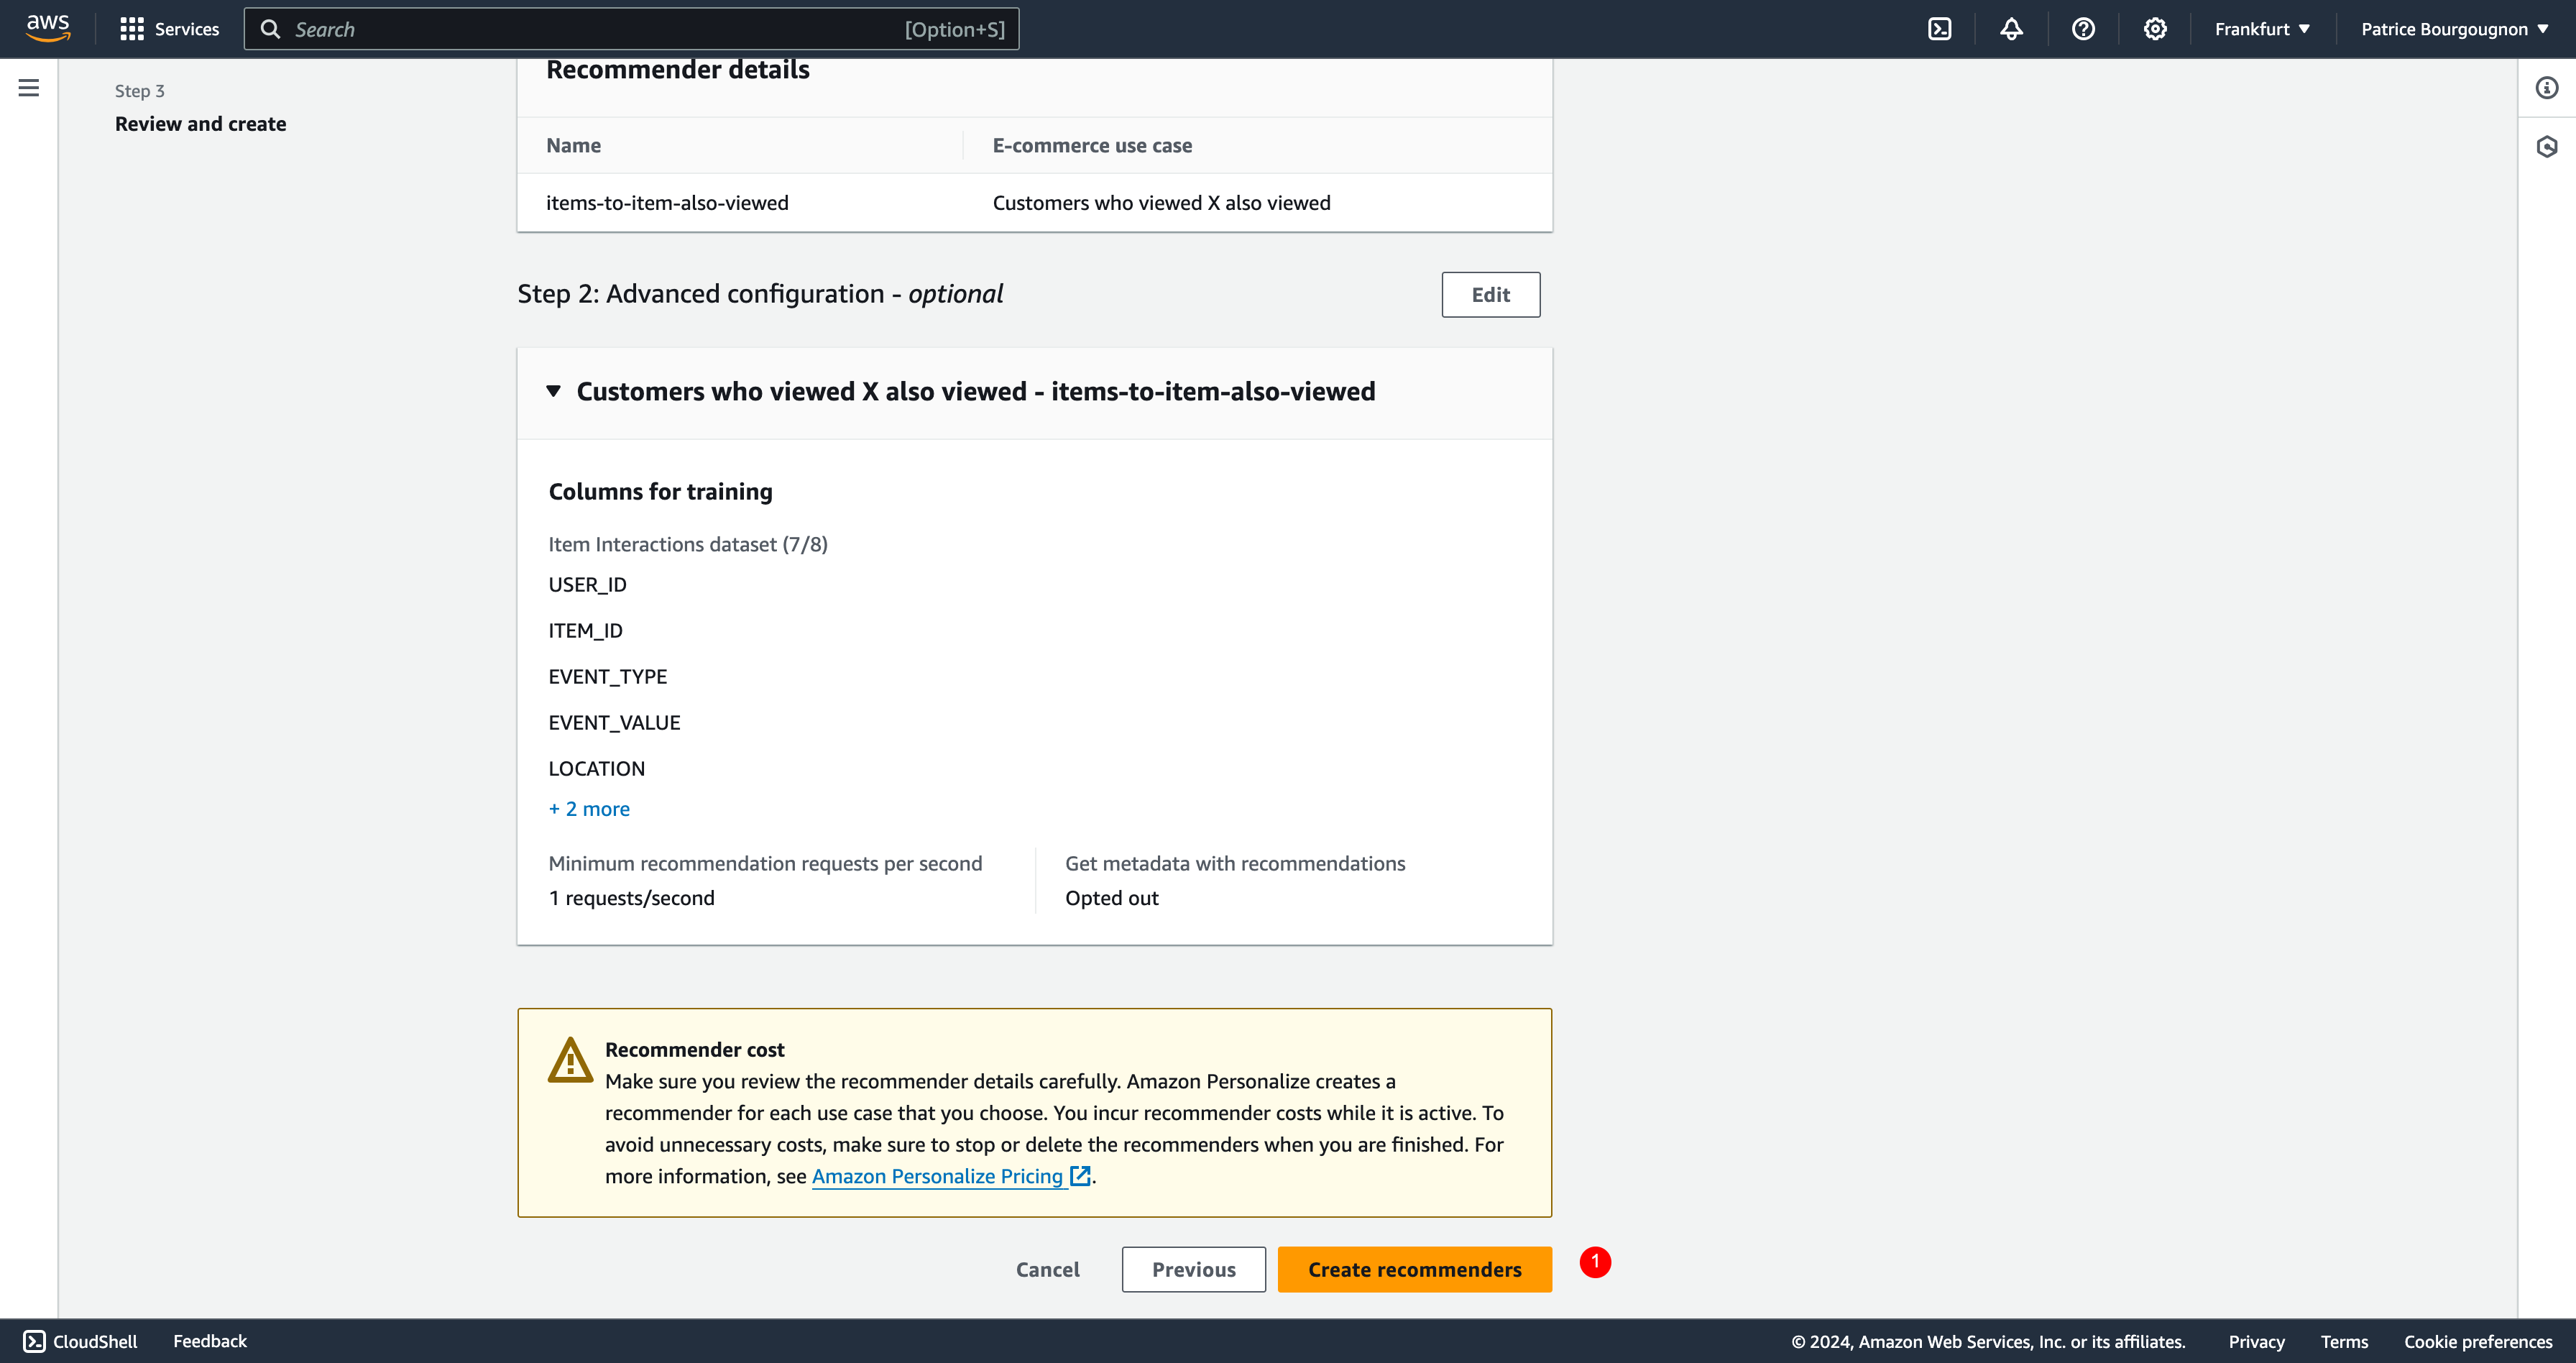
- Review/edit settings, then click on button “Create recommenders”. The recommenders you chose before (one per use case) will be created and trained on the datasets.
Fix errors on recommender training
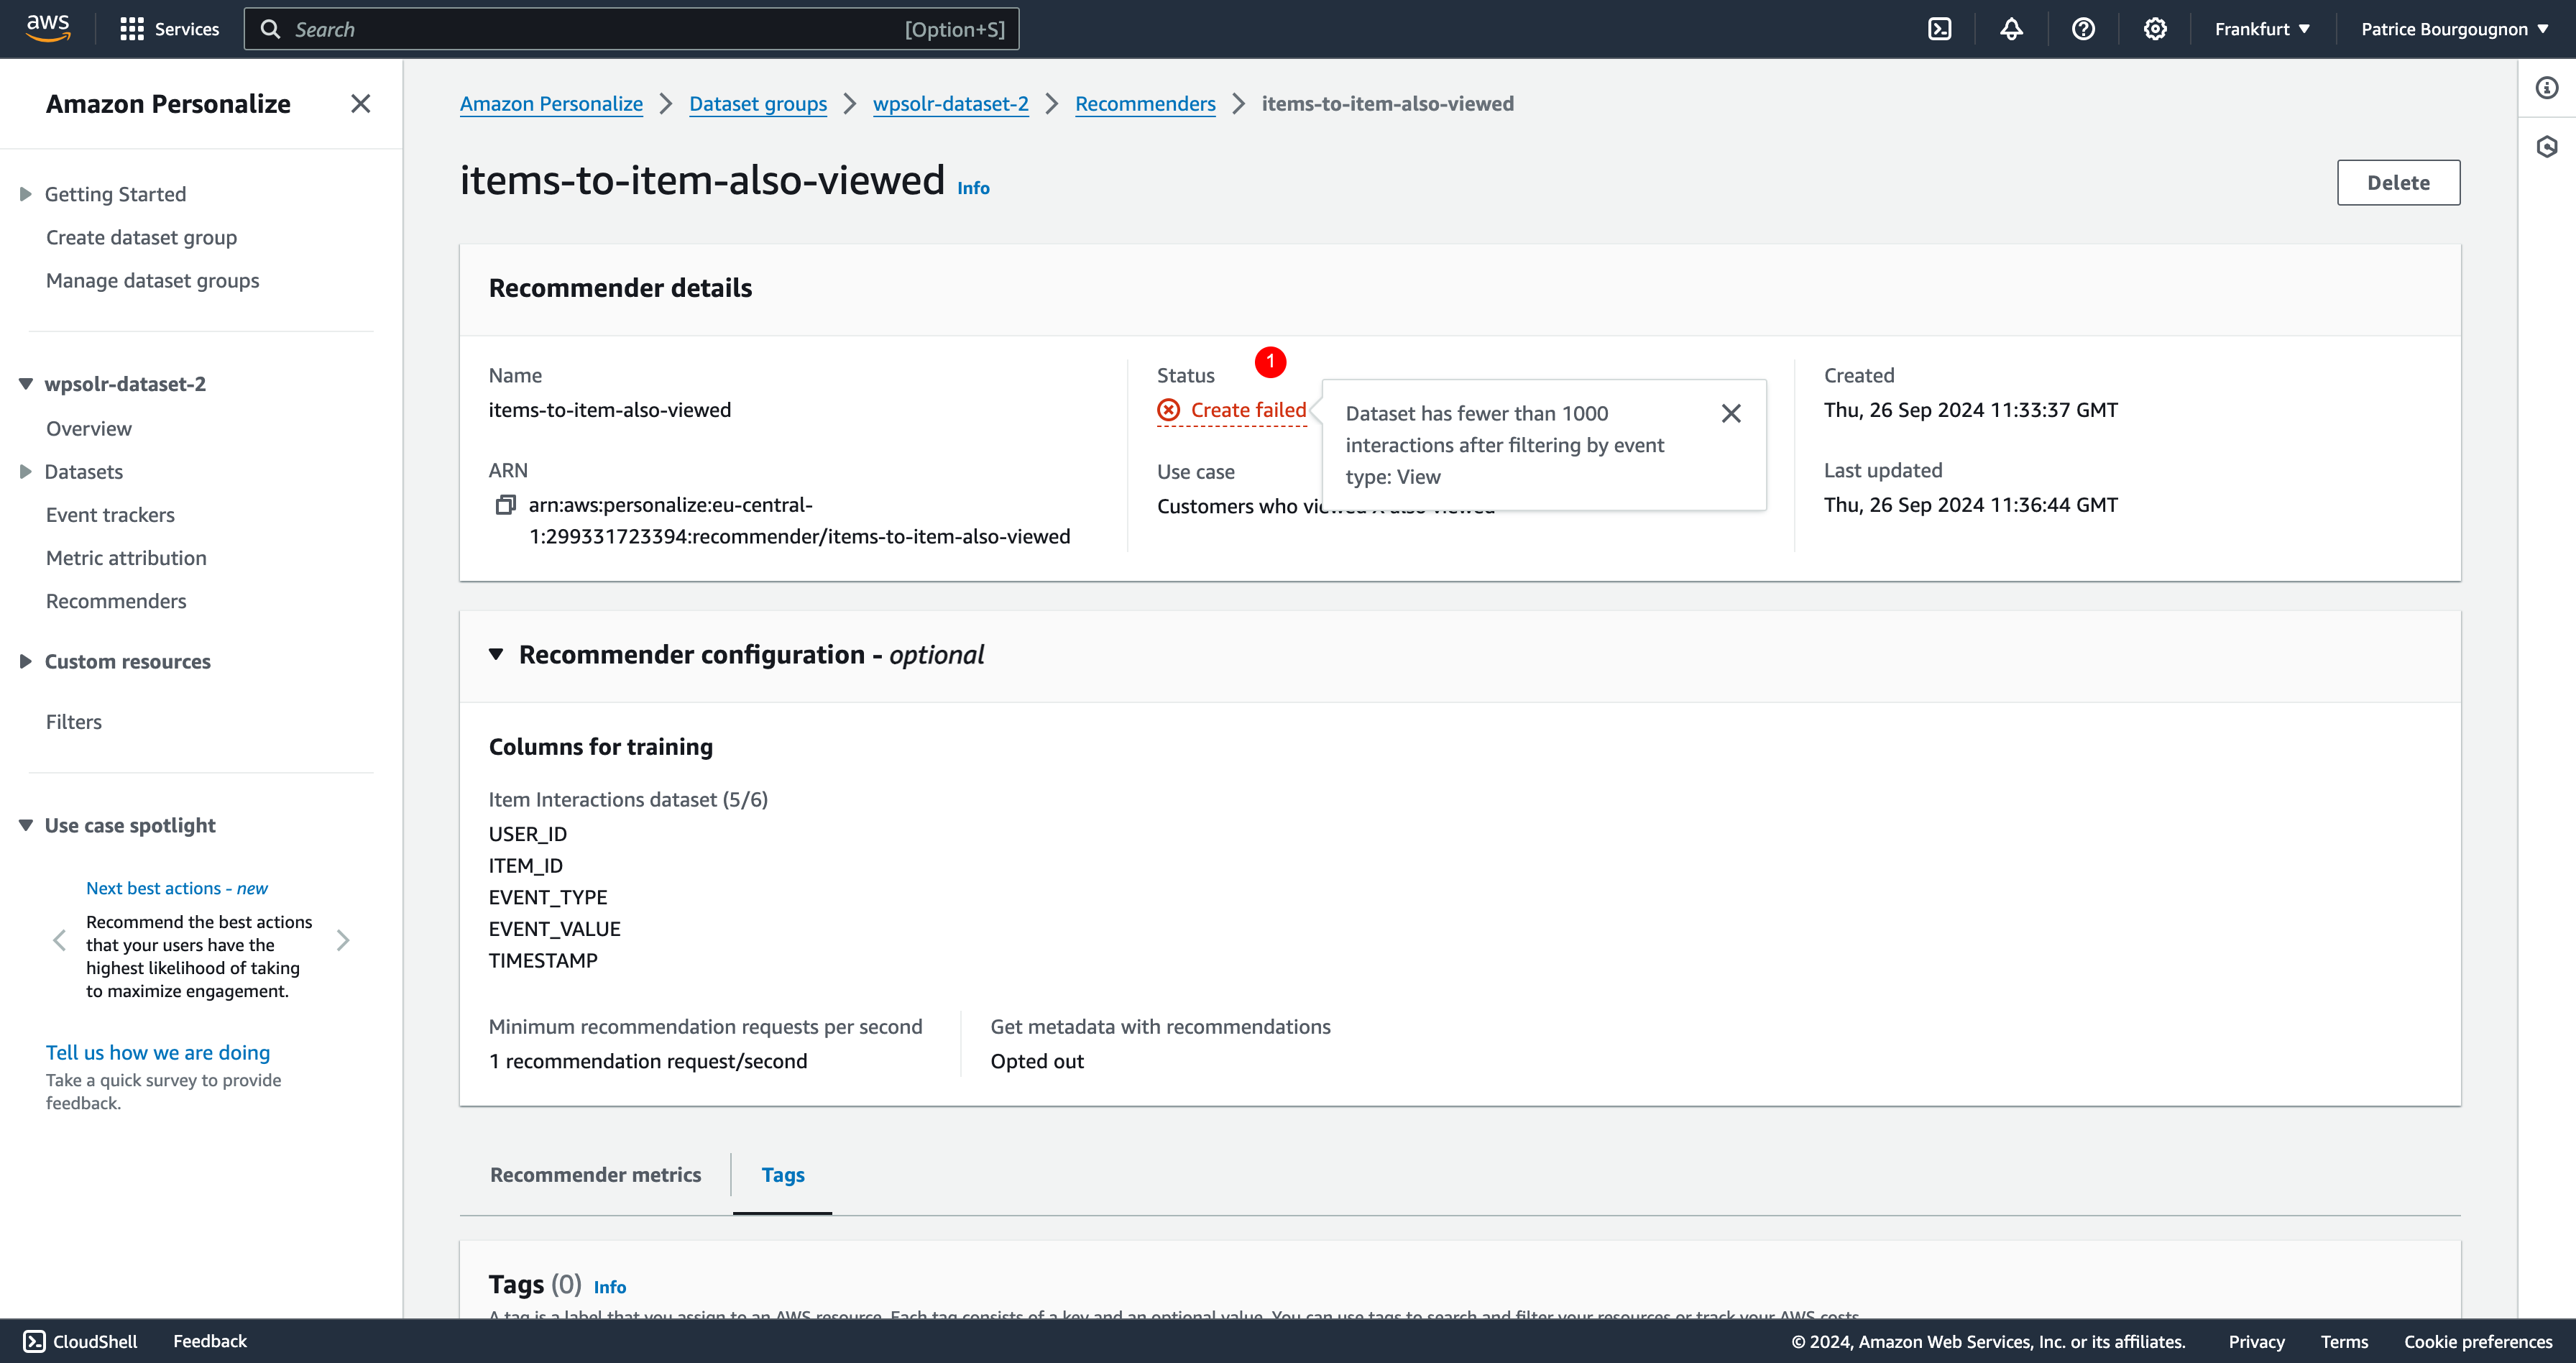
- You can check training errors by clicking on the “Status Create failed” link. Here we can see that we need 1000 “View” events.
We can fake events to Amazon Personalize, on a test environement of course. For that, reindex your data with the following options:
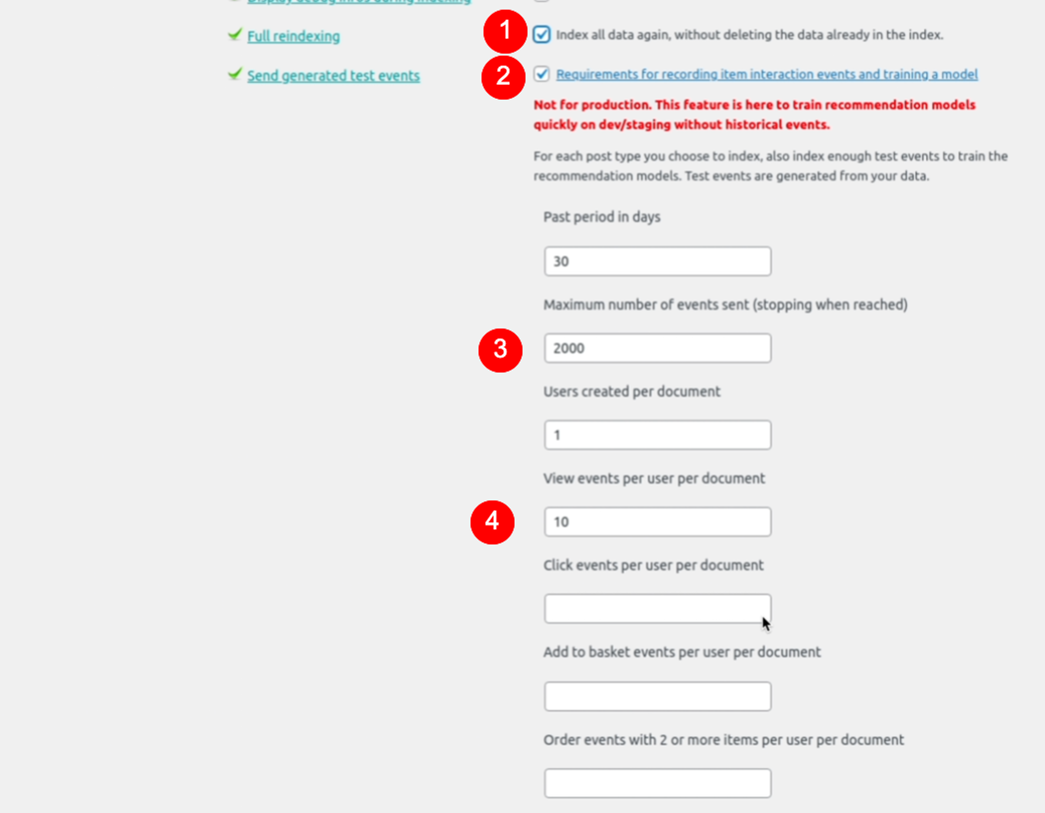
- Select “Full reindexing” to restart indexing all data. For each data indexes, events will be also sent as described in the following points
- Select “Send generated test events”
- Set the maximum events you want to send. Here 2000.
- Set how many View events to send per data indexed. Here, with 10 view events per user per document, and 90 documents to index, a total of 900 view events will be sent.
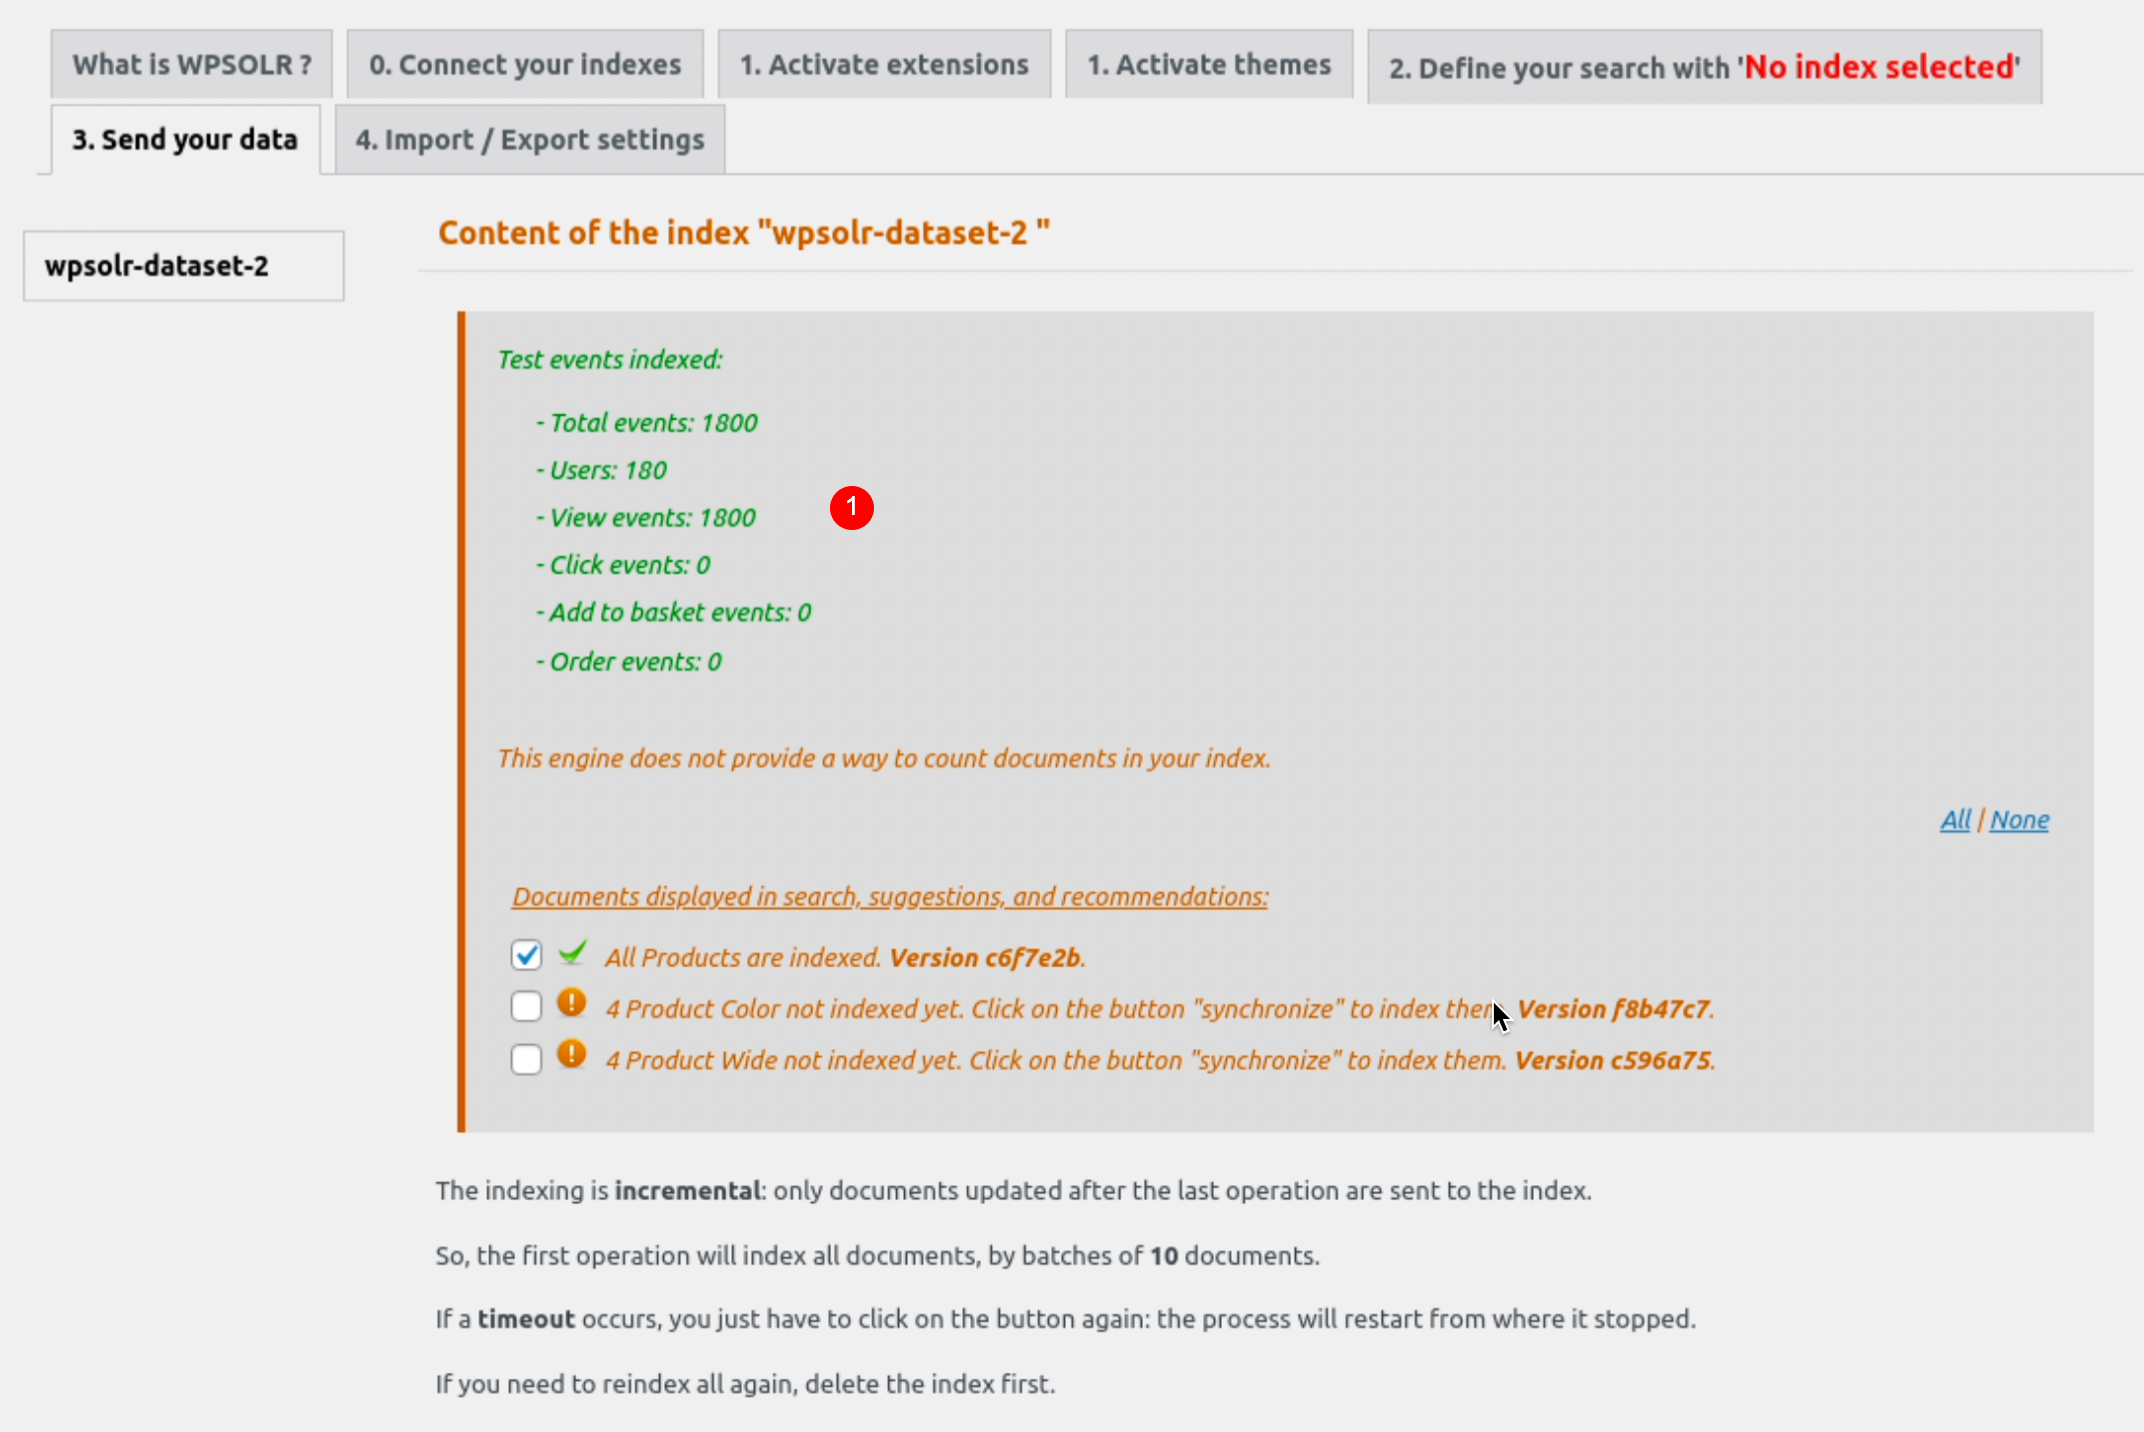
- Statistics about test events sent during indexing are shown when the process is complete
Create a solution
A solution is basically the definition of how a specific model will be trained on your datasets data. Solutions can be trained for all domains (CUSTOM or ECOMMERCE).
You must have launched a data analysis first, or the solution will fail during training.
Select the menu “Solutions and recipes”
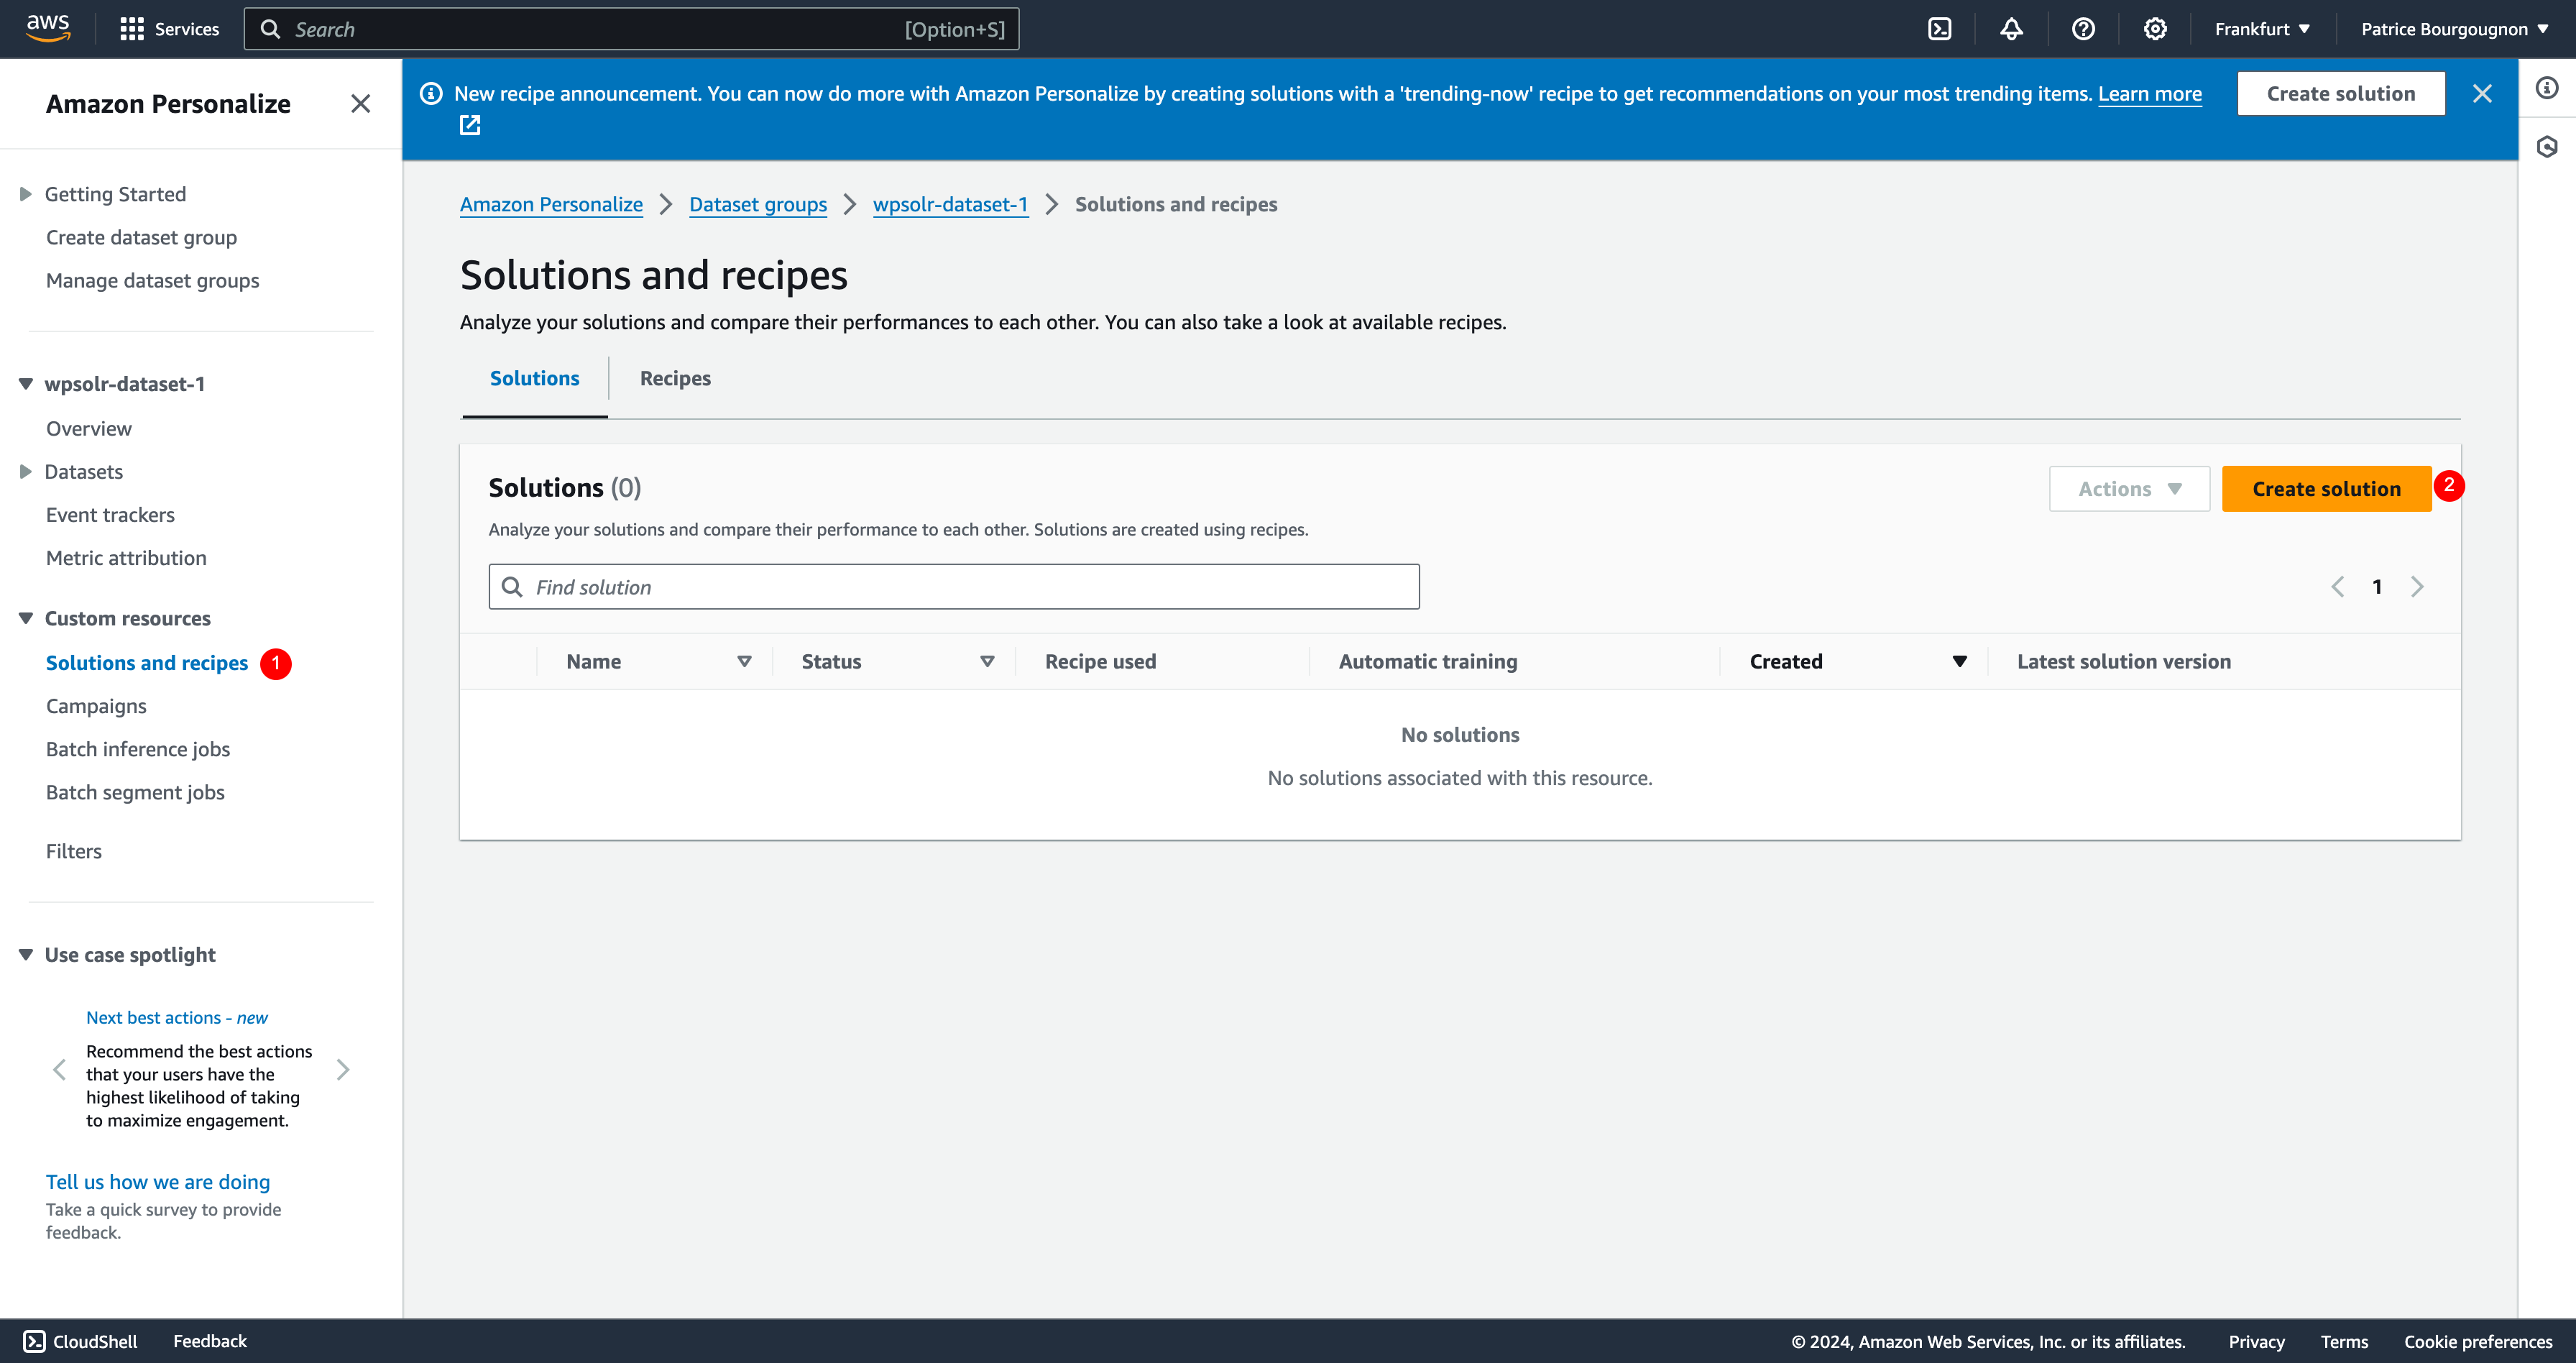
- Click the “Create solution” button
Select the solution’s recipe
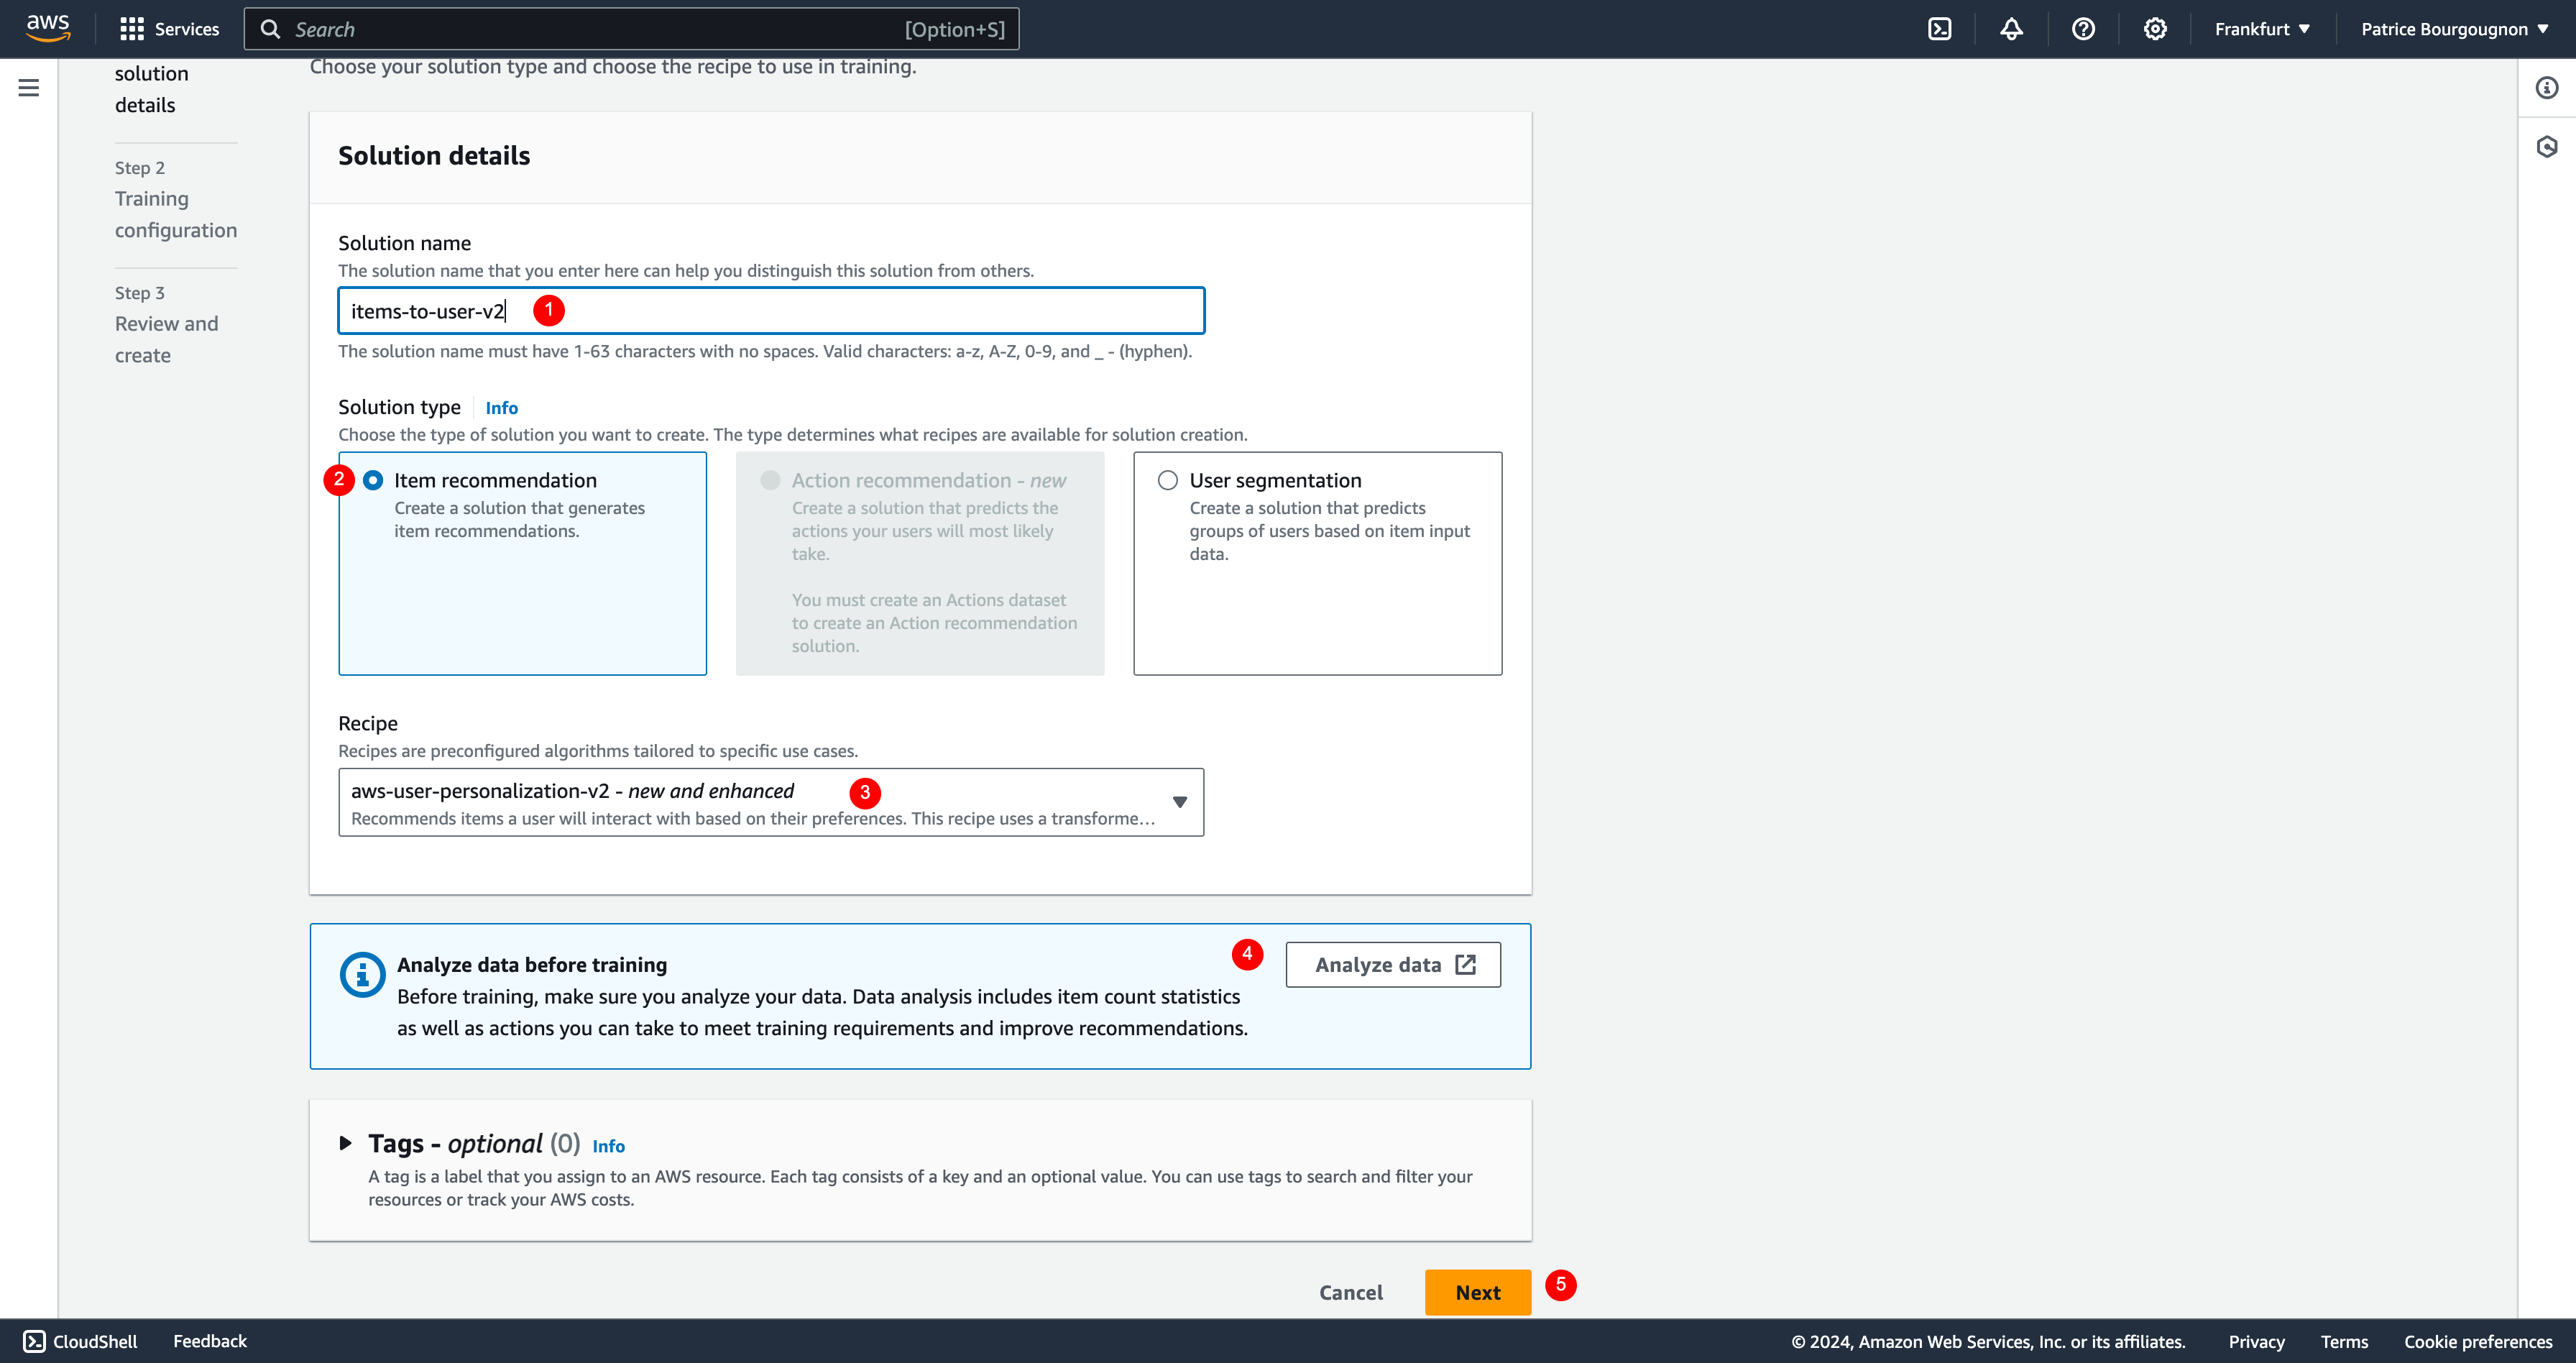
- Give your solution a name
- Select the solution type “Item recommendation”
- Chose a recipe in the list
- (Optional) Run a data analysis to confirm the data imported is good enough in quality and quantity for good recommendations
- Click on button “Next”
Confirm the solution’s recipe
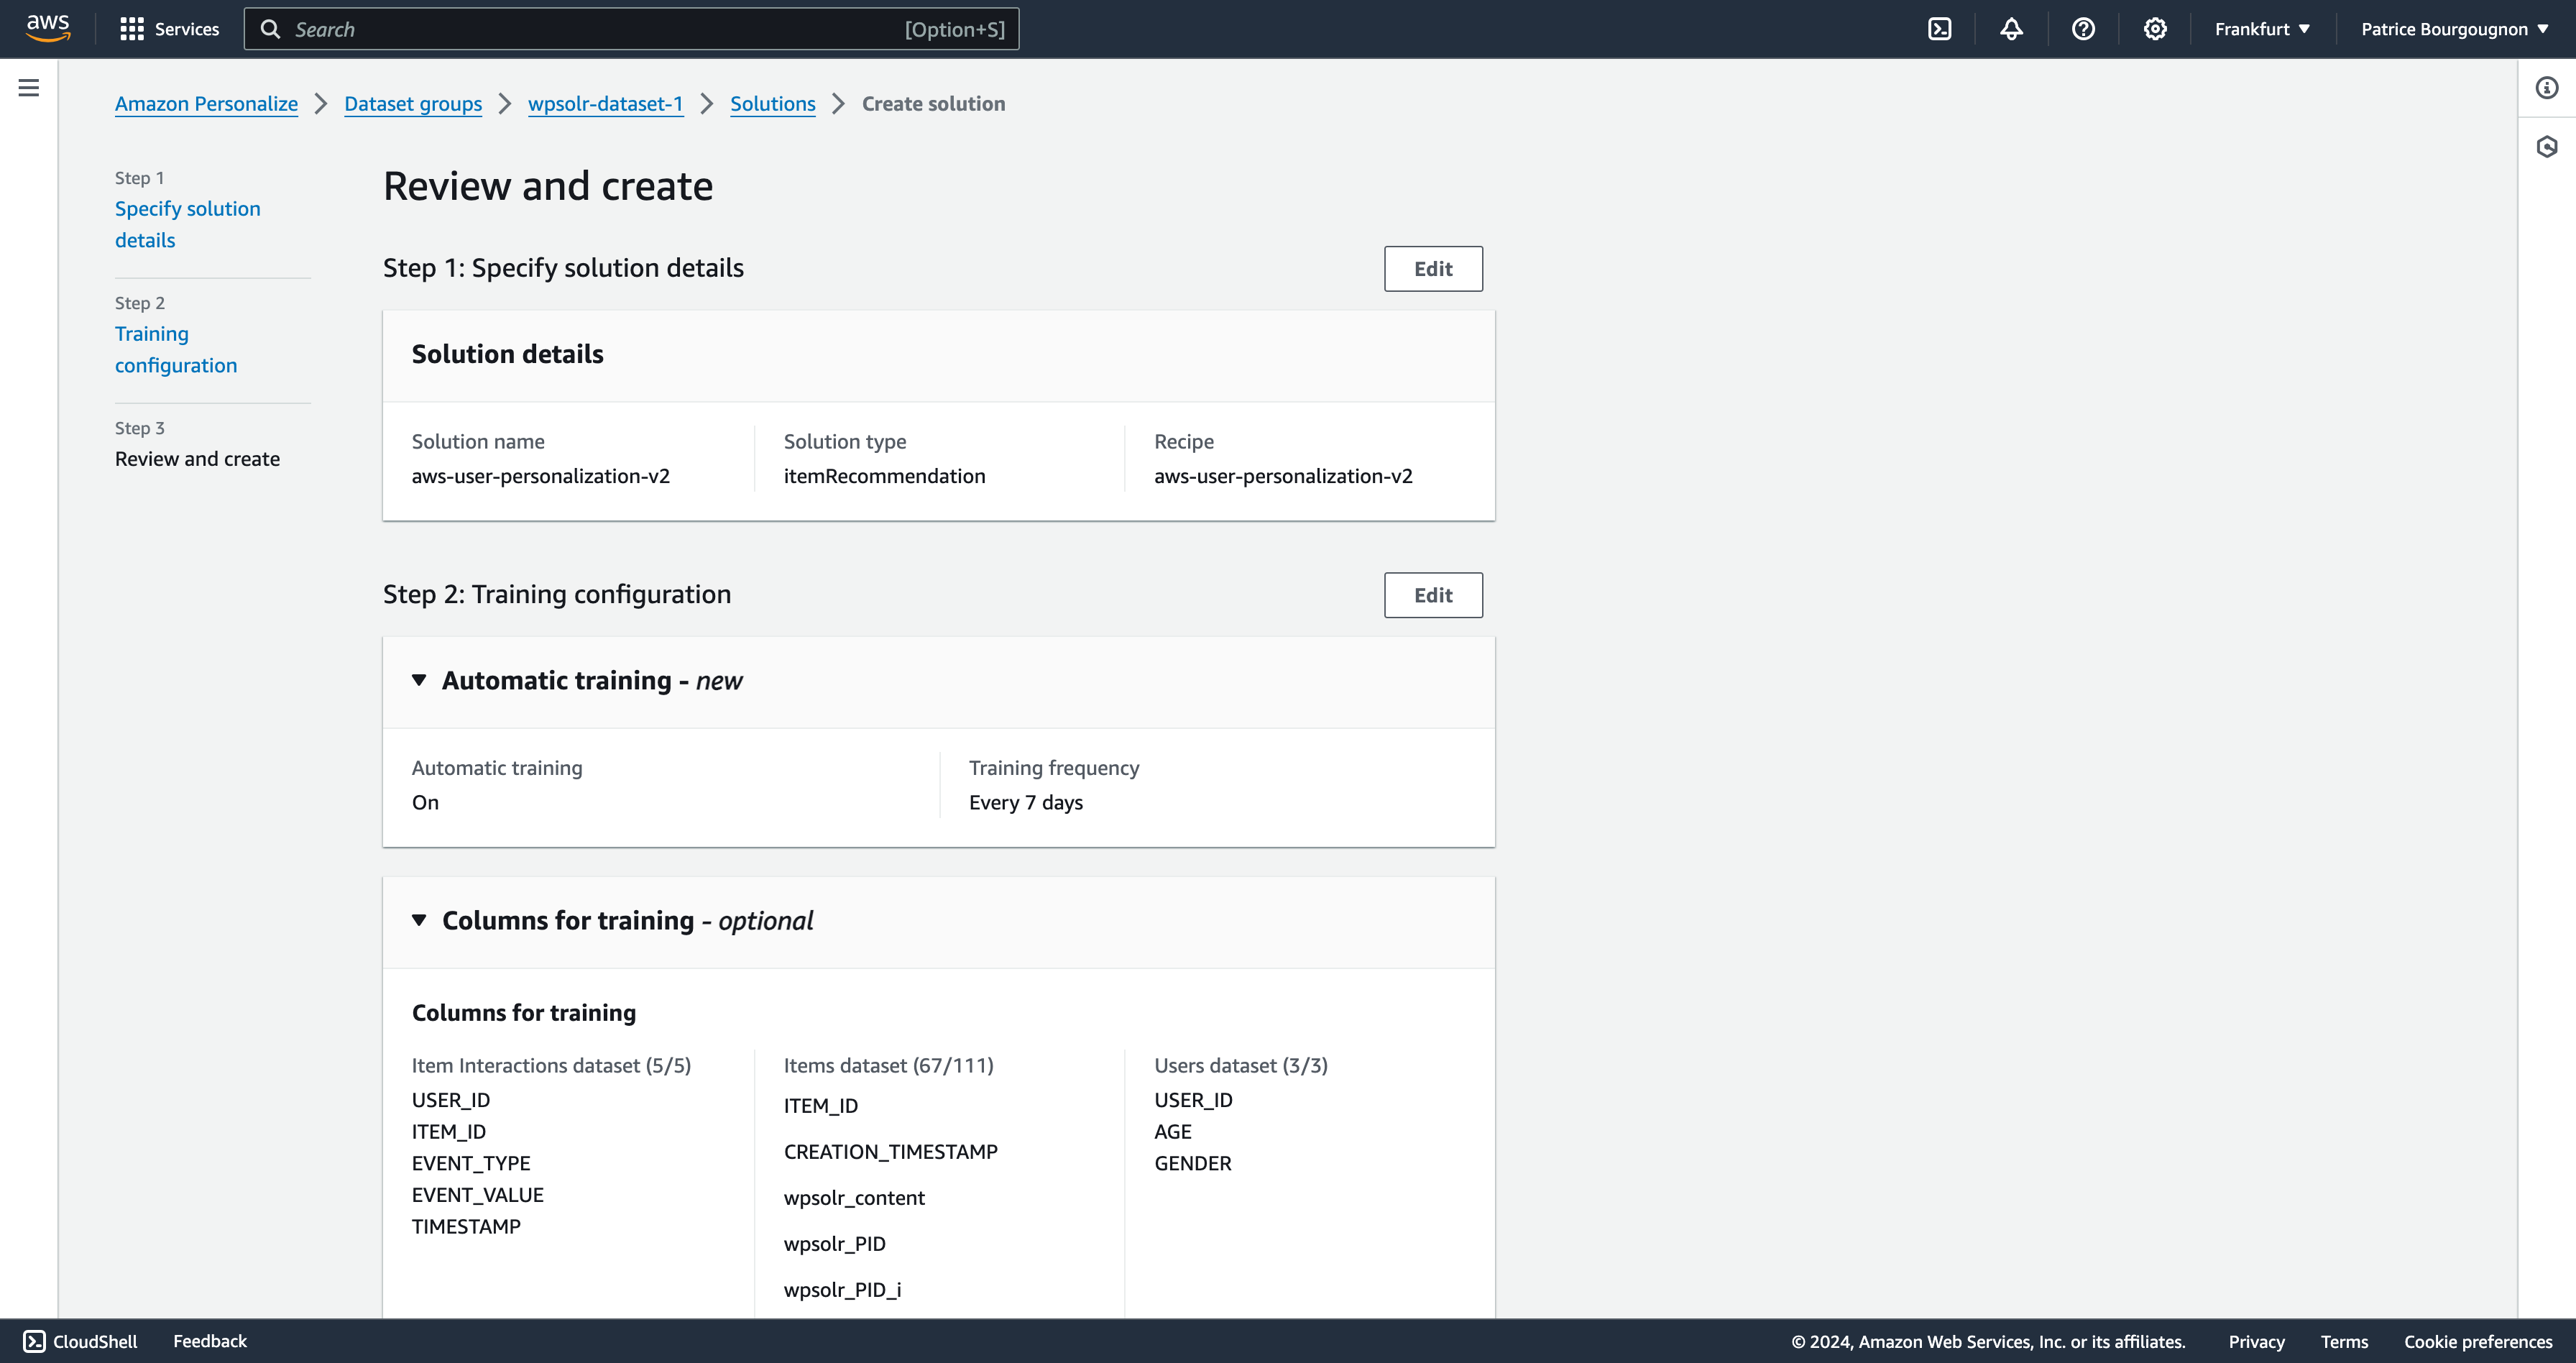
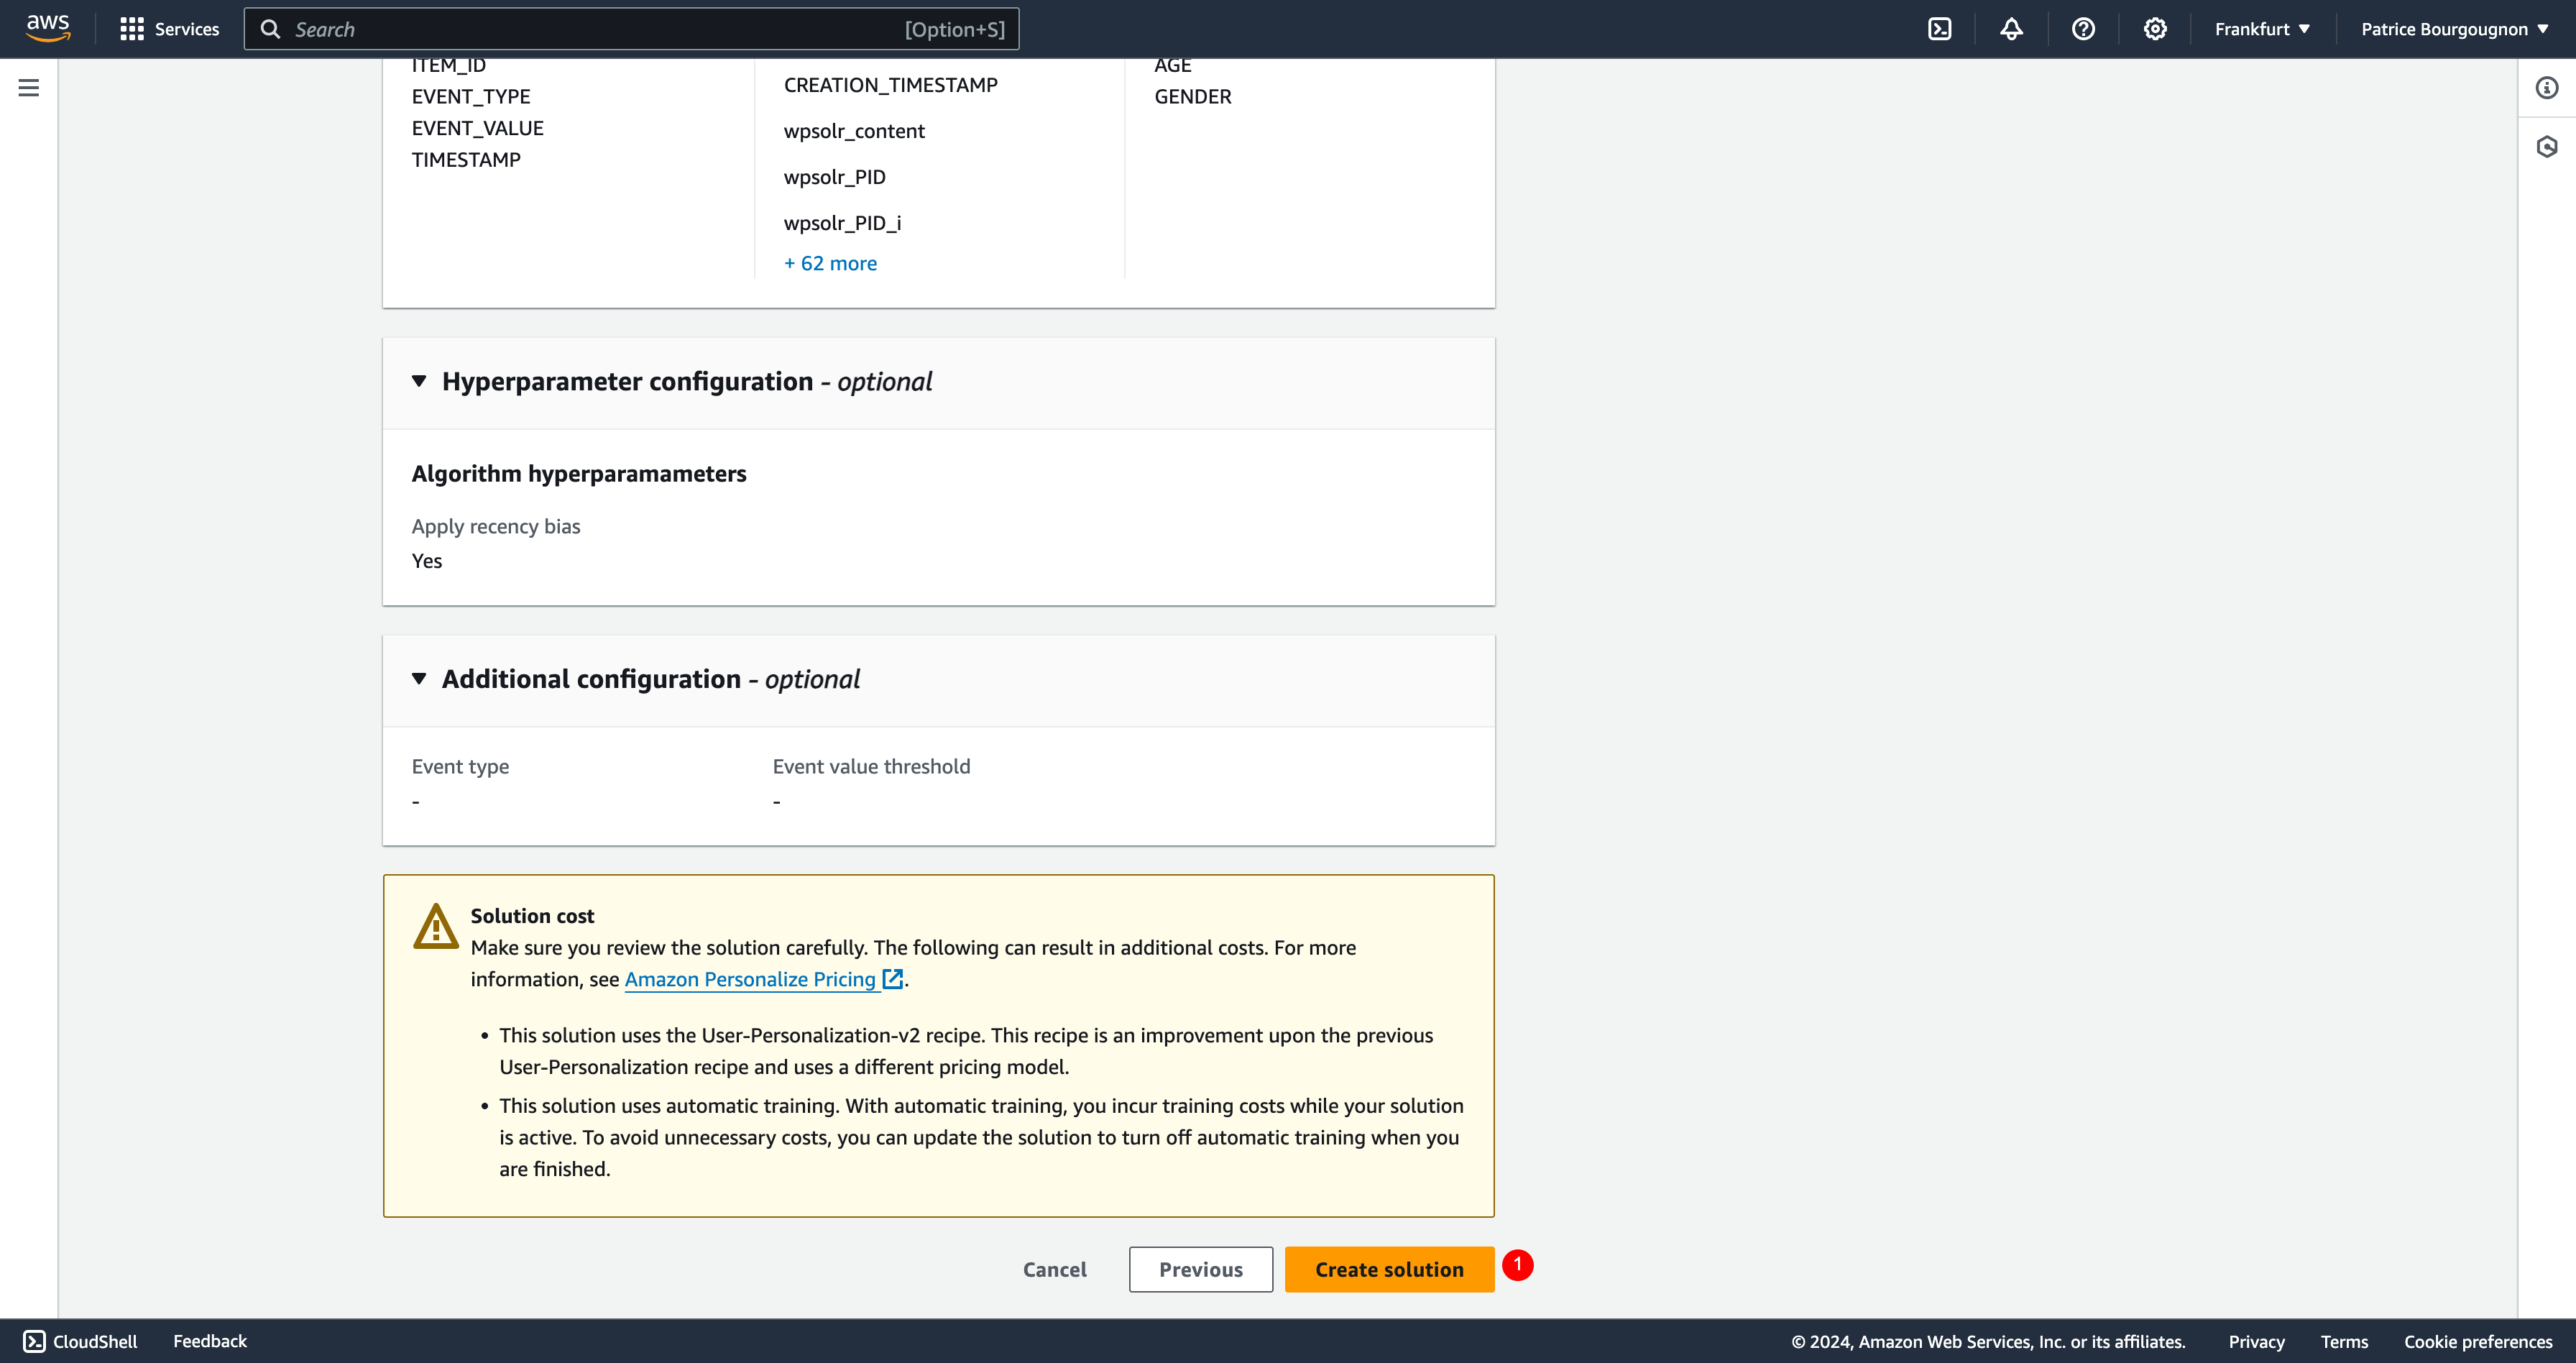
- Click on button “Create solution” to start the solution creation.
Wait for the solution’s version “active” status
The solution version is a trained solution on your datasets data. You can train several versions, but must select one later in your campaign.
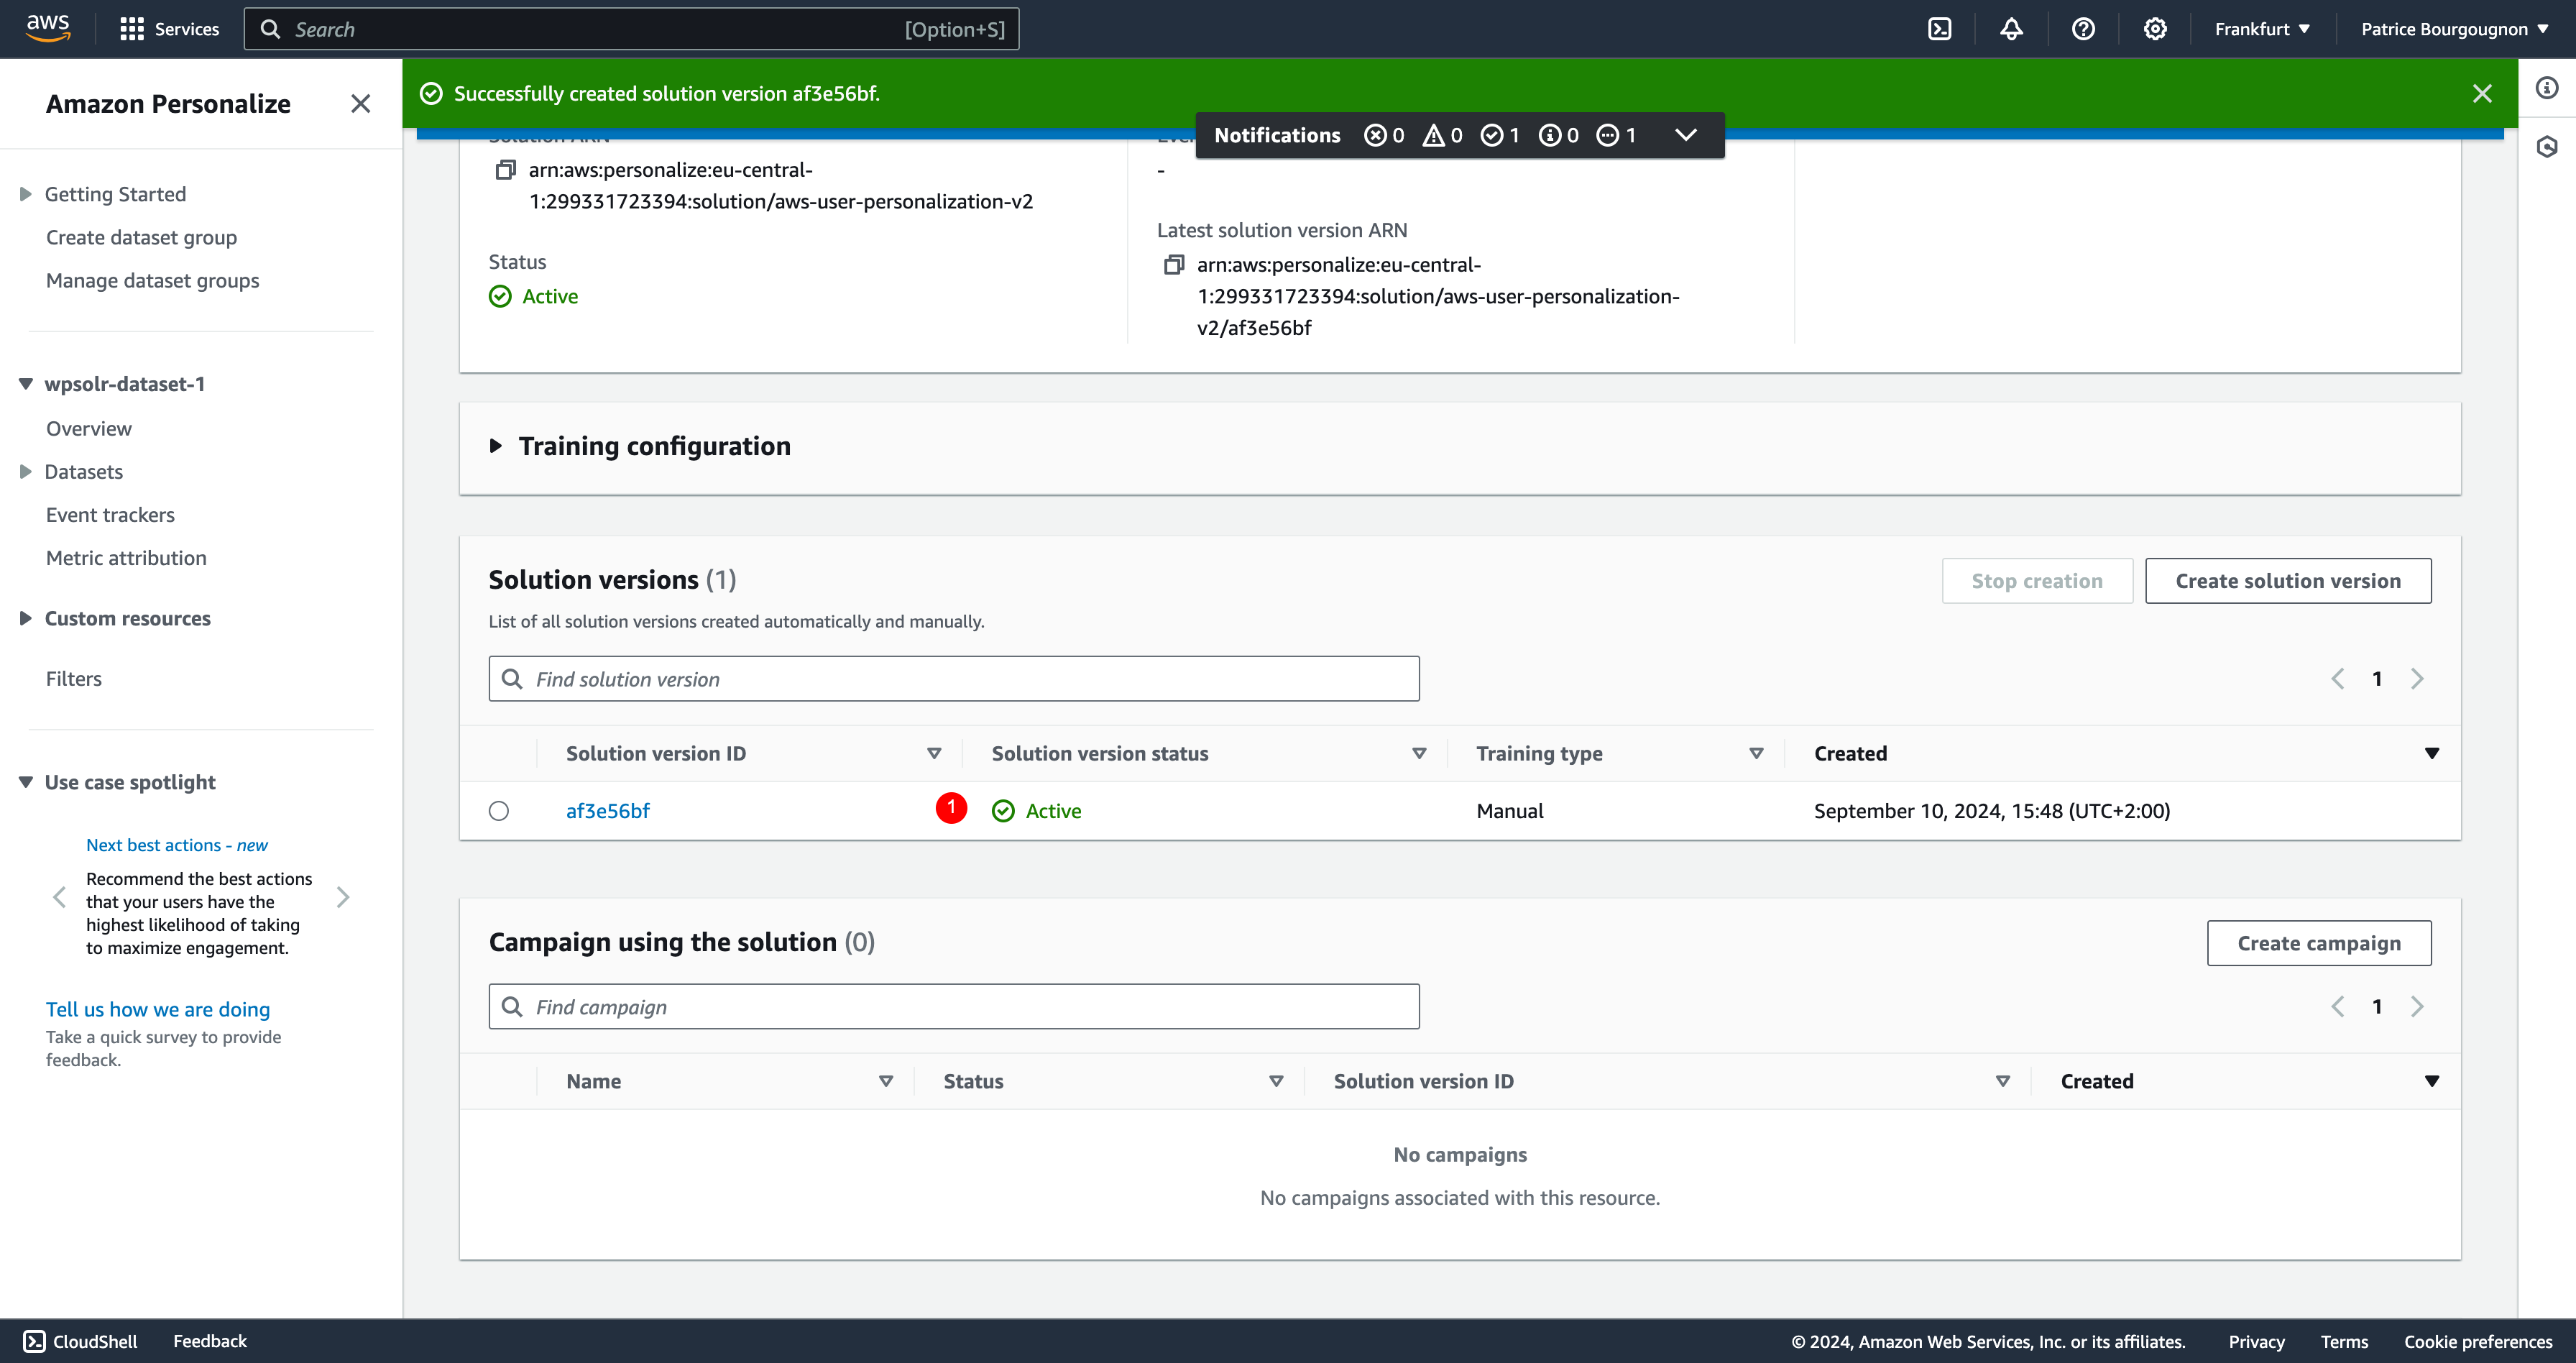
- Wait until the trained solution (aka version)becomes active
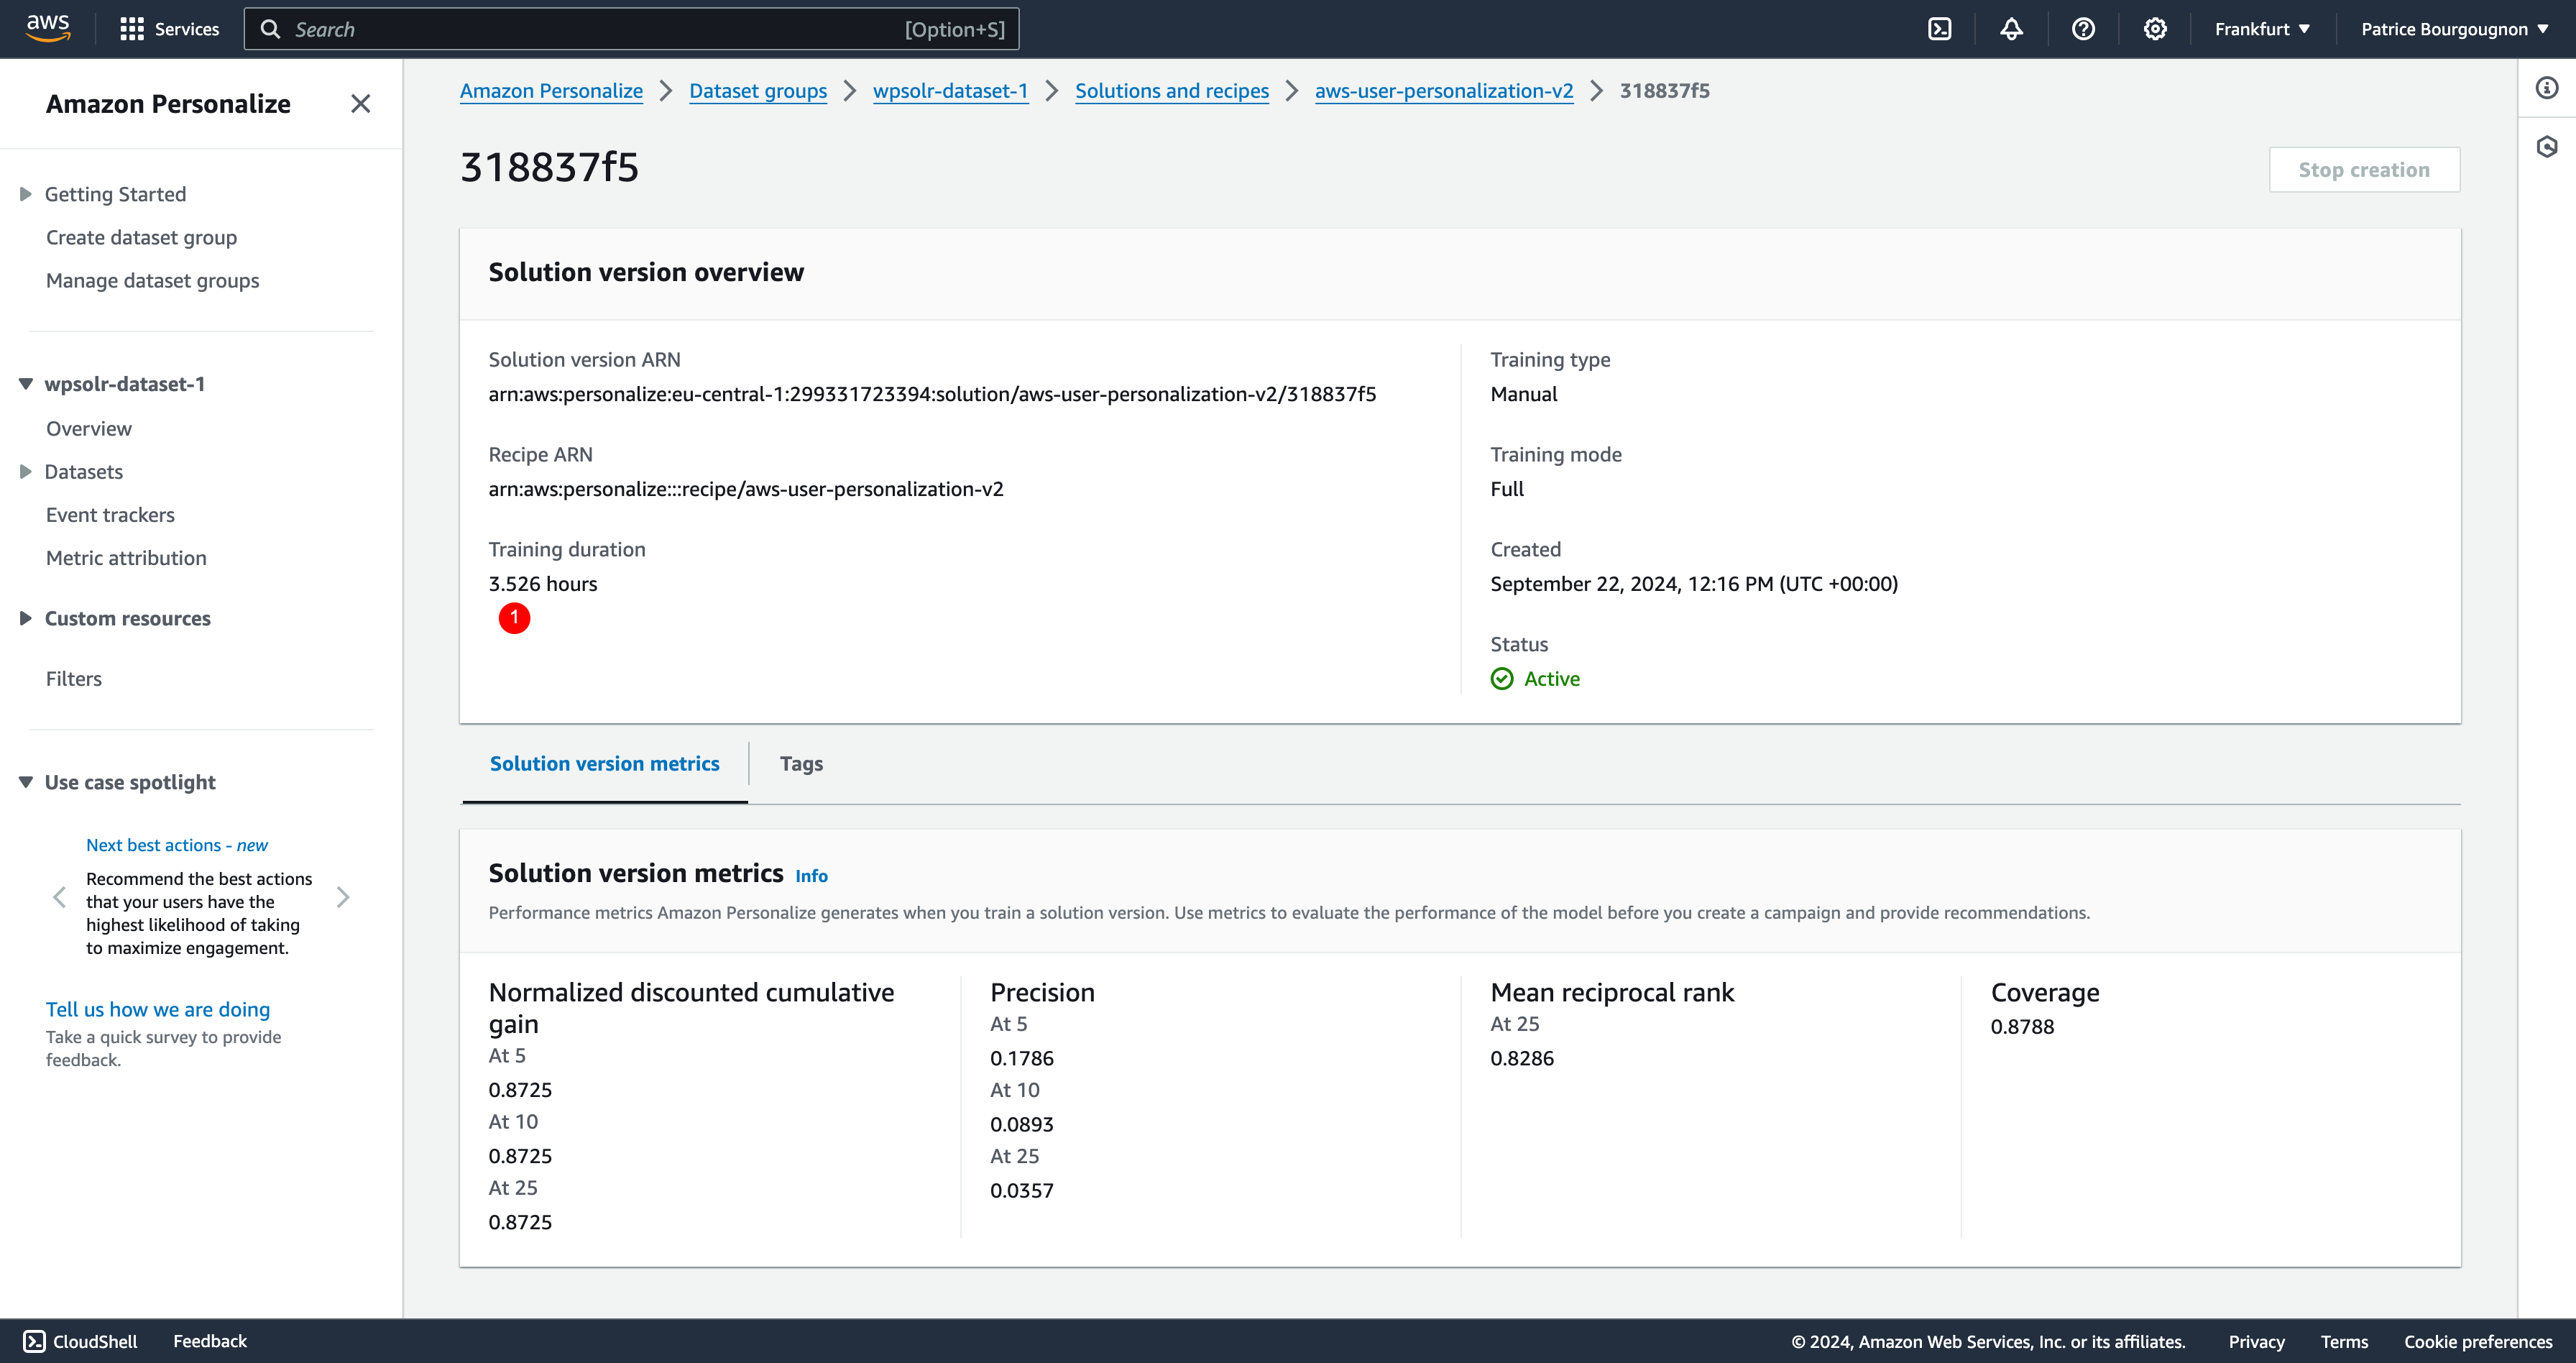
- Just for reference, training a small dataset with 100 items and 2000 interactions can take 4 hours. So, be patient!
Create a campaign
Campaigns expose the trained solutions to the recommendations inference API.
Select a trained solution version
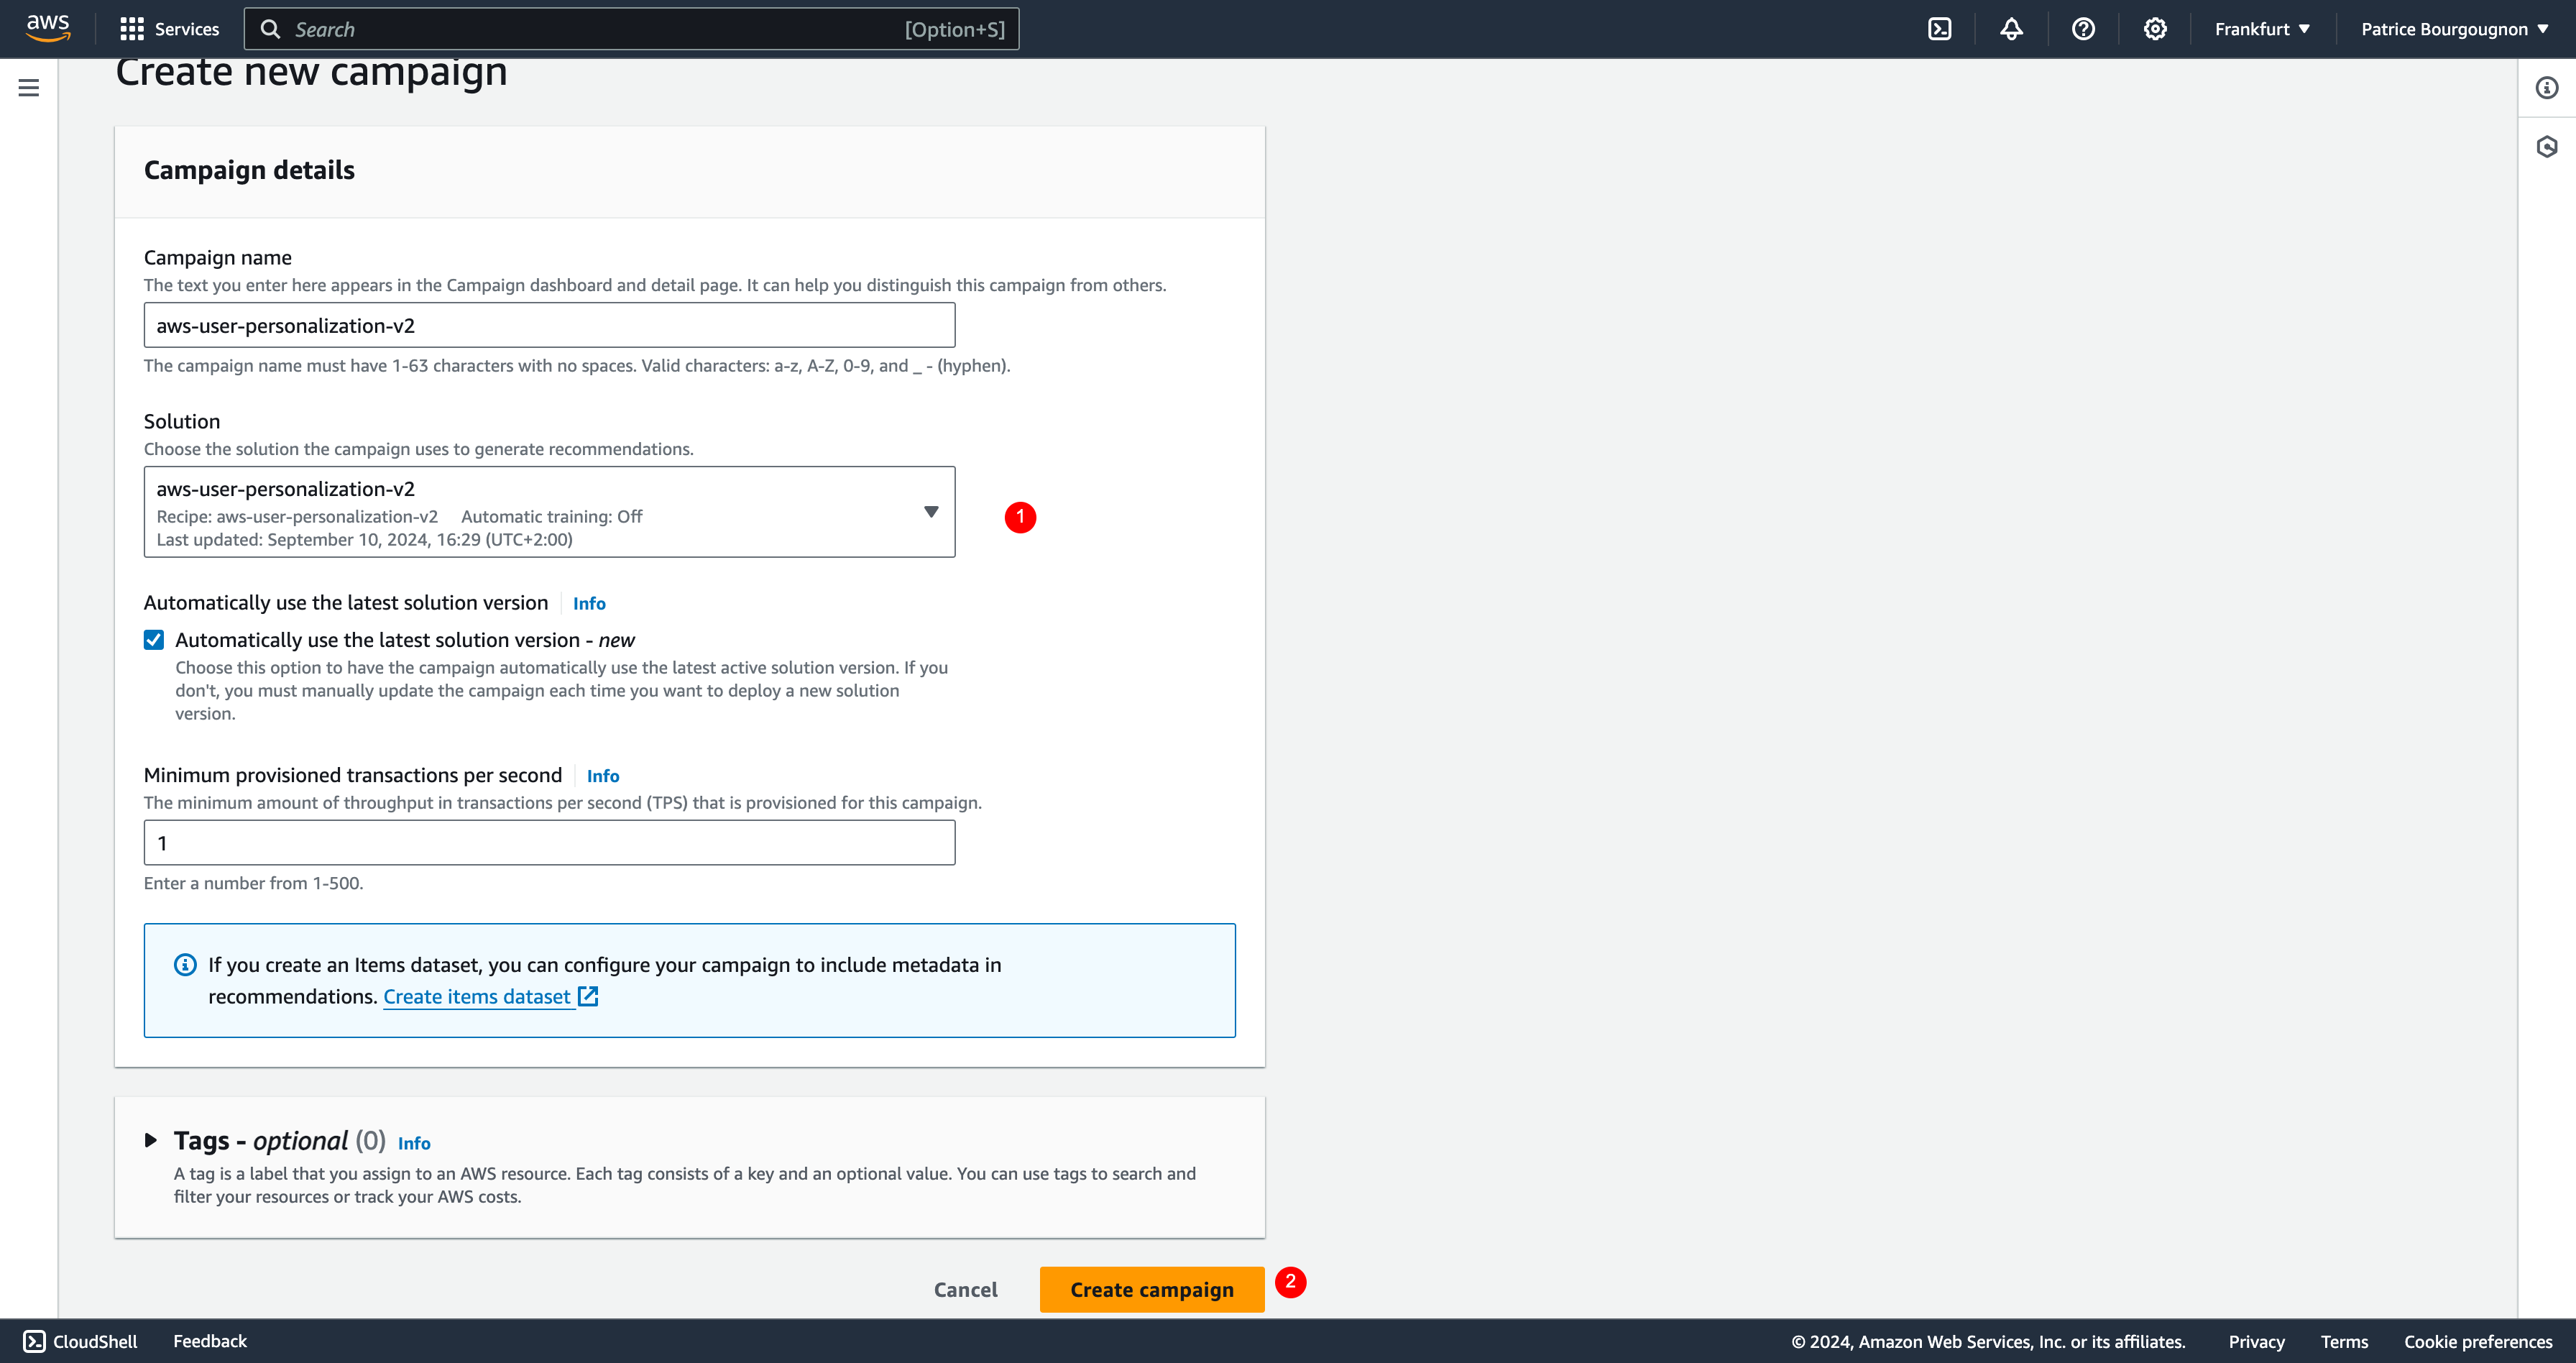
- Choose your trained solution versin
- Click on button “Create campaign”
Wait the campaign “active” status
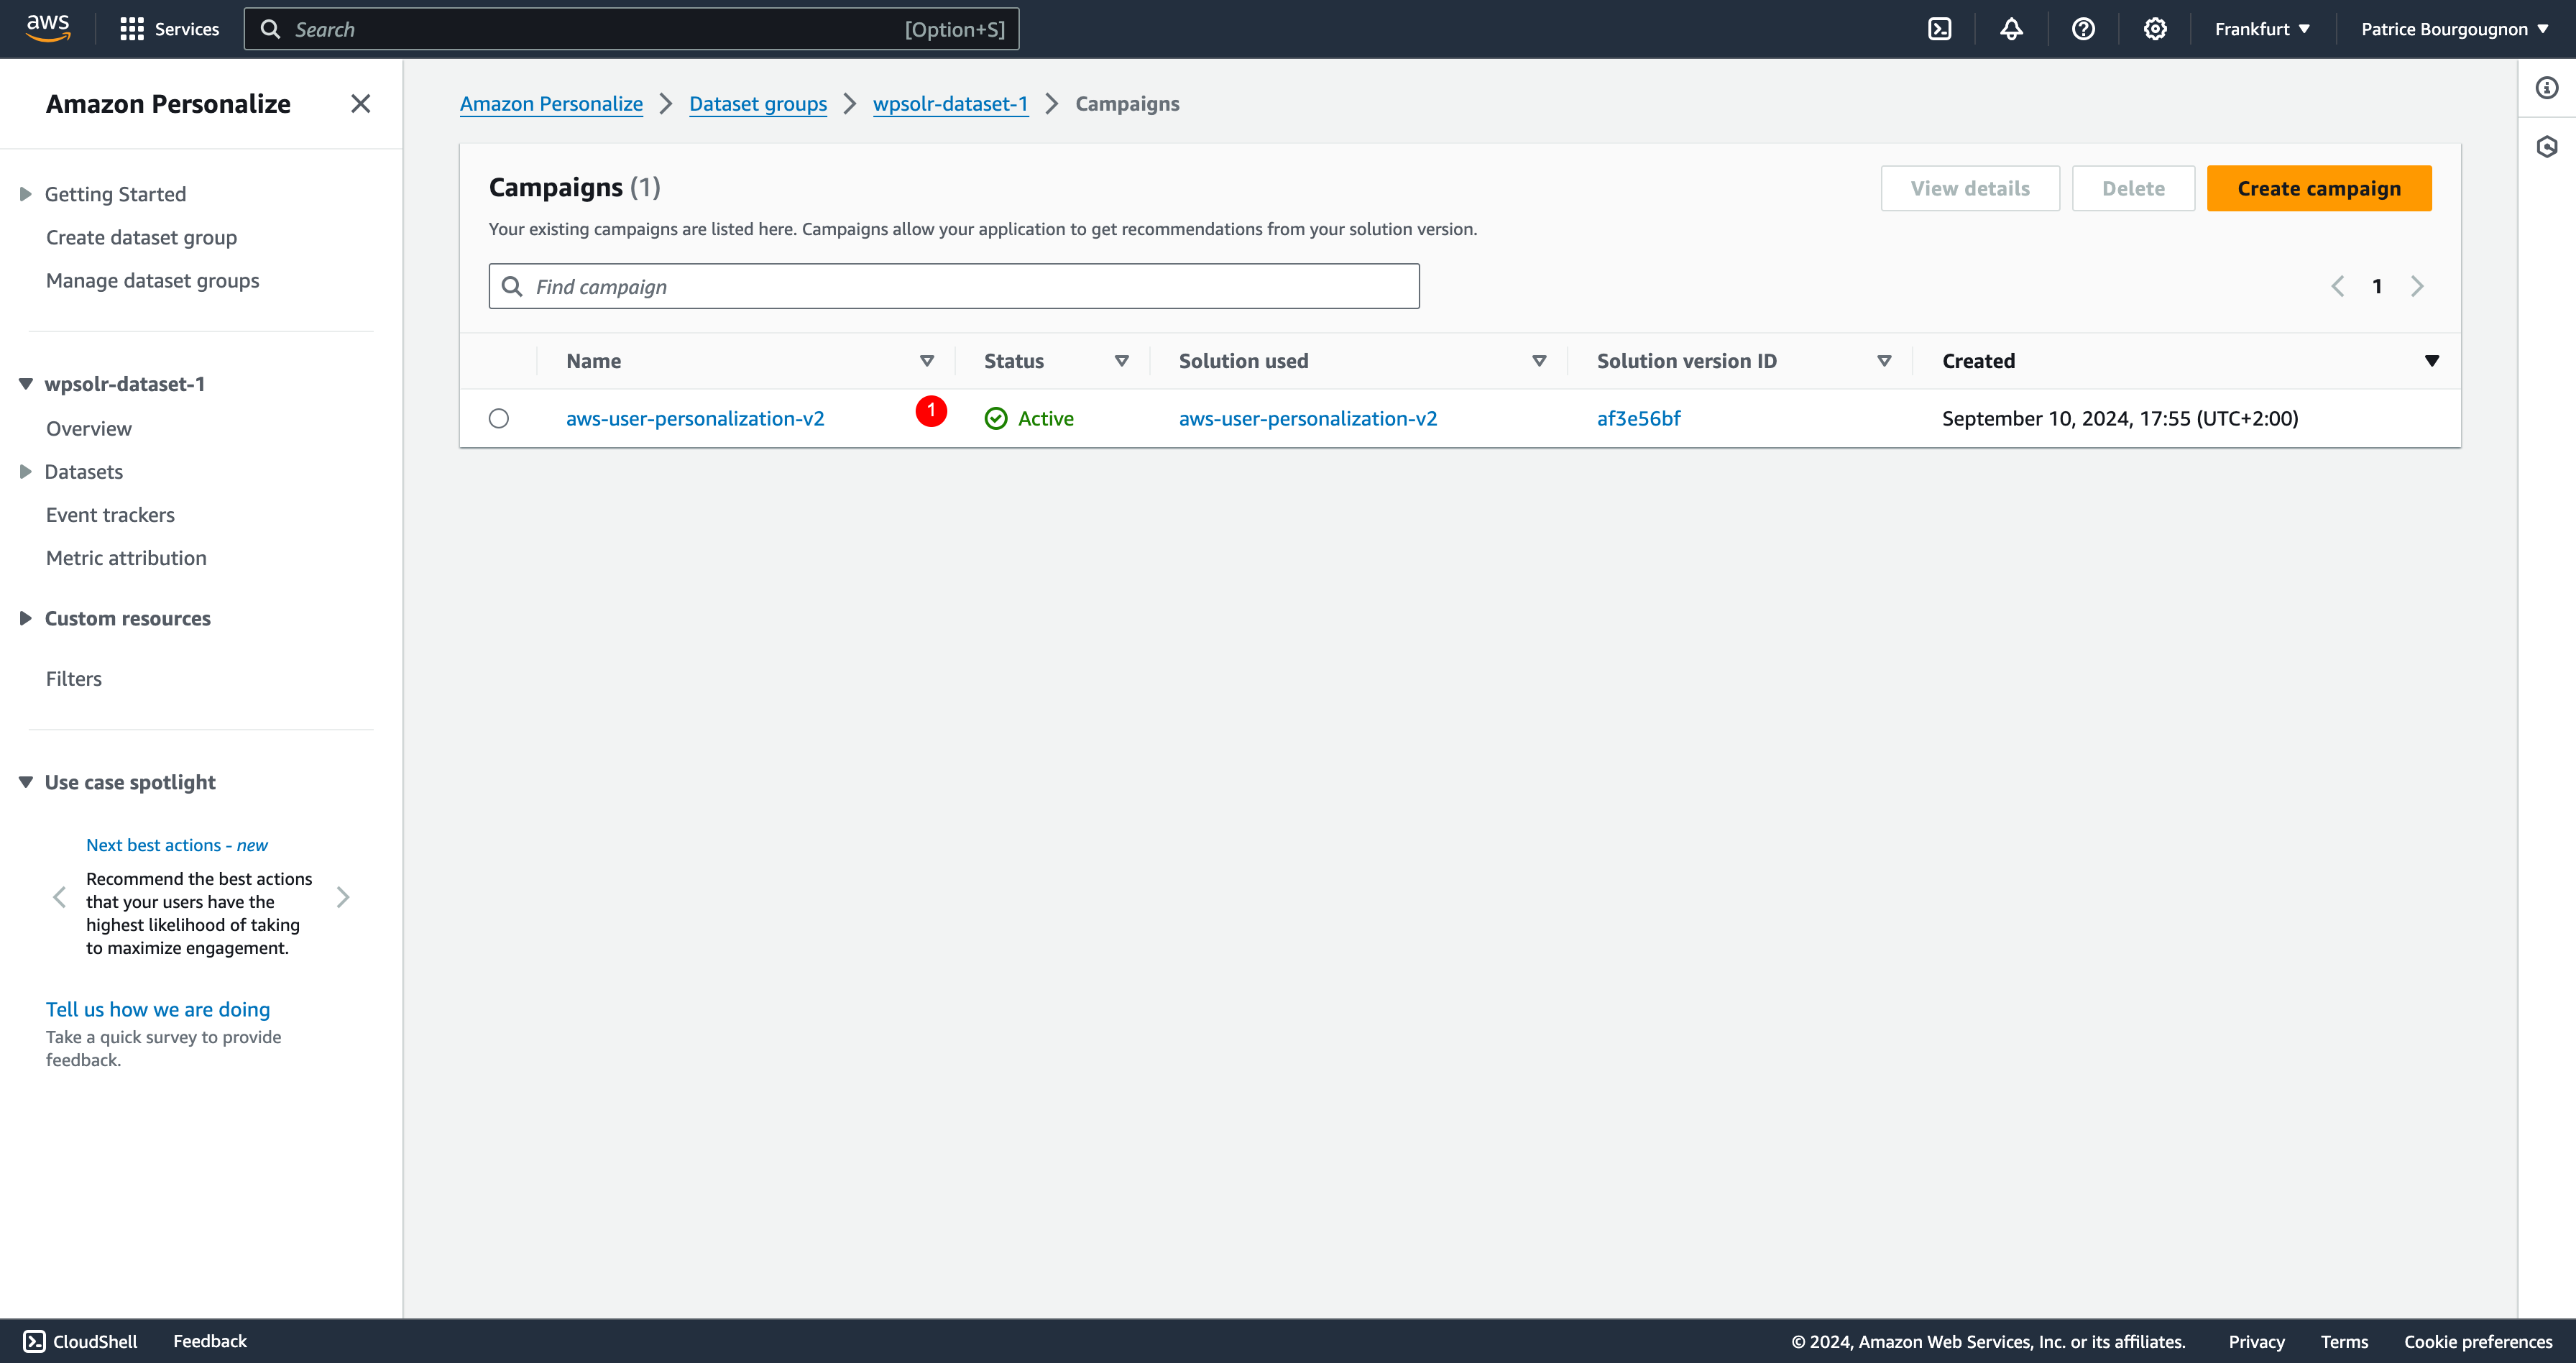
- Wait until the campaign becomes “active”. You can now use it inside WPSolr to fetch recommendations in a widget.
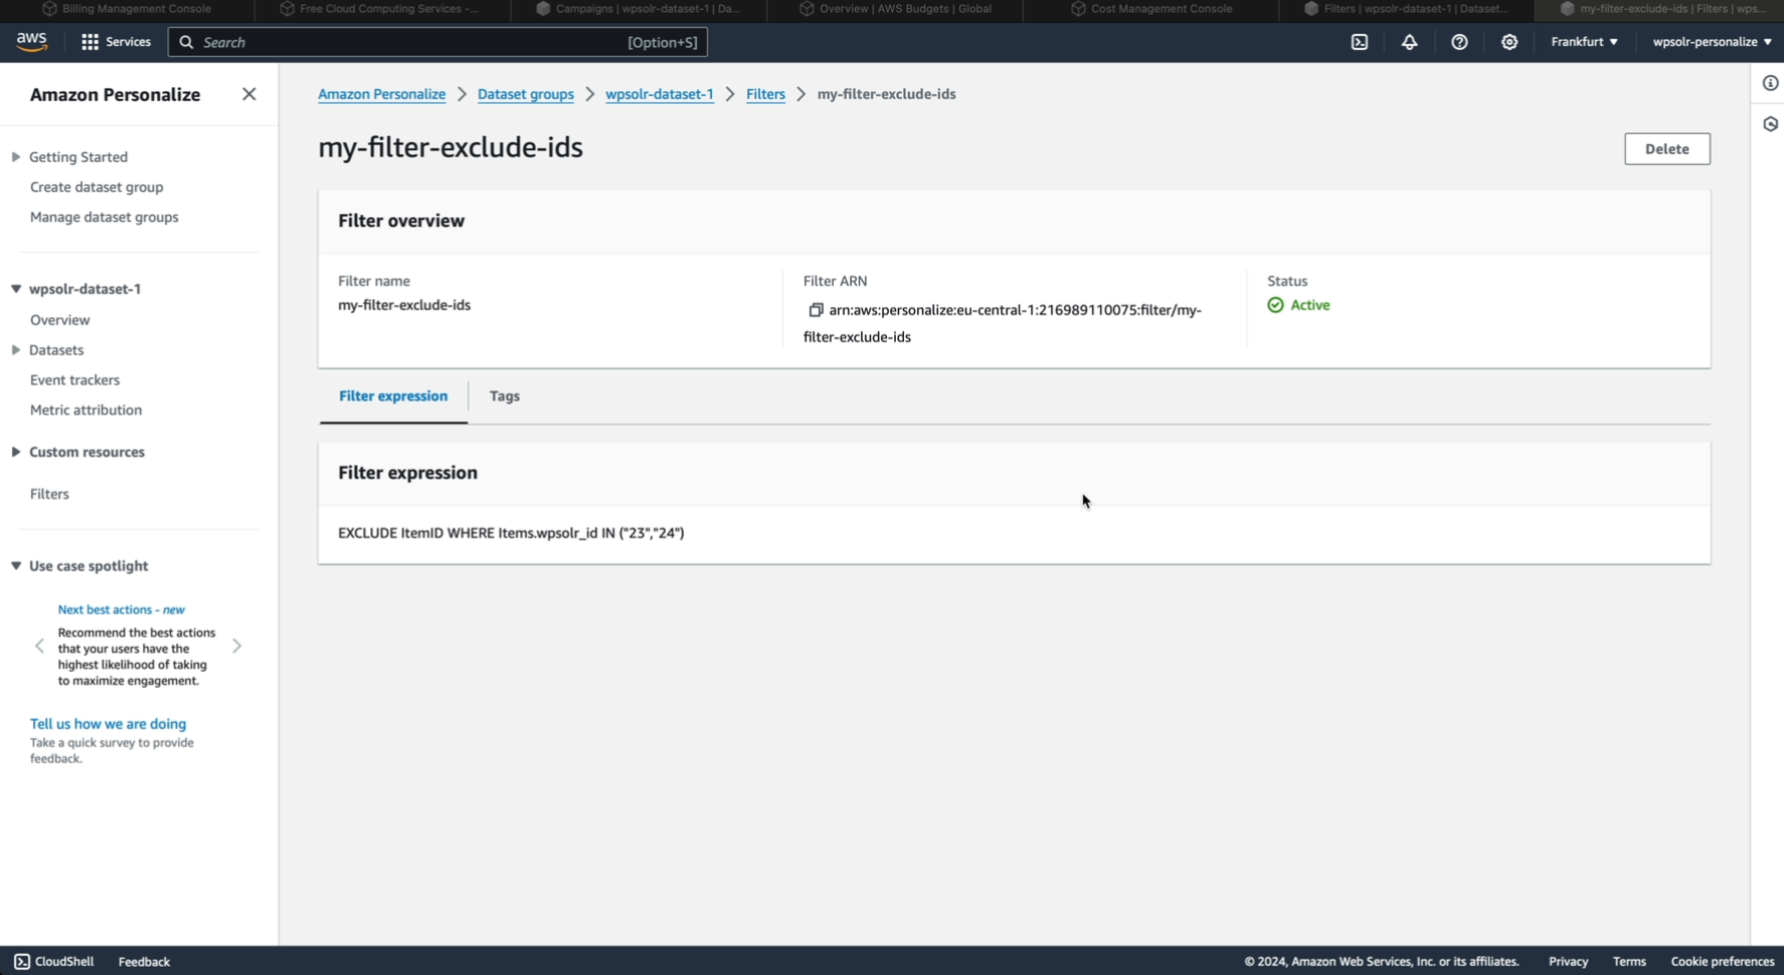
Filters
Filters are created globally, and can be selected in WPSolr to apply on a campaign.
Default filter created by WPsolr
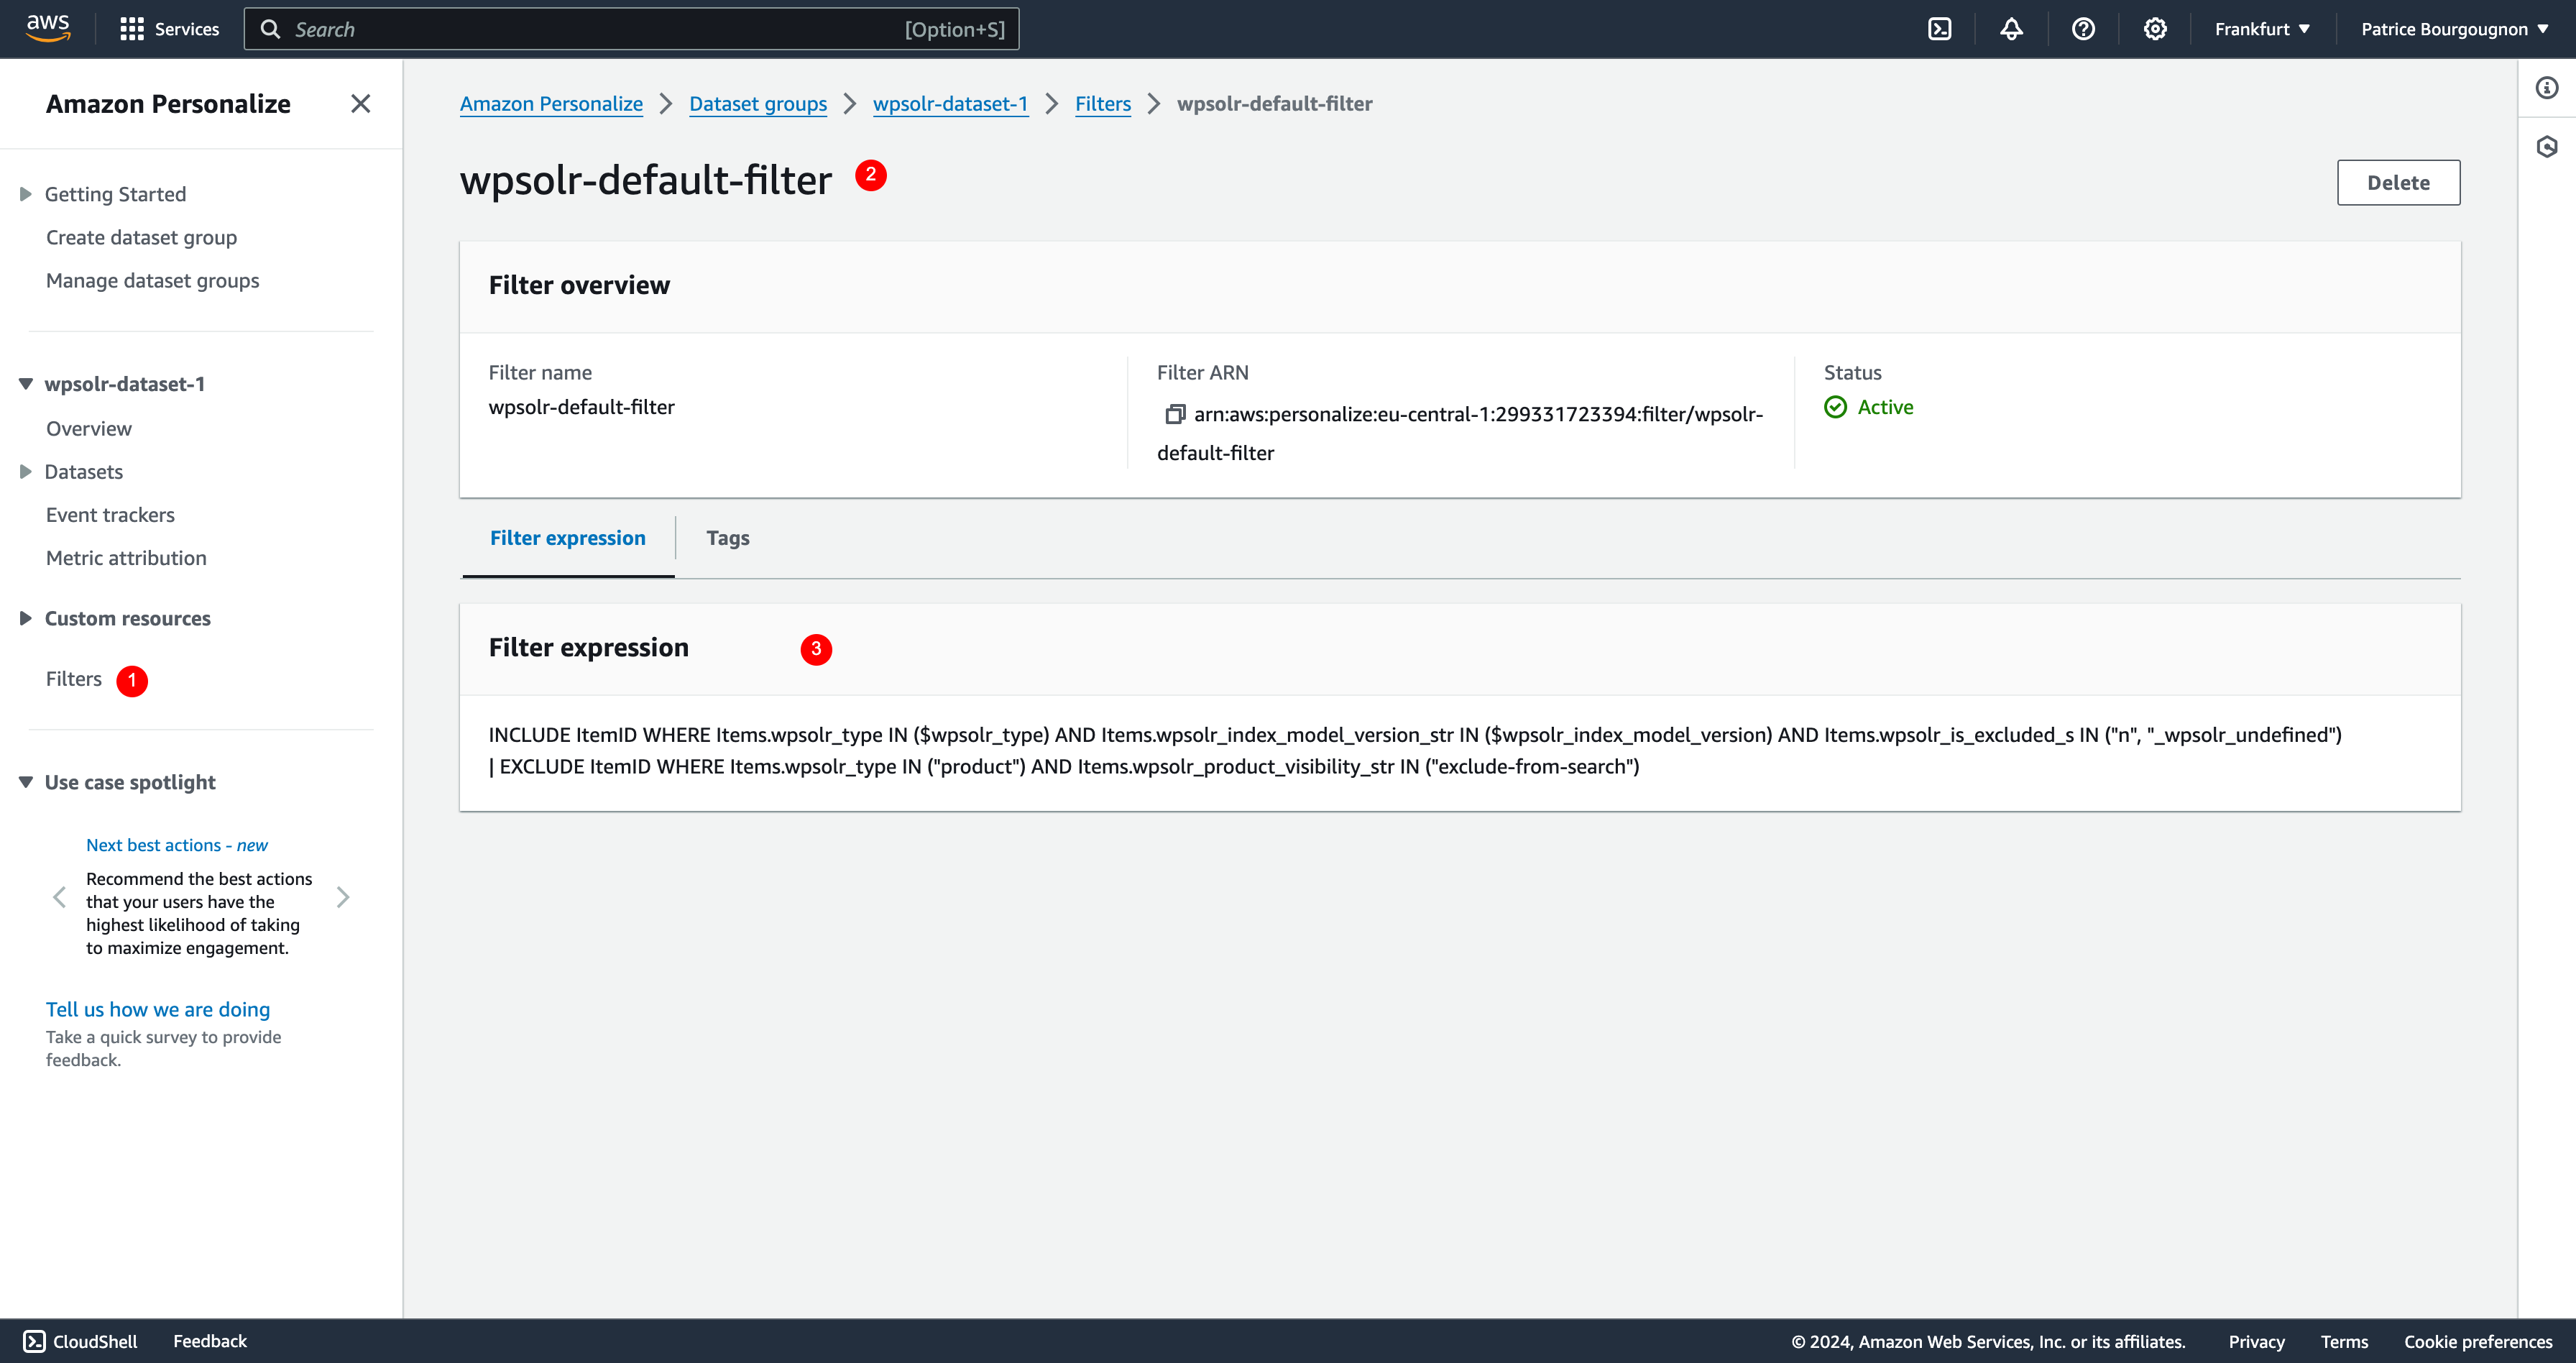
One filter is created for you automatically, named “wpsolr-default-filter”.
It enables WPSolr to filter out recommendations based on their items version, and their post types.
The version is a field managed by WPSOlr to simulate items deletion, real deletion being impossible with Amazon Personalize. Filter variable $wpsolr_index_model_version is used for that purpose.
Post types are selected in WPSolr and passed to the campaign’s filter with filter variable $wpsolr_type.
Create your custom filter
Create one or several filters that you will assign to your campaign later.
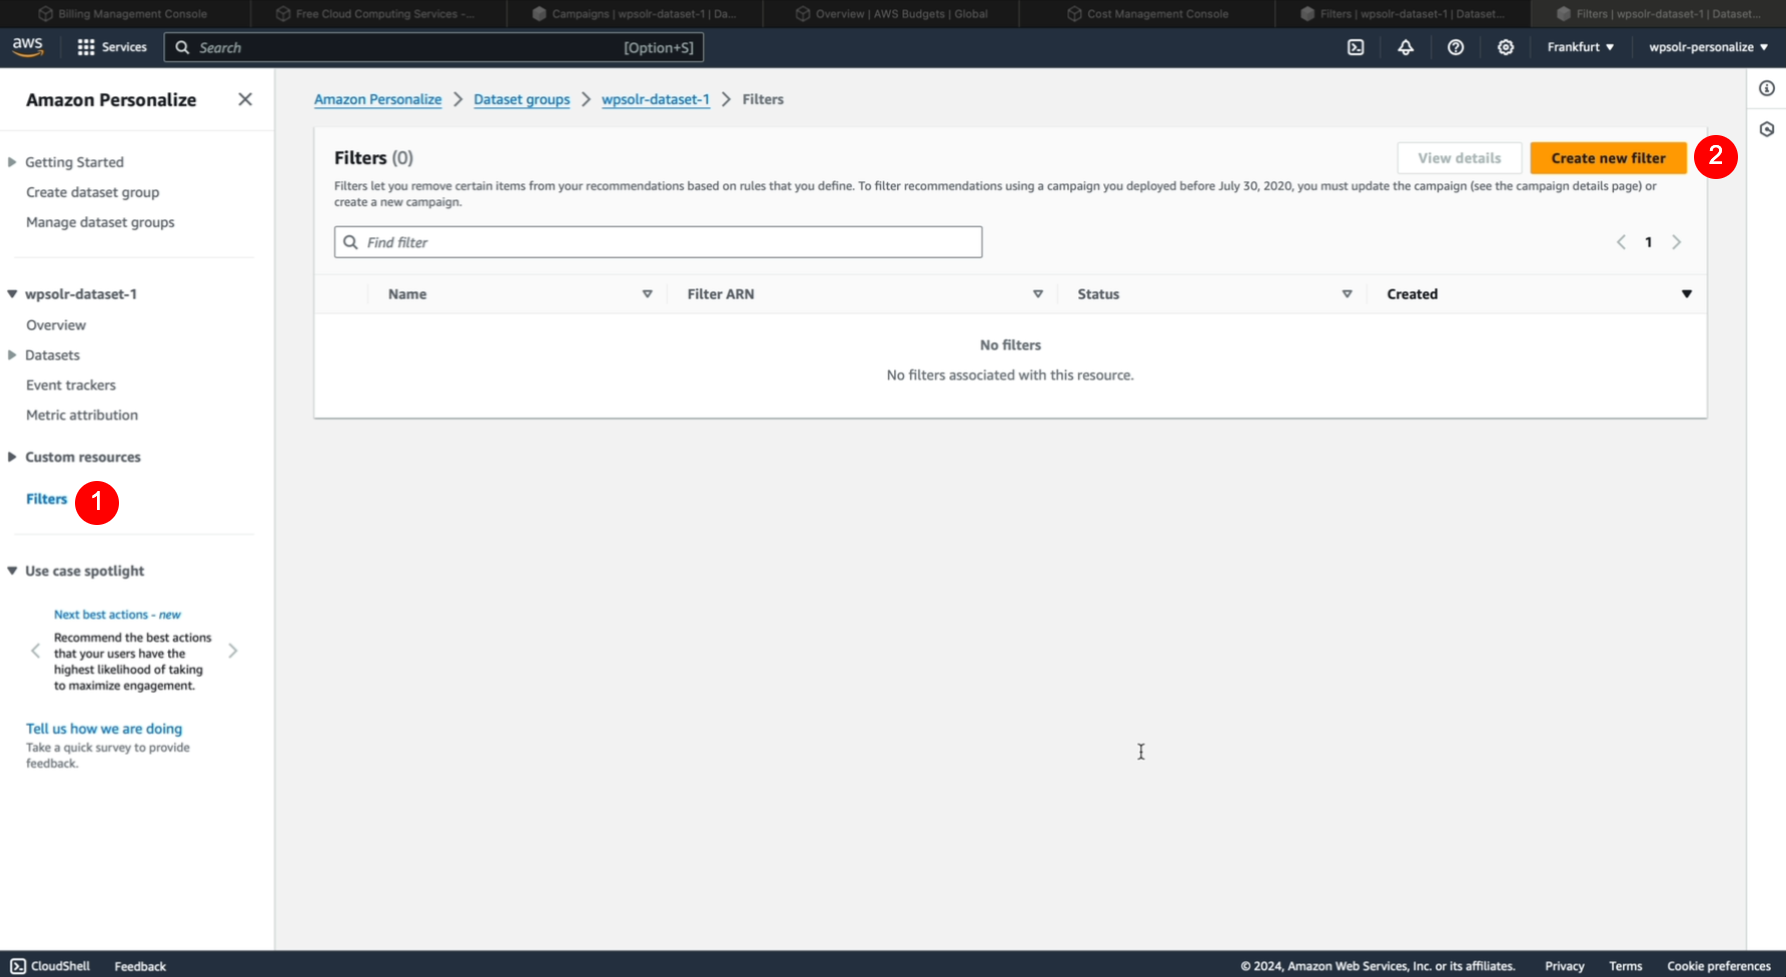
- Select the menu “Filters”
- Click on button “Create new filter”
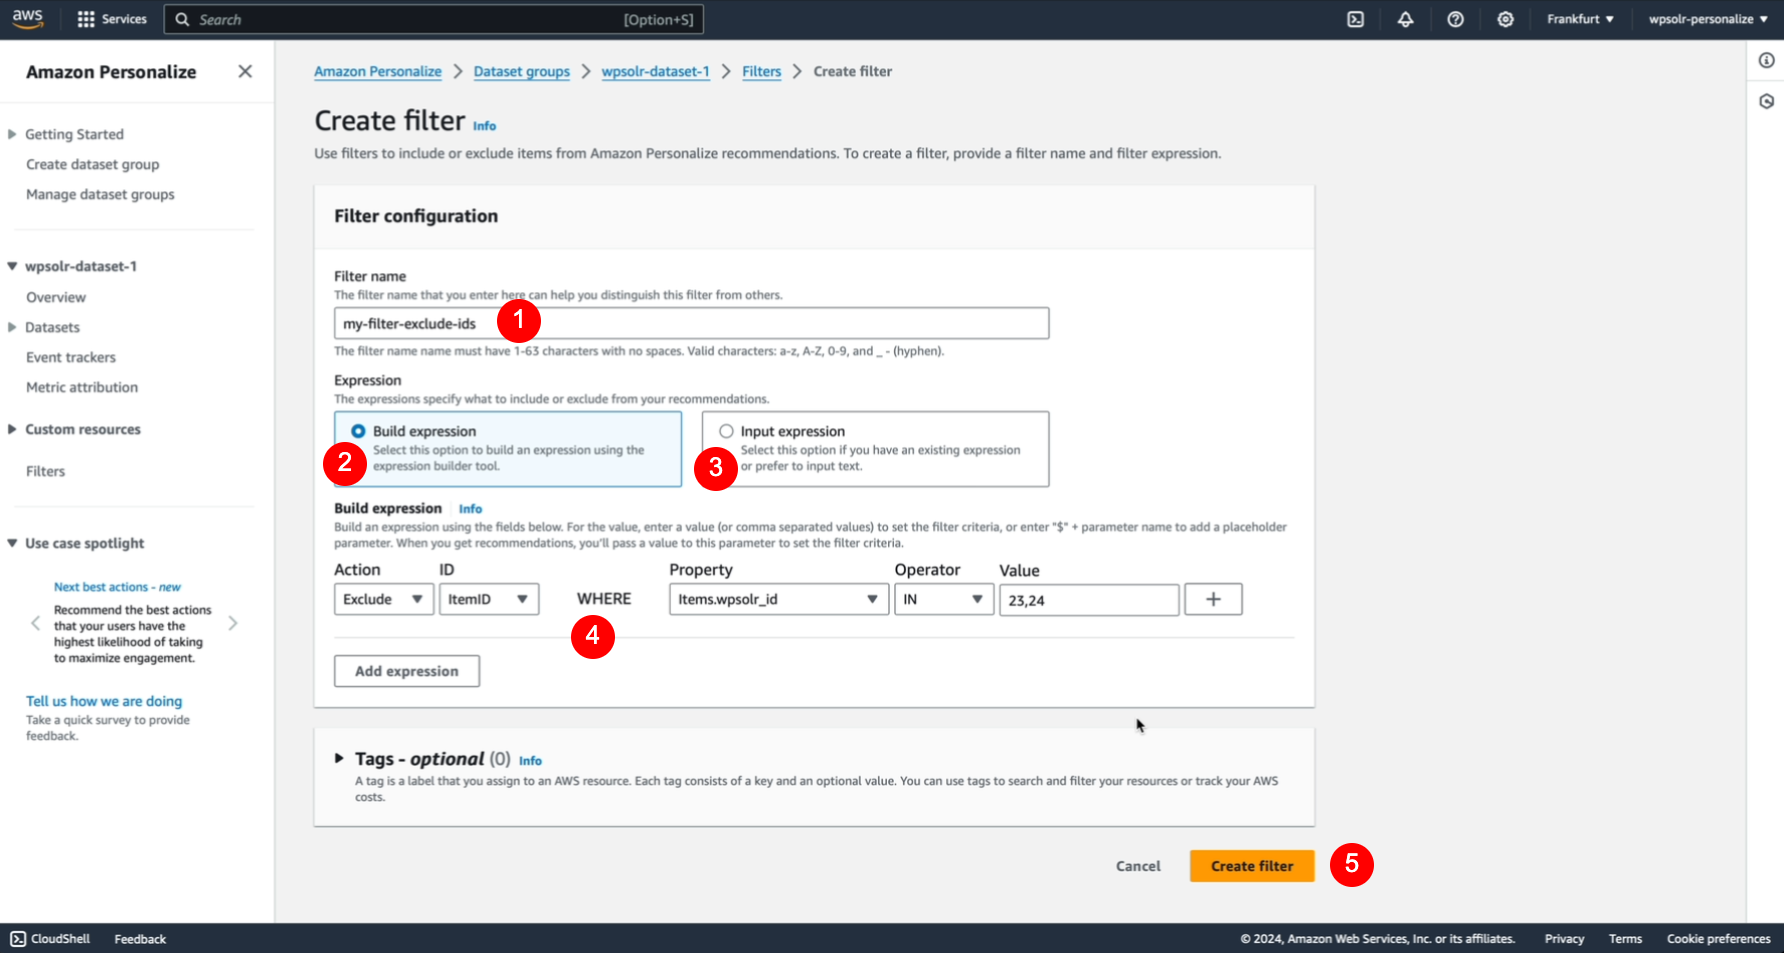
- Set the filter a name
- Choose the expression builder to help you create your filter
- Choose the free text if you want full freedom on the filter conditions
- Build conditions with the builder
- Click on button “Create filter”