
WPSolr logo
  • Brands & Agencies 💛
  • Products
    • Parsing & Chunking
    • Search
      • Algolia  Search
      • Apache Solr  Search
      • Elasticsearch  Search
      • Google AI Commerce  Search
      • OpenSearch  Search
      • OpenSolr  Search
    • AI Search
      • OpenSearch  AI Search
      • PostgreSQL  AI Search
      • Vespa  AI Search
      • Weaviate  AI Search
    • AI Recommendations
      • Amazon Personalize  AI Recommendations
      • Recombee  AI Recommendations
    • AI Personalized Search & Recommendations
      • Algolia  AI Personalized Search & Recommendations
      • Google AI Commerce  AI Personalized Search & Recommendations
  • Learn
    • Documentation & Guides – Everything to get started fast
    • Youtube – 100 practical videos from setup to live site demos
    • Forums – Direct support from our team
    • Blog
  • Pricing
  • My licenses
  • Meet
  • 📞  Call
    • 📞  US : (951) 612-8259
    • 📞  France : 01 62 04 55 85
  • Brands & Agencies 💛
  • Products
    • Parsing & Chunking
    • Search
      • Algolia  Search
      • Apache Solr  Search
      • Elasticsearch  Search
      • Google AI Commerce  Search
      • OpenSearch  Search
      • OpenSolr  Search
    • AI Search
      • OpenSearch  AI Search
      • PostgreSQL  AI Search
      • Vespa  AI Search
      • Weaviate  AI Search
    • AI Recommendations
      • Amazon Personalize  AI Recommendations
      • Recombee  AI Recommendations
    • AI Personalized Search & Recommendations
      • Algolia  AI Personalized Search & Recommendations
      • Google AI Commerce  AI Personalized Search & Recommendations
  • Learn
    • Documentation & Guides – Everything to get started fast
    • Youtube – 100 practical videos from setup to live site demos
    • Forums – Direct support from our team
    • Blog
  • Pricing
  • My licenses
  • Meet
  • 📞  Call
    • 📞  US : (951) 612-8259
    • 📞  France : 01 62 04 55 85
  • Brands & Agencies 💛
  • Products
    • Parsing & Chunking
    • Search
      • Algolia  Search
      • Apache Solr  Search
      • Elasticsearch  Search
      • Google AI Commerce  Search
      • OpenSearch  Search
      • OpenSolr  Search
    • AI Search
      • OpenSearch  AI Search
      • PostgreSQL  AI Search
      • Vespa  AI Search
      • Weaviate  AI Search
    • AI Recommendations
      • Amazon Personalize  AI Recommendations
      • Recombee  AI Recommendations
    • AI Personalized Search & Recommendations
      • Algolia  AI Personalized Search & Recommendations
      • Google AI Commerce  AI Personalized Search & Recommendations
  • Learn
    • Documentation & Guides – Everything to get started fast
    • Youtube – 100 practical videos from setup to live site demos
    • Forums – Direct support from our team
    • Blog
  • Pricing
  • My licenses
  • Meet
  • 📞  Call
    • 📞  US : (951) 612-8259
    • 📞  France : 01 62 04 55 85
Expand All Collapse All
  • What is WPSOLR ?
    • The standard WordPress SQL search
    • The WPSOLR search with Elasticsearch, Apache Solr, or Algolia
  • Your configuration journey, step by step
    • Install Apache Solr
    • Hosted Apache Solr and SolrCloud Services
    • Install Weaviate
    • Install Opensearch
    • Install Elasticsearch
    • Elasticsearch Hosting
    • Configure search
      • Getting started with search
      • Getting started with Ajax (live) search
      • Getting started with facets
      • 0. Connect your indexes
        • Create a Google Retail search index
        • Create an Elasticsearch index
          • Generate a test Elasticsearch index
          • Create an Elastic Elasticsearch index
          • Create an Elasticsearch index
          • Create a Qbox Elasticsearch index
          • Create an ElasticPress Elasticsearch index
          • Create an Aiven Elasticsearch or OpenSearch index
          • Create a Bonsai Elasticsearch index
          • Create an Amazon AWS Elasticsearch index
          • Create an ObjectRocket Elasticsearch index
          • Create a Cloudways Elasticsearch or Opensearch index
          • Create an Alibaba Cloud Elasticsearch index
          • Create a Compose Elasticsearch index
          • Connect to an Elasticsearch index
        • Create an Apache Solr index
          • Generate a test Apache Solr index
          • Create an Apache Solr index
          • Create a SearchStax SolrCloud index
          • Create an Opensolr Solr index
          • Connect to an Apache Solr index
        • Create an Opensearch index
          • Create a WPSOLR Hosting OpenSearch index
          • Create an Amazon AWS OpenSearch index
        • Create a Weaviate index
          • Weaviate with Google PaLM API
          • Weaviate with GPT4All
          • Weaviate with sentence transformers
          • Weaviate with CLIP text-to-image
          • Weaviate with HuggingFace Endpoints API
          • Weaviate with OpenAI GPT API
          • Weaviate with Cohere Multilingual API
          • Weaviate with Question Answering transformers
          • Weaviate with Hybrid search
          • Weaviate with Reranker - Cohere
          • Weaviate with Reranker - Transformers (cross-encoders)
        • Create an Algolia index
      • 1. Activate extensions (Add-ons)
        • bbPress add-on
        • YITH WooCommerce Ajax Search add-on
        • SEO add-ons
          • Yoast SEO add-on
          • All in One SEO add-on
        • Listable add-on
        • ACF add-on
        • Advanced Scoring add-on
        • Cron Scheduling add-on
        • Theme add-on
          • Filters layouts
            • Radiobox & Checkbox Layout
            • Numeric Range Layout
            • Colour Picker Layout
            • Date Picker (Flatpickr) Layout
            • Range Slider Layout
          • Add Ajax to the current Theme
          • Collapse taxonomy hierarchies
          • Custom Facets CSS
        • WPML add-on
        • Premium add-on
          • Manage more than one Elasticsearch or Solr index
        • PDF Embedder add-on
        • Geolocation add-on
        • AI Natural Language APIs add-on
          • Amazon Comprehend
          • Google Natural Language
          • Aylien Text Analysis
          • MeaningCloud
          • Qwam Text Analytics
        • Toolset Types add-on
        • AI Image and OCR APIs add-on
          • Google Vision
          • Amazon Rekognition
        • Embed Any Document add-on
        • MyListing add-on
        • Polylang add-on
        • WooCommerce add-on
        • Cross-domain federated search add-on
        • Directory+ add-on
        • Toolset Views add-on
        • Listify add-on
        • Jobify add-on
        • Query Monitor add-on
      • 2. Define your search
        • 2.3 Boosts
        • 2.3 Suggestions (Ajax search)
        • 2.1 Search
        • 2.2 Data
      • 3. Index your data
    • Configure recommendations
      • Algolia - Recommend and Personalized search
      • Recombee - Recommendations
      • Google Retail - AI Recommendations and Personalized search
      • Amazon Personalize
    • Configure WPSOLR Parsing and Chunking
    • Create your Custom Templates for Citations, Suggestions, Related Posts & Recommendations
  • Quick start

Create an Amazon AWS Elasticsearch index

7183 views 1 February 13, 2019 Updated on December 18, 2023

Table of Contents

Toggle
  • ⚠️ Amazon AWS is no longer updating its Elasticsearch service.
  • Consider creating an Amazon AWS OpenSearch  index instead.
  • Setup WPSOLR and Amazon AWS Elasticsearch
    • What is Amazon AWS Elasticsearch?
  • 1 – Signup for a free test subscription at AWS Elasticsearch
  • 2 – Create a Key/Secret to secure your Elasticsearch indexes
      • 2.1 – Navigate to your security credentials
      • 2.2 – Navigate to your policies
      • 2.3 – Click on Create policy button
      • 2.4 – Add the Elasticsearch service to the new policy
      • 2.5 – Add all Elasticsearch service actions (es:*) to the new policy
      • 2.6 – Add all domains resources to the new policy
      • 2.7 – Review the the new policy
      • 2.8 – New policy has been created
      • 2.9 – Navigate to your users menu. Click on Add user button
      • 2.10 – Give new user a programmatic access: he will carry the access keys used by WPSOLR to access the index
      • 2.11 – Attach new policy to new user
      • 2.12 – Download user access keys before saving
      • 2.13 – New user has been created
  • 3 – Create a new Elasticsearch domain (aka “cluster”)
      • 3.1 – Navigate to the Elasticsearch service page
      • 3.2 – Click on Create a new domain button
      • 3.3 – Select the latest Elasticsearch version
      • 3.4 – Configure your domain instances
      • 3.5 – Configure your domain instances SSD storage
      • 3.6 – Configure your domain network access: VPC or internet
      • 3.7 – Copy your new user ARN (aka “user ID”)
      • 3.8 – Select the domain template policy
      • 3.9 – Paste your new user ARN in the template policy
      • 3.10 – Copy the new domain endpoint to copy in WPSOLR later
      • 3.11 – Summary. We now have: a new domain, with its endpoint, access key/secret, and region
  • 4 – Create a new index in WPSOLR
      • 4.1 – Activate your WPSOLR license
      • 4.2 – Select “Elasticsearch”, then “Amazon AWS” hosting
      • 4.3 – Paste the Amazon domain Endpoint url
      • 4.4 – Paste the AWS user access keys. The user is attached to the domain policy.
      • 4.5 – Paste the domain region
      • 4.6 – Index is created !
      • 4.7 – Send your data to the index
      • 4.8 – Perform a few searches

⚠️ Amazon AWS is no longer updating its Elasticsearch service.

Consider creating an Amazon AWS OpenSearch  index instead.

Setup WPSOLR and Amazon AWS Elasticsearch

From WPSOLR 21.3.

This video suppose you already signed up to create an AWS account (Amazon Elasticsearch Service).

We will show you how to configure your first Elasticsearch index creation with a few clicks.


What is Amazon AWS Elasticsearch?

It is a service to host open source Elasticsearch indexes (with the ELK stack), managed by Amazon AWS. Rather than installing Elasticsearch on your own servers, you get a subscription and let the service manage your indexes on your behalf. No need of manpower, or servers, anymore.

WPSOLR (the plugin) communicates with the Elasticsearch  service through the Elasticsearch rest api. With a zest of AWS SDK for authentication.

Here is the video tutorial to create and secure (authentication by user/secret) your first Elasticsearch cluster:


1 – Signup for a free test subscription at AWS Elasticsearch

2 – Create a Key/Secret to secure your Elasticsearch indexes

2.1 – Navigate to your security credentials

Amazon Elasticsearch: credentials menu
Credentials menu


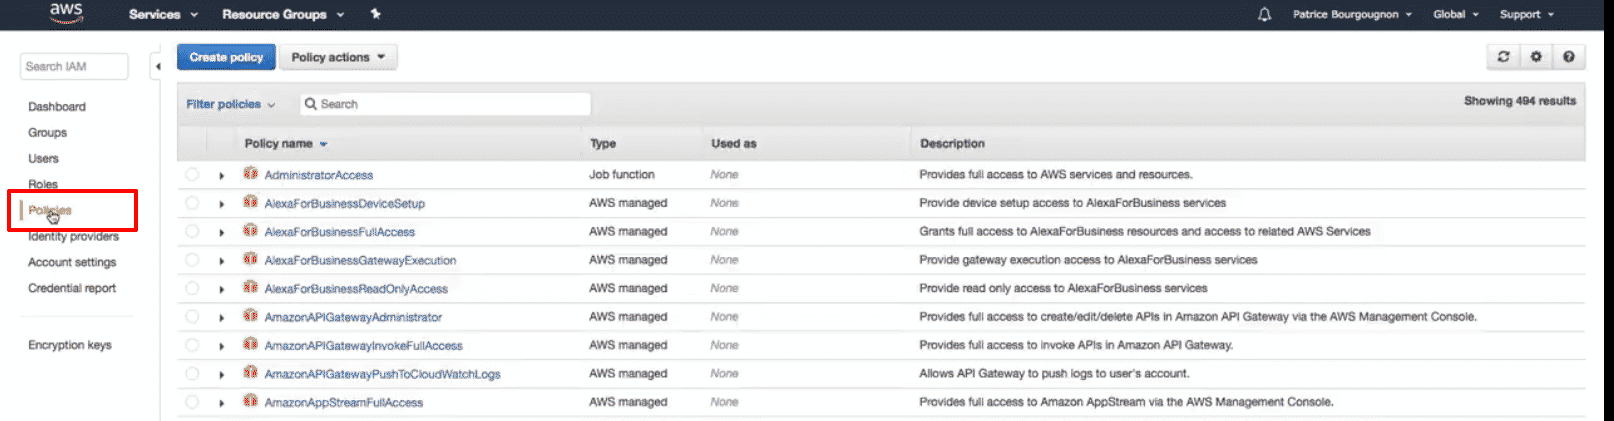
2.2 – Navigate to your policies

Amazon Elasticsearch: policies menu
AWS Elasticsearch: policies menu


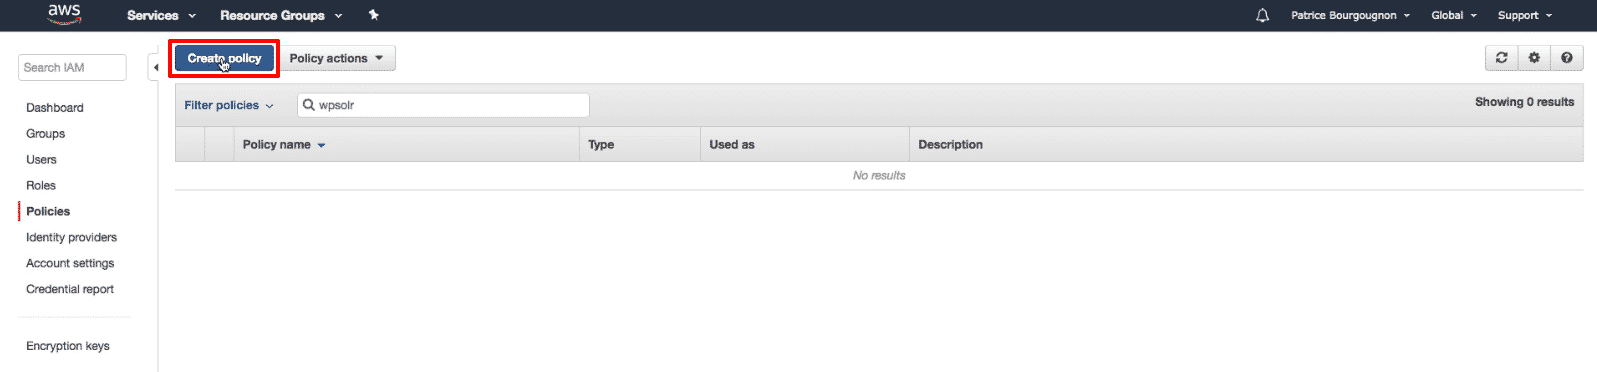
2.3 – Click on Create policy button

Image wpsolr-amazon-cluster-button-new-policy.png of Create an Amazon AWS Elasticsearch index
Create policy button


2.4 – Add the Elasticsearch service to the new policy
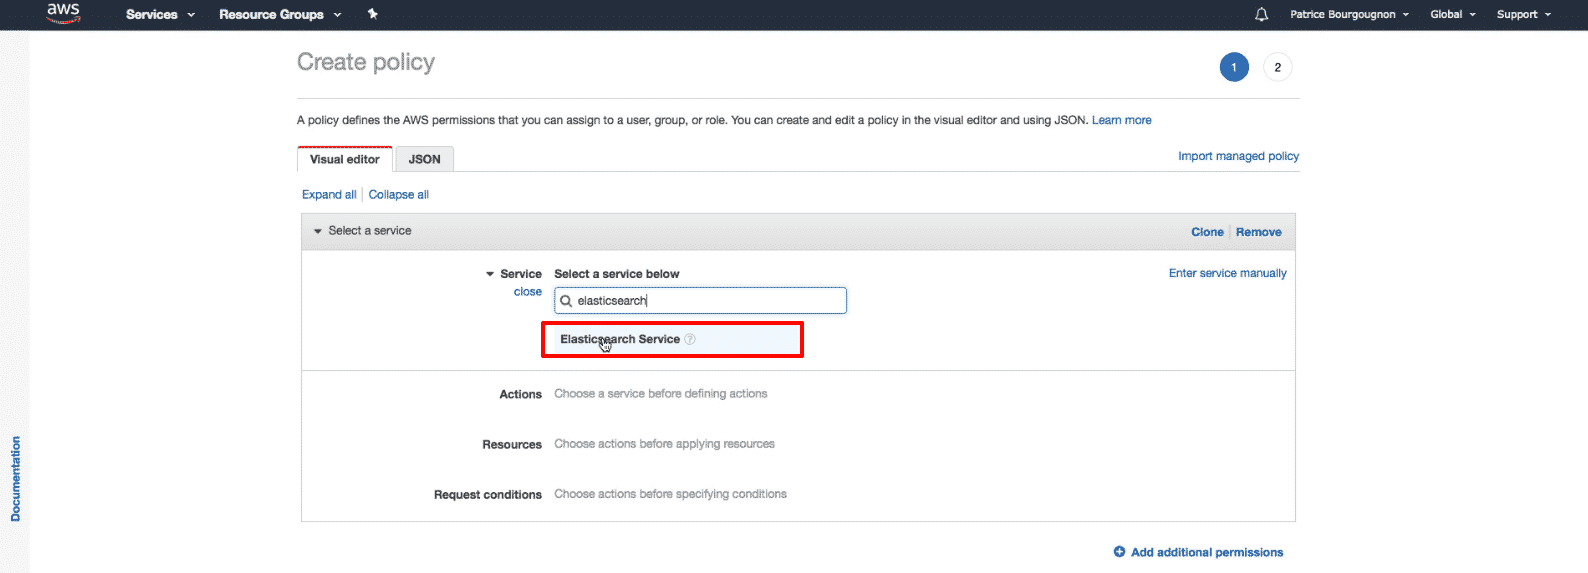
Image wpsolr-amazon-cluster-new-policy-add-elasticsearch-service.png of Create an Amazon AWS Elasticsearch index
New policy select Elasticsearch service


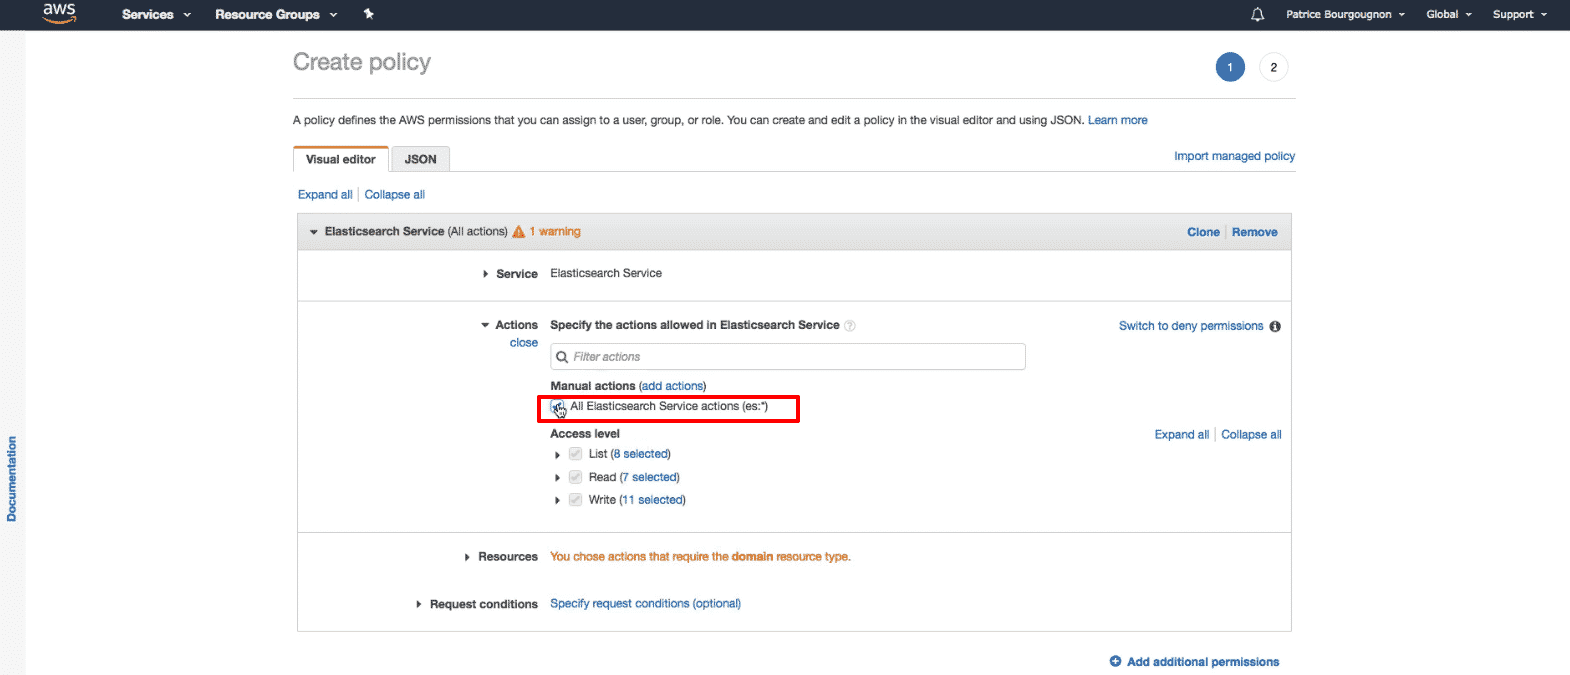
2.5 – Add all Elasticsearch service actions (es:*) to the new policy
Amazon Elasticsearch: new policy select all actions
New policy select all actions


2.6 – Add all domains resources to the new policy

Amazon Elasticsearch: new policy select all domains
New policy select all domains


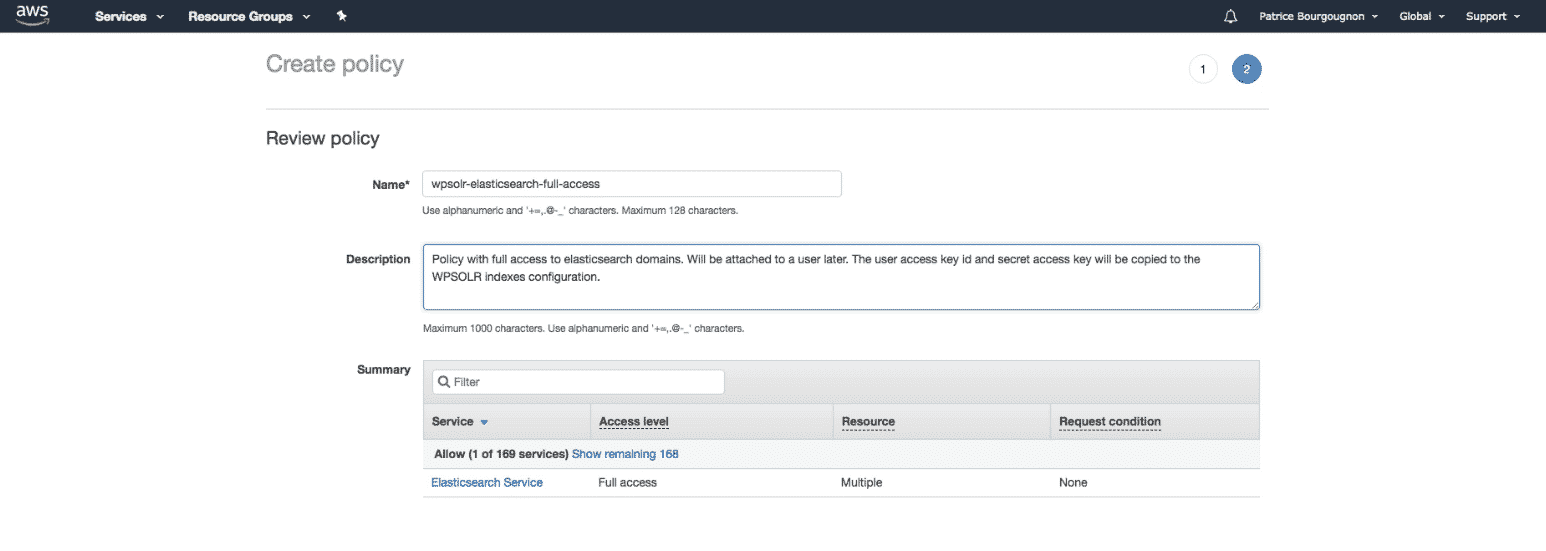
2.7 – Review the the new policy

Amazon Elasticsearch: new policy review
New policy review


2.8 – New policy has been created

Amazon Elasticsearch: new policy created
New policy created


2.9 – Navigate to your users menu. Click on Add user button

Amazon Elasticsearch: new user button
New user button


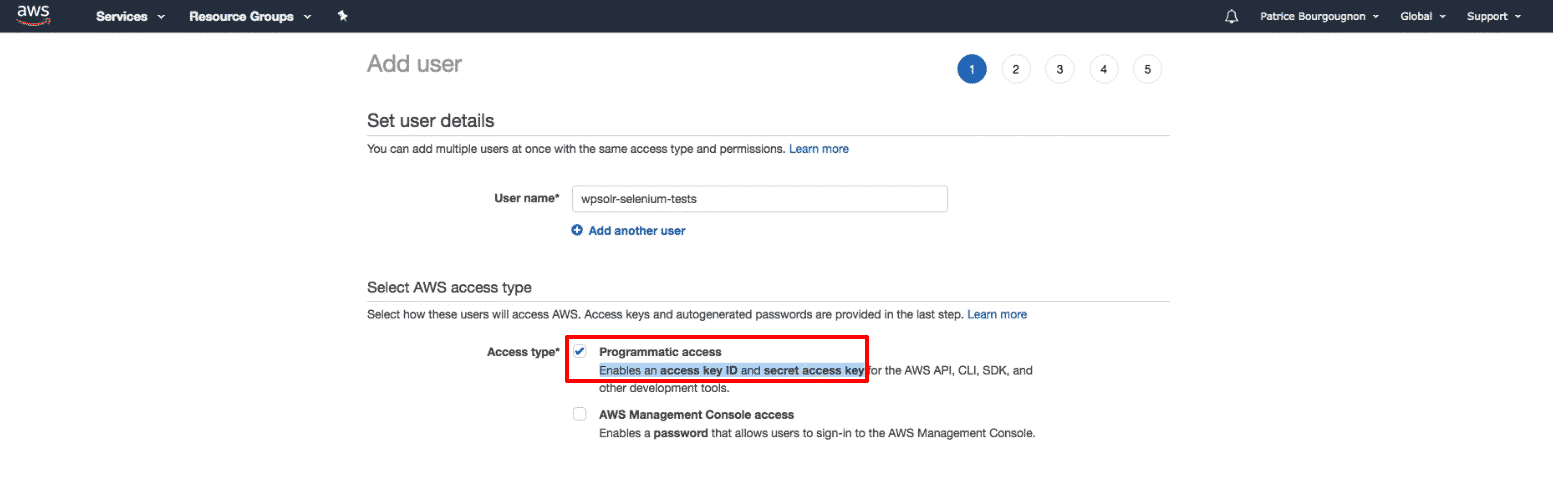
2.10 – Give new user a programmatic access: he will carry the access keys used by WPSOLR to access the index
Amazon Elasticsearch: new user give programmatic access to use access keys
New user give programmatic access to use access keys


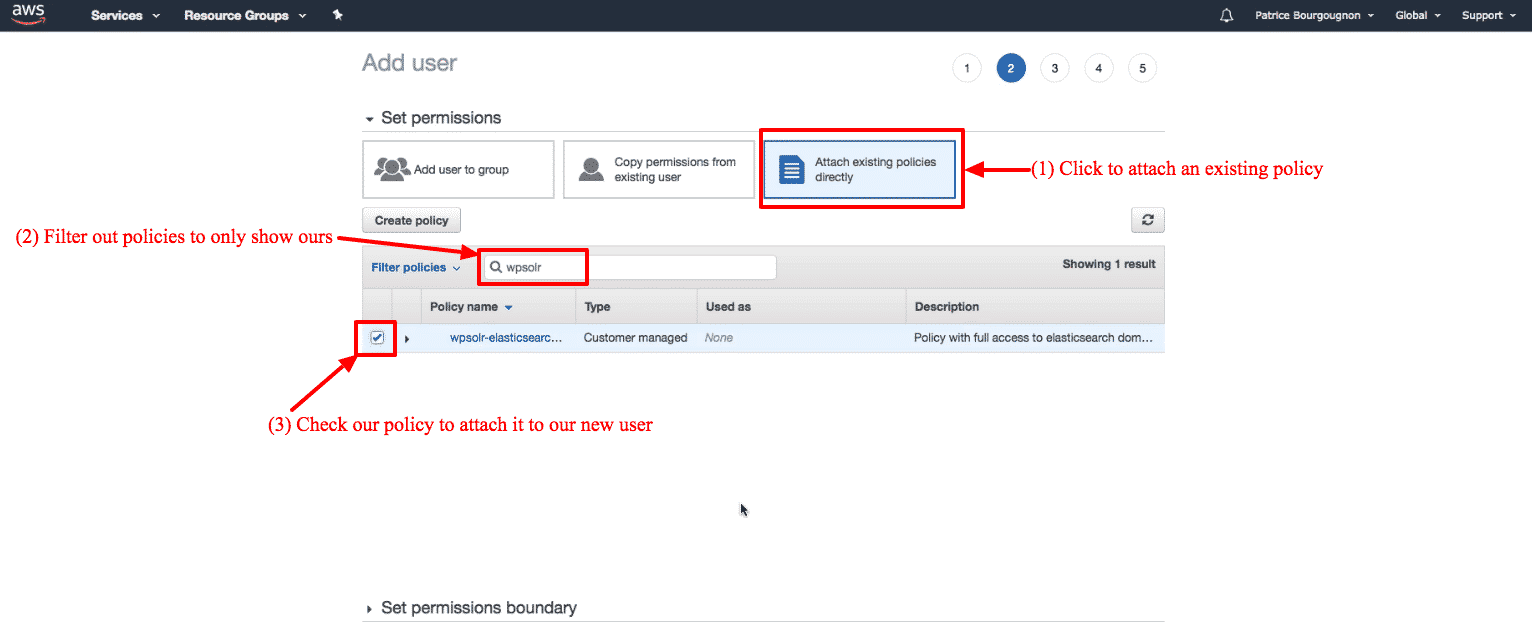
2.11 – Attach new policy to new user

Amazon Elasticsearch: new user attach our policy
New user attach our policy


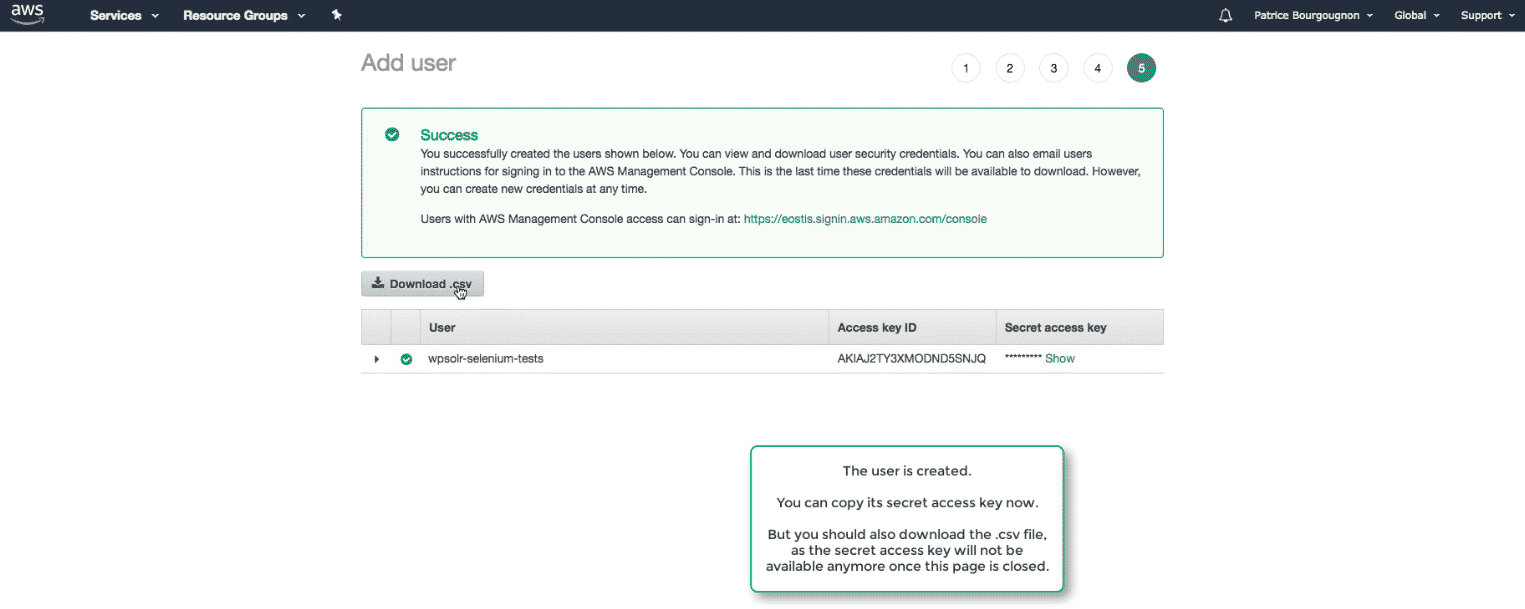
2.12 – Download user access keys before saving
Amazon Elasticsearch: new user download access keys before saving
New user download access keys before saving


2.13 – New user has been created
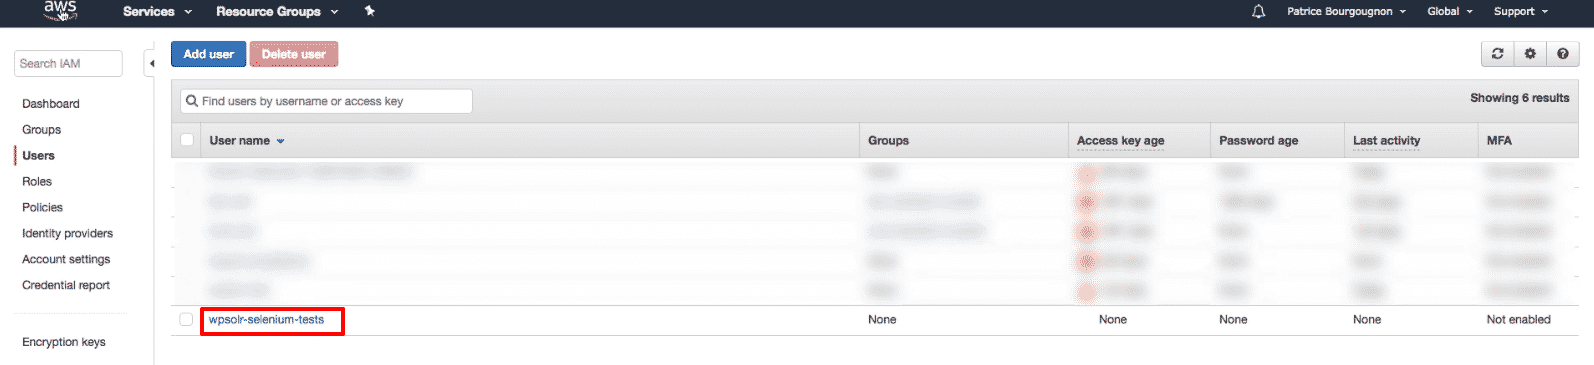
Amazon Elasticsearch: new user has been created
New user has been created


3 – Create a new Elasticsearch domain (aka “cluster”)

3.1 – Navigate to the Elasticsearch service page
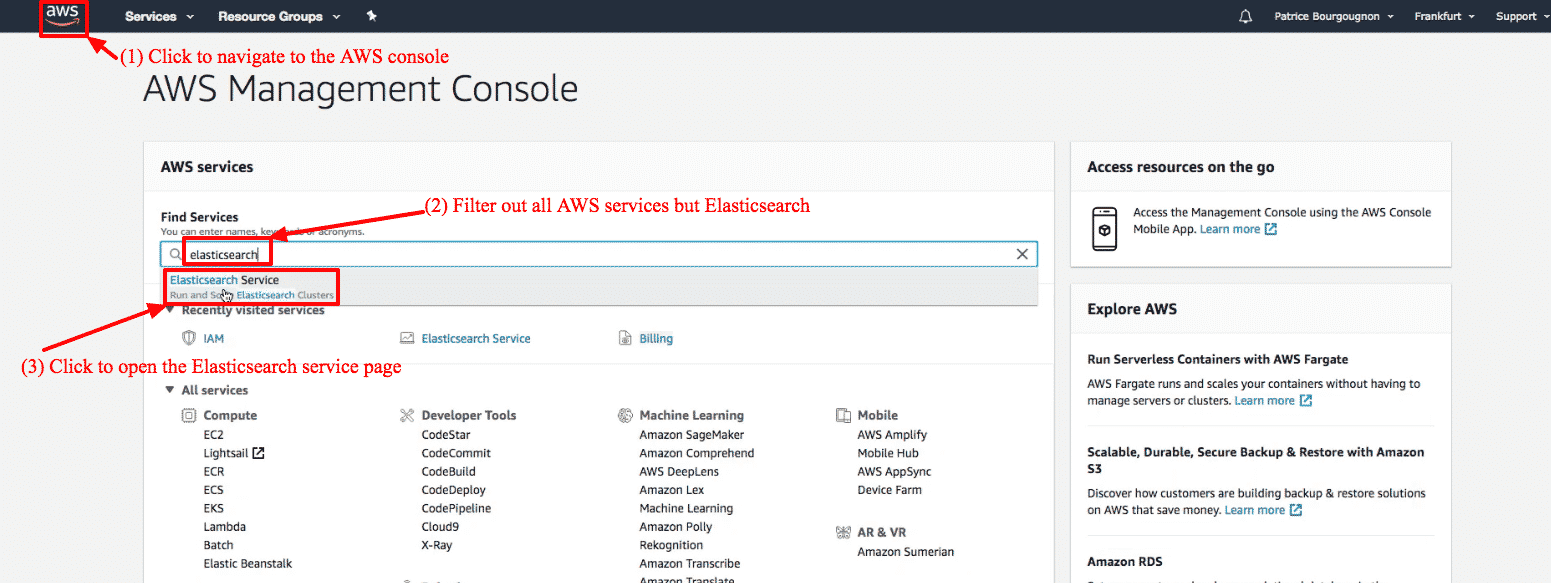
Amazon Elasticsearch: new Elasticsearch domain menu
New Elasticsearch domain menu


3.2 – Click on Create a new domain button

Amazon Elasticsearch: new Elasticsearch domain button
New Elasticsearch domain button


3.3 – Select the latest Elasticsearch version

Amazon Elasticsearch: new Elasticsearch domain version
New Elasticsearch domain version


3.4 – Configure your domain instances
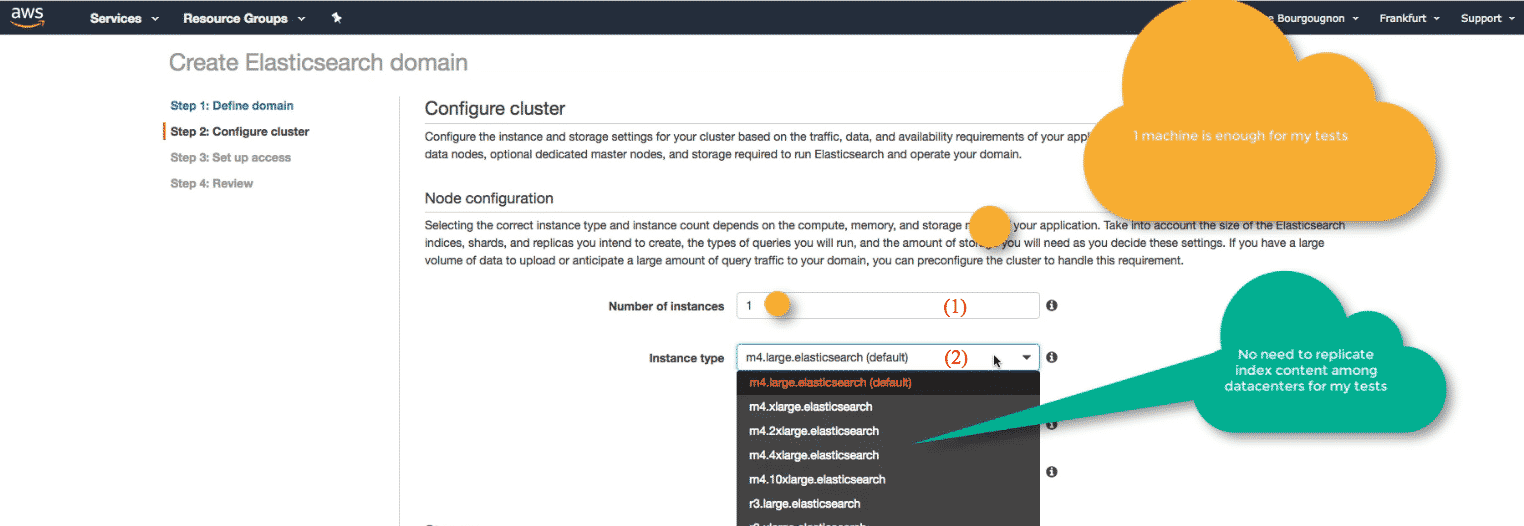
Amazon Elasticsearch: new Elasticsearch domain instance
New Elasticsearch domain instance
  1. Set a number of instance types deployed in your domain
    An instance type is a VM (virtual machine). Each index in your domain will be split in primary shards and replicas (copy of shards). Each shard and each replica will be stored on exactly one instance. How many instance you need depends on: how many and how big indexes are, and how many shards and replicas are there per index.
  2. Select a VM type for each instance in your domain
    The VM type defines how many resources (and of which quality) are given to each instance: RAM, disk, vCPUs.


3.5 – Configure your domain instances SSD storage
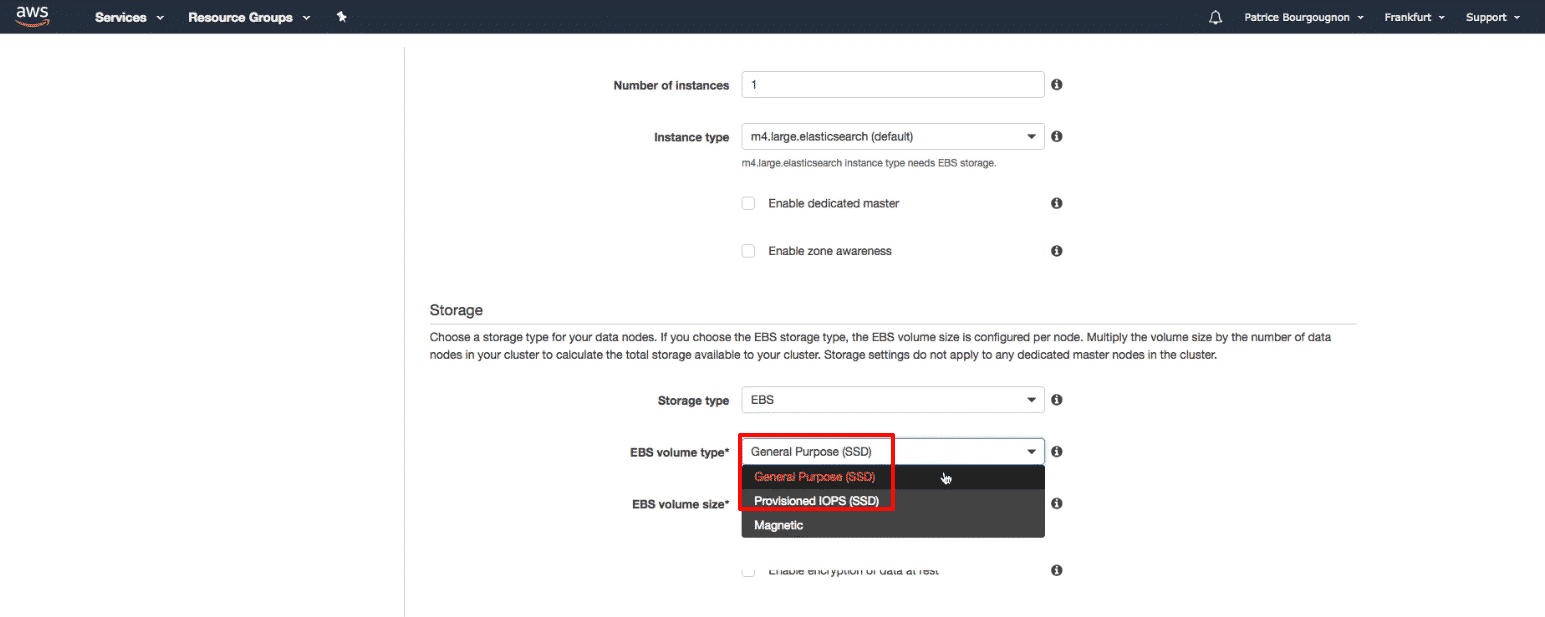
Amazon Elasticsearch: new Elasticsearch domain SSD storage
New Elasticsearch domain SSD storage

AWS recommend that you allocate three dedicated master nodes for each production Amazon ES domain.
Fast disks are extremely important for Elasticsearch performance. Always choose SSD storage, not magnetic.


3.6 – Configure your domain network access: VPC or internet

Choose a VPC access if your WordPress is also hosted on Amazon AWS:

Amazon Elasticsearch: new Elasticsearch domain VPC access
New Elasticsearch domain VPC access

Or choose an internet access if your WordPress is not hosted on Amazon AWS:

Amazon Elasticsearch: new Elasticsearch domain internet access
New Elasticsearch domain internet access


3.7 – Copy your new user ARN (aka “user ID”)
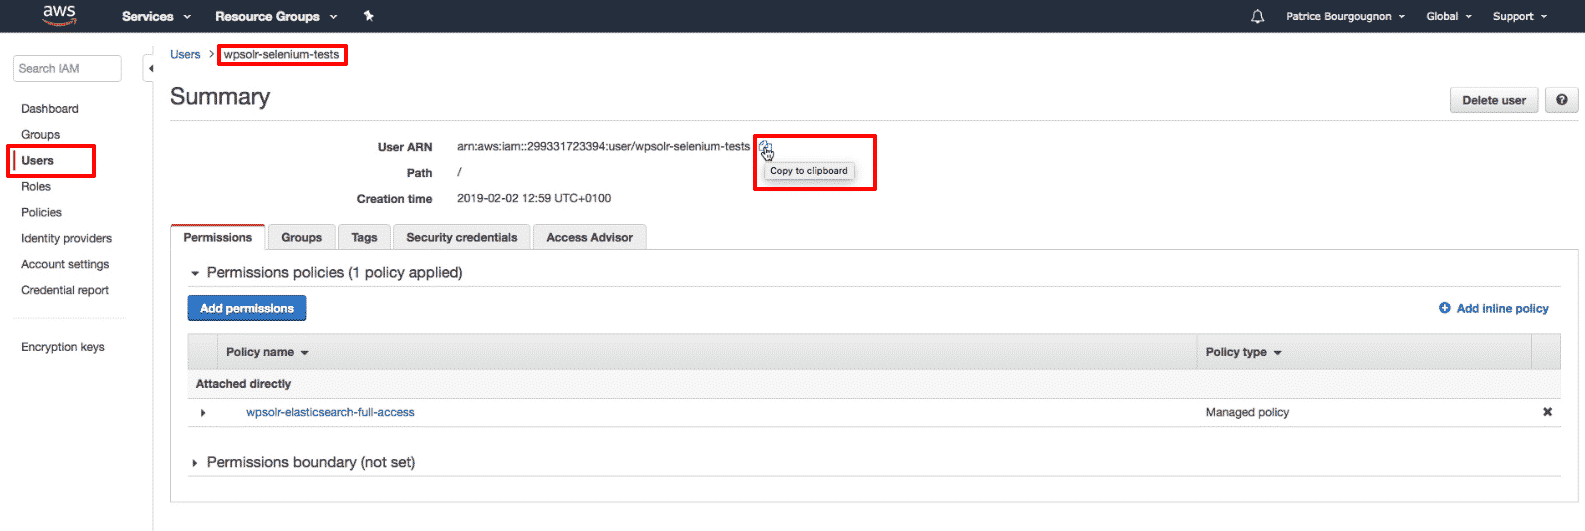
Amazon Elasticsearch: new Elasticsearch domain copy user ARN
New Elasticsearch domain copy user ARN


3.8 – Select the domain template policy

Amazon Elasticsearch: new Elasticsearch domain template policy
New Elasticsearch domain template policy


3.9 – Paste your new user ARN in the template policy

Amazon Elasticsearch: new Elasticsearch domain paste user ARN
New Elasticsearch domain paste user ARN


3.10 – Copy the new domain endpoint to copy in WPSOLR later
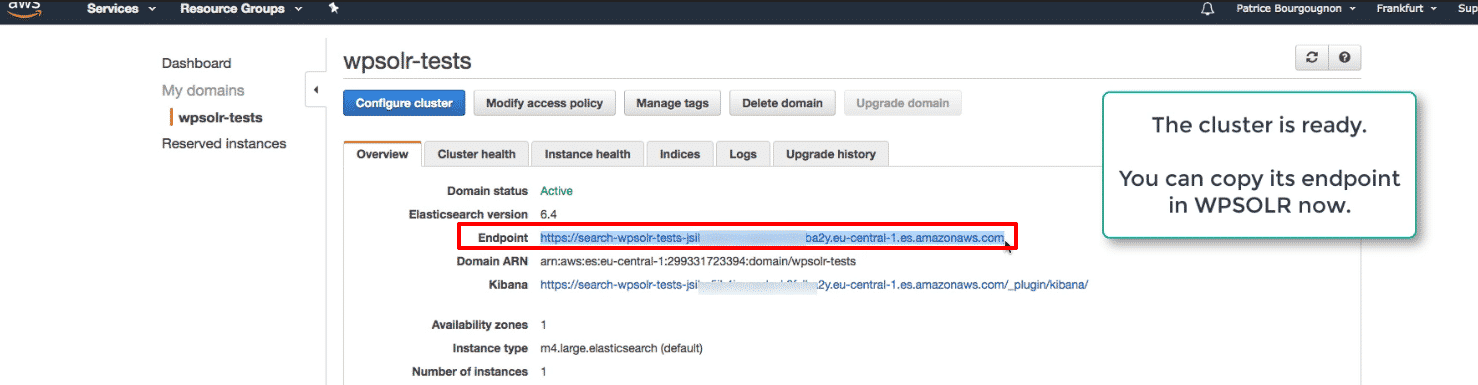
Amazon Elasticsearch: new Elasticsearch domain copy endpoint
New Elasticsearch domain copy endpoint

Wait a few minutes, until the cluster is deployed. Then copy the endpoint that will later be pasted in WPSOLR.


3.11 – Summary. We now have: a new domain, with its endpoint, access key/secret, and region

Amazon Elasticsearch: new Elasticsearch domain no indexes yet
New Elasticsearch domain no indexes yet


4 – Create a new index in WPSOLR

Here is the video tutorial to create your first Amazon AWS Elasticsearch index in WPSOLR:

4.1 – Activate your WPSOLR license

WPSOLR admin: activate a license
WPSOLR admin: activate a license if your site is not dev/test/staging

After buying or trying WPSOLR, check your email for your license code. Enter the code in the activation popup window as show above. Wait a few seconds for WPSOLR servers to return a response, which will unlock the WPSOLR admin screens.

4.2 – Select “Elasticsearch”, then “Amazon AWS” hosting

WPSOLR admin: new index menu


WPSOLR Amazon index: select Amazon hosting


4.3 – Paste the Amazon domain Endpoint url

WPSOLR Amazon index: paste Amazon domain endpoint url


4.4 – Paste the AWS user access keys. The user is attached to the domain policy.
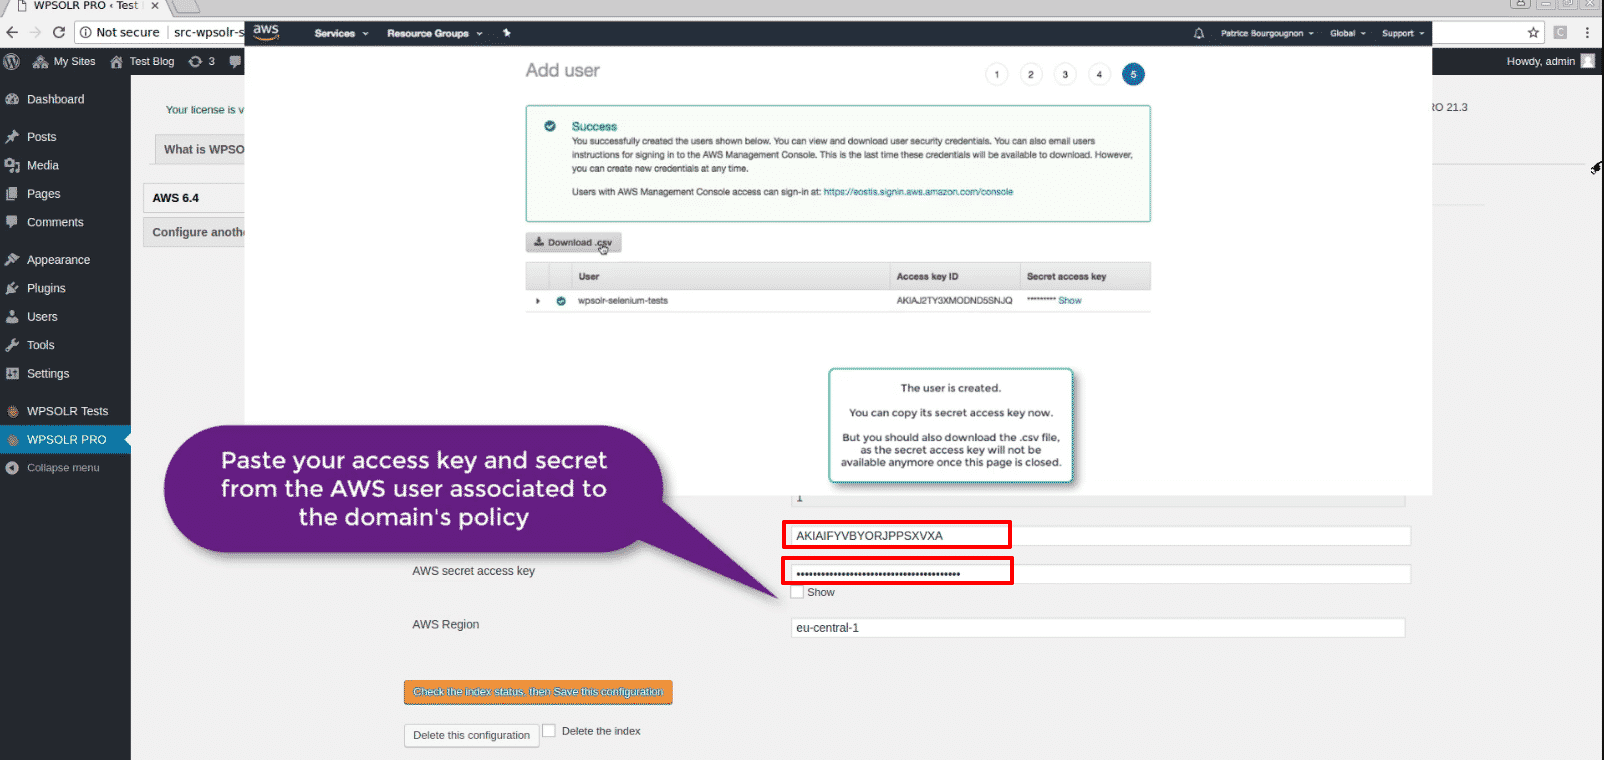
WPSOLR Amazon index: paste Amazon domain's policy user access keys
WPSOLR Amazon index: paste Amazon domain’s policy user access keys

Do not forget to enter your AWS access control key and secret, as shown in the above screen.

4.5 – Paste the domain region

Copy the domain’s region from your Amazon AWS console:
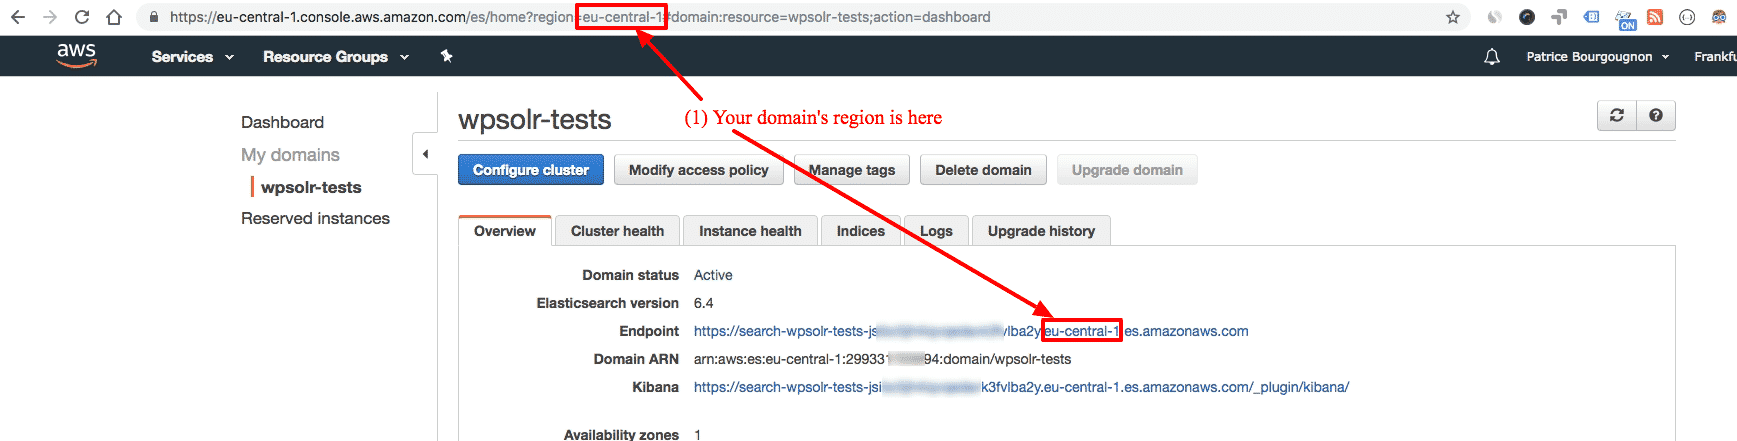
Amazon Elasticsearch: new Elasticsearch domain region
New Elasticsearch domain region


Then copy the region to WPSOLR’s index form:

WPSOLR Amazon index: paste Amazon domain's region
WPSOLR Amazon index: paste Amazon domain’s region


4.6 – Index is created !

WPSOLR Amazon index: index created !

Click on the button “Check the index status”, which calls the Elasticsearch create index api. Wait for active shards acknowledged true (a few seconds at most). The newly created index is now ready to accept your documents.

4.7 – Send your data to the index
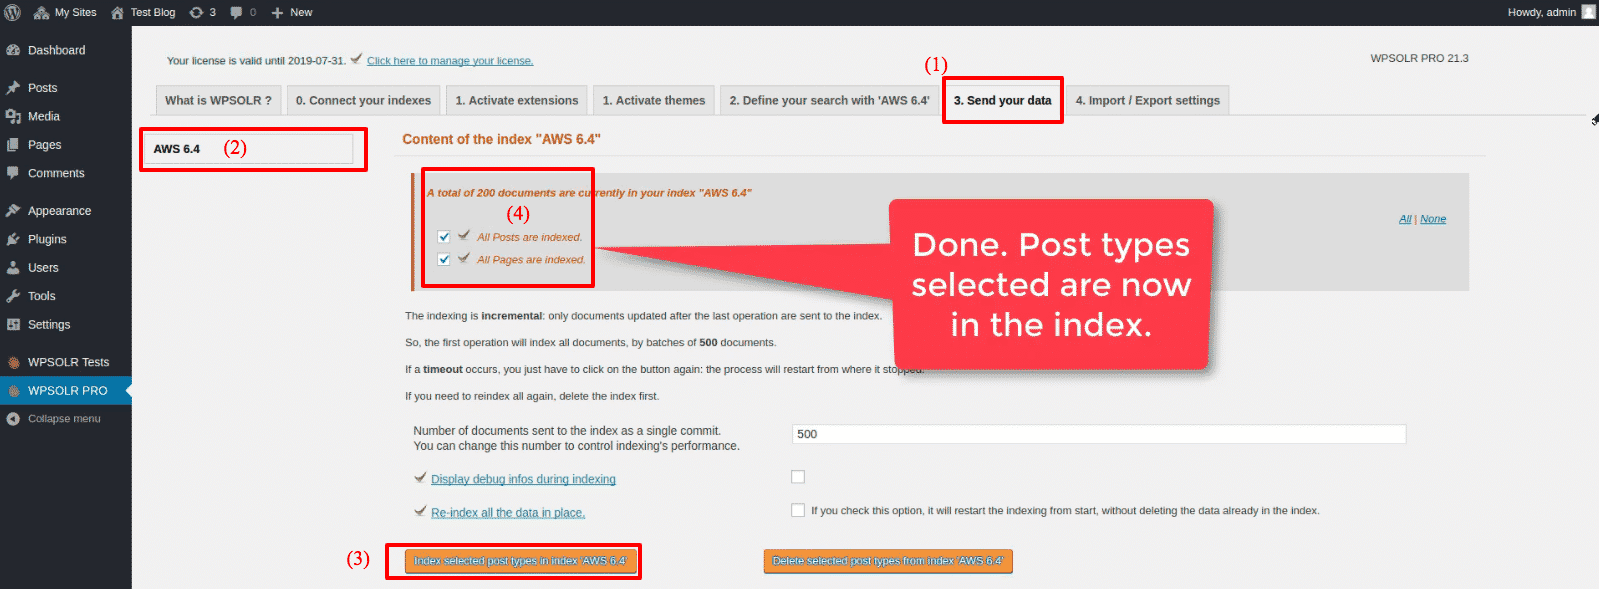
WPSOLR Amazon index: index indexed

Select your index (you can have more than one), click on the “Index” button. Wait while your documents are sent in batch to the AWS index in real time.

4.8 – Perform a few searches
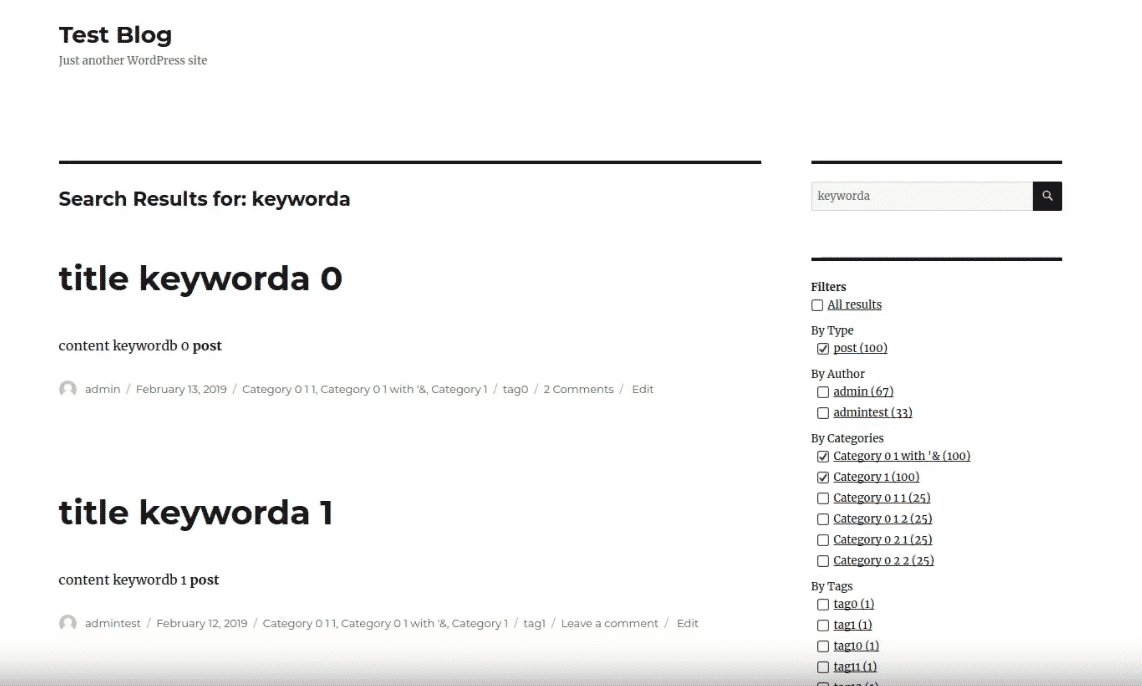
WPSOLR Amazon index: perform a search with facets


Was this helpful?

1 Yes  2 No
Related Articles
  • Configure WPSOLR Parsing and Chunking
  • Create a WPSOLR Hosting OpenSearch index
  • Create your Custom Templates for Citations, Suggestions, Related Posts & Recommendations
  • Getting started with facets
  • Getting started with Ajax (live) search
  • Getting started with search

Didn't find your answer? Contact Us

Previously
Create a Bonsai Elasticsearch index
Up Next
Create an ObjectRocket Elasticsearch index

Built for brands and agencies worldwide

Adobe
Software Development
10K+ employees
Harvard University
Higher Education
798K alumni
University of Essex
Higher Education
101K alumni
Tally
Software development
501-1K employees
WebFX
Advertising Services
501-1K employees
DEFINITION 6
Advertising Services
1K-5K employees
Proto Thema
Newspaper Publishing
51-200 employees
The Fold London
Retail Apparel and Fashion
11-50 employees
Georgia-Pacific LLC
Paper and Forest Product Manufacturing
10K+ employees
Agencies, Software, Universities, Media, Newspapers, Publishers, Retails, Manufacturing, E-Commerce. And many more »

Recommended content

Powered by WPSOLR Enterprise with Recombee

Understand Where Your Store Is Losing Sales
Join our Affiliate Program!
Features
Search Hosting for WordPress
File Parsing and Chunking
Integration Hub
Search
Facets (Filters)
Search Add-ons
Recommendations
Keyword search engines
Comparison grid
Apache Solr & Solr Cloud
Elasticsearch
OpenSearch
Algolia
AI search engines
Comparison grid
PostgreSQL pgvector
Weaviate
Google Retail
Vespa.ai
OpenSearch vector
AI recommendation engines
Comparison grid
Recombee
Amazon Personalize
AI personalization engines
Comparison grid
Google Retail
Algolia
Buy and Learn
Pricing
Privacy policy
Terms and Conditions
© 2026 Eostis SARL. All Rights Reserved.
More
My licenses
Support
Documentation
Blog
Recommendations powered for you by WPSolr
Manage Consent
To provide the best experiences, we use technologies like cookies to store and/or access device information. Consenting to these technologies will allow us to process data such as browsing behavior or unique IDs on this site. Not consenting or withdrawing consent, may adversely affect certain features and functions.
Functional Always active
The technical storage or access is strictly necessary for the legitimate purpose of enabling the use of a specific service explicitly requested by the subscriber or user, or for the sole purpose of carrying out the transmission of a communication over an electronic communications network.
Preferences
The technical storage or access is necessary for the legitimate purpose of storing preferences that are not requested by the subscriber or user.
Statistics
The technical storage or access that is used exclusively for statistical purposes. The technical storage or access that is used exclusively for anonymous statistical purposes. Without a subpoena, voluntary compliance on the part of your Internet Service Provider, or additional records from a third party, information stored or retrieved for this purpose alone cannot usually be used to identify you.
Marketing
The technical storage or access is required to create user profiles to send advertising, or to track the user on a website or across several websites for similar marketing purposes.
  • Manage options
  • Manage services
  • Manage {vendor_count} vendors
  • Read more about these purposes
View preferences
  • {title}
  • {title}
  • {title}